I’ve been working on a side project lately.
It’s a Chat-GPT bot that you can train to answer questions by uploading PDF documents with custom context.
Recent conversations I’ve had with clients inspired this project. In the last few weeks, three different people asked me about building Chat-GPT related bots. Some use-cases for a tool like this include:
Building a Personal Chat-Bot - A nutritionist wanted to reduce their time spent answering repetitive questions by providing Chat-GPT with the most common questions they get and having the bot answer for them.
Enterprise Knowledge Management - Another client had a folder of business strategy documents and Powerpoints, and wanted a way to query them for stats and insights when preparing for meetings.
Cover Letter Writing - One client spent a lot of time writing cover letters for jobs and wanted a way to feed it examples of past cover letters that resulted in an interview. That way the bot could write a custom cover letter in their style for any job.
Despite the different use-cases, they all have two things in common:
Each client had custom context they wanted to feed Chat-GPT
They needed a way to ask questions about that context
Although I ended up building custom solutions for these clients, I felt it was possible to build a generalized version of this chat-bot for anyone to upload context to and use.
So I spent the last week hacking away, and I just finished building it!
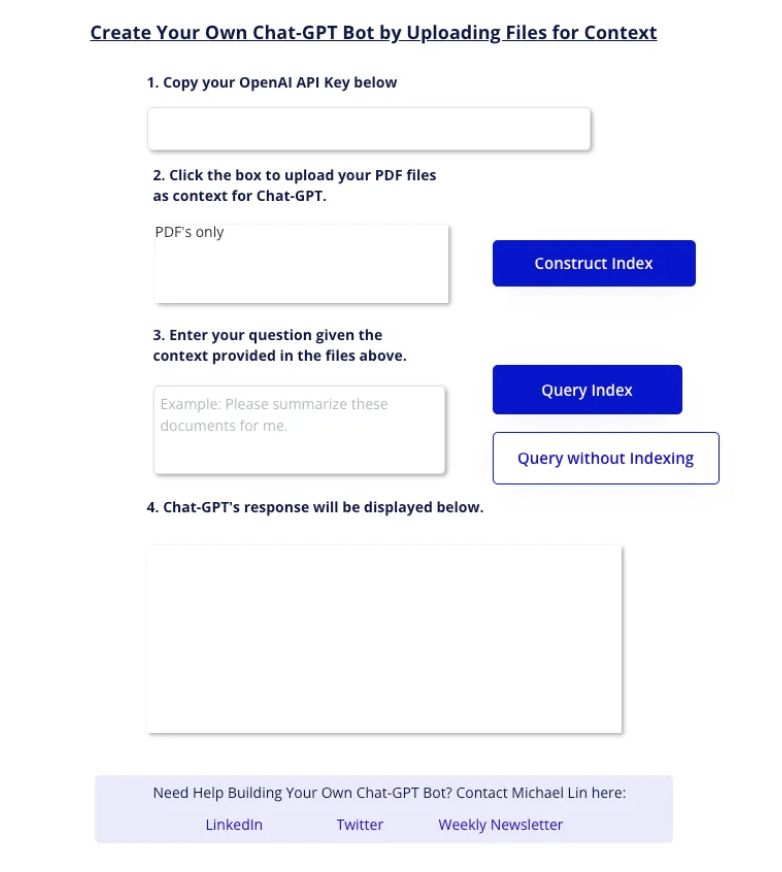
You can see a screenshot of the product below.
You can also try it out right now 👇
Below, I’ll discuss how this product works, how to get a copy of this bot up and running yourself, and areas for further improvement.
How to Use This AI ChatBot
Using this ChatBot involves 3 steps:
- Copying your OpenAI API key over to the app
- Uploading your PDF files as context
- Inputting a question
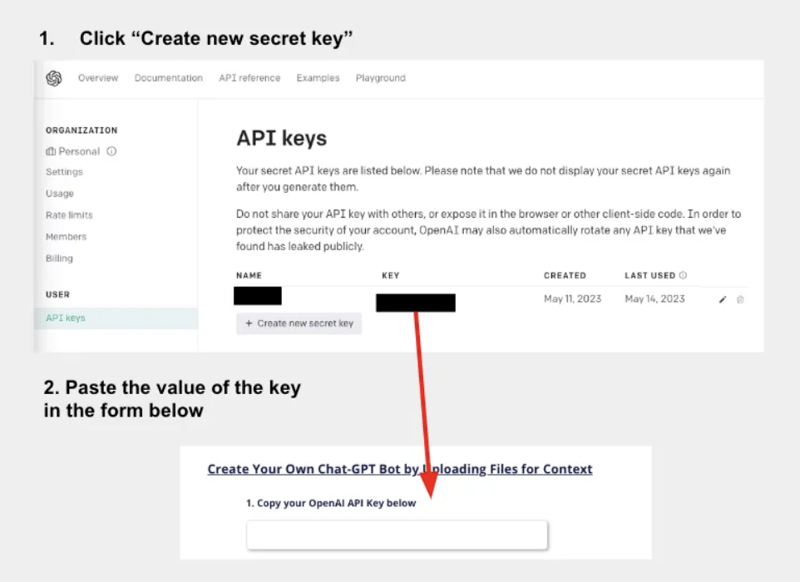
So get started, create an OpenAI account and get your API keys at this link here.
Then paste it into the API Key form in the first box of the app. See the screenshot below.
Now upload all the context you want to train Chat-GPT with.
Do this by clicking the 2nd box below, uploading all the PDF files, and clicking “Construct Index”. This step will prepare them for querying later.
You can think of indexing like organizing a room. If you spend time upfront organizing, then when you search for your keys later, it won’t take as much time because everything is where it should be.
So by constructing the index first, the app will organize your data so that future searches will finish faster.
After you’ve constructed the index, you can ask questions about the context you gave it. Go to the next box, input your question, and click “Query Index”:
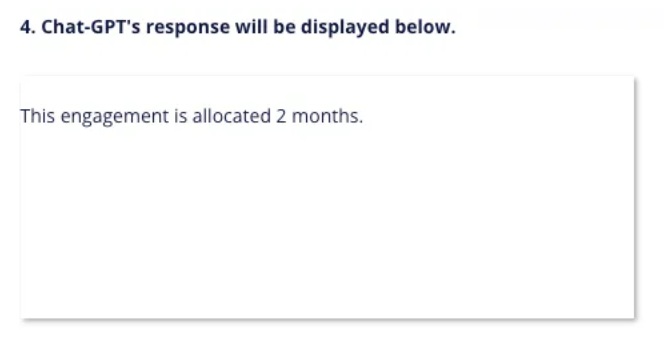
Afterwards you should see a response to your question below:
Which is indeed what the test document says. Magical!
Note that indexing is an optimization. It is possible to skip the indexing by:
- Uploading the files
- Inputting your question
- Clicking “Query without Indexing”
However there are two limitations that come with not indexing.
First, there’s an upper limit to how many words we can stuff into a prompt. This limit is around 3000 words, or 4k “tokens” as Open AI calls it.
If we don’t index, we would have to stuff all the text from our files into the prompt, which would likely be more than 3000 words.
This would cause us to get an error like the one below:
Second, if we don’t index first, Chat-GPT can be slow to return a response. When I skipped the index construction and directly called “Query without Indexing,” it took the bot over 15 seconds to return a response in the example above.
However, when I constructed the index first and then queried it, it took the app about 7 seconds to return a response.
So constructing the index helps improve the speed at which the Chat-Bot returns answers.
How to Build This App Yourself
The tech stack for this app is:
- Python Flask server as the backend
- Heroku for deployments
- Bubble as a no-code UI
In fact, if you just:
Create a Heroku account and connect it to that repo
Copy all the settings I have in this demo Bubble app to connect it to your server.
Your chat-bot should just work!
I’ll go over these steps in a bit more detail below, but first let’s go over the key components of this app, starting with the
Python Flask Server.
Python Flask Server
The Flask Server is the code that makes all the buttons in the app work. It contains 3 API’s that correspond to the 3 buttons on the page.
- Construct_Index()
- Query_Index()
- Query()
The full source-code is here. I’ll go over the most important parts of the code below.
Construct_Index()
Constructing the index is fairly simple, as Open AI has an API for this. The first line of code below is what generates the ndex, and the second line is what stores that index in a file locally on the server.
Query_Index()
This is also fairly straightforward as it just loads the index we created from the last step, and then passes the users’ prompt straight to it:
Query()
Note that this API won’t construct an index, and it will call OpenAI’s API directly with the context stuffed into the prompt like this:
Note how we have to manually append the context to the prompt if we don’t construct an index first.
Deploying to Heroku
This is also fairly straightforward.
First, get all the files that I have in this repo by:
Creating your own Git repo
Going to my repo, and clicking “Code”
Then copy-paste the “cloning” URL, and typing “git clone ” in your terminal
After you push all of the code to your own repo, your repo should have all the same files and look the same as mine here.
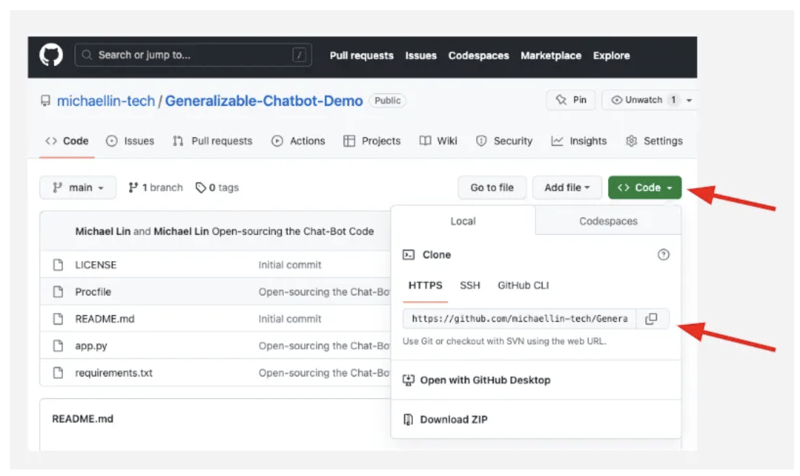
Click “Code” then copy the “URL” to clone this repo for yourself.
Now create an account on Heroku and then go to your dashboard here to create an app by clicking “New” -> “Create new app.”
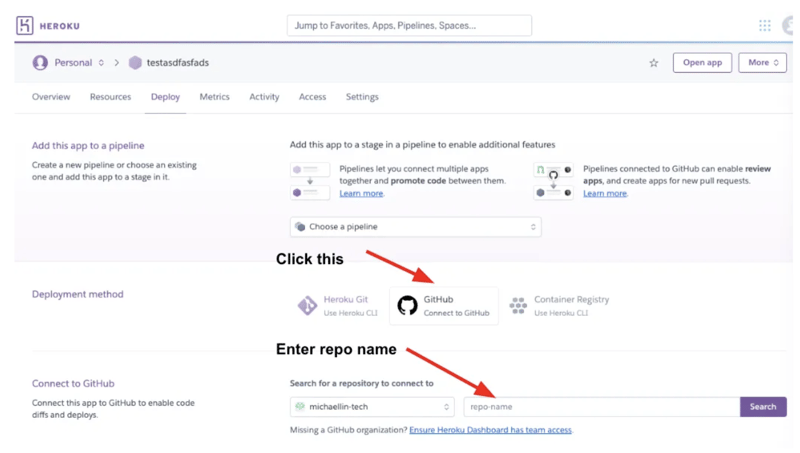
Once you finish the setup process (which should take less than 1 minute), you’ll be on your Dashboard page that looks like the below screenshot, where you just hit “Connect to Github” and input the name of your cloned repo.
When you’re done with that, you can click into the logs by clicking “More” -> View Logs”
And if you go in and see “Build succeeded” in the logs, then you’ve successfully deployed the app!
In fact, if you now navigate to “https://.herokuapp.com”, you should see a page like this below:
Bubble UI
Now the final part of this is to create a user interface (UI) like a website or app and connect your Flask server’s API’s to the buttons in your UI. For this part I used a no-code website builder called Bubble.
This part is actually fairly straightforward. I made the UI for the demo publicly viewable, so you can create a new Bubble app and copy exactly what I did here.
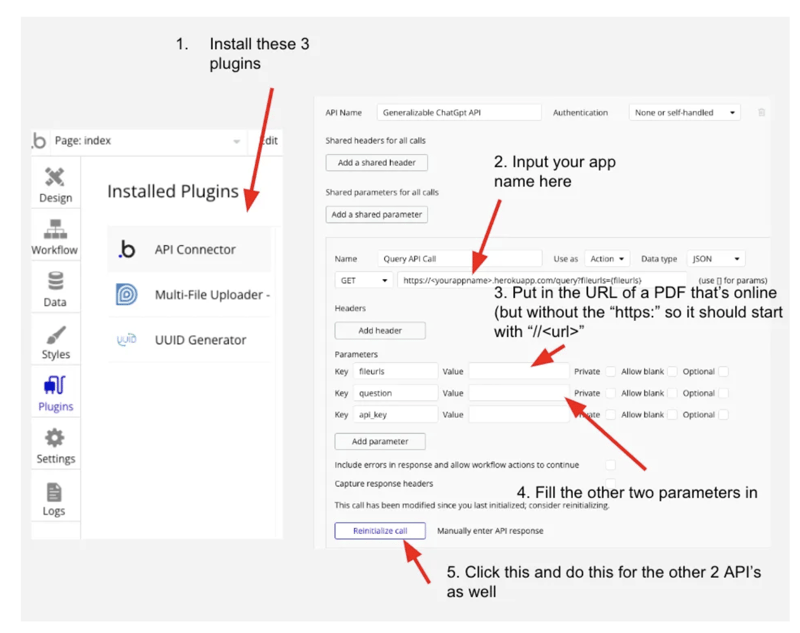
Then make these changes in the “Plugins tab”
And it should just work!
Limitations
The biggest issue with the code right now is that it stores the index locally on the Flask server. If there are too many users using this, then everyone’s index would get stored on disk and eventually it would run out of memory.
I plan to fix this eventually by storing the index in an external database, for example in AWS.
There is also no error-checking so if a user makes a mistake (for example if they forget to paste in their API Key), they will get a cryptic error message and not know what to do.
Also currently only PDF’s are supported, and the UI obviously needs some work, particularly on Mobile.
But at least it works!
Anyways, why don’t you give the app a try and let me know how it goes. If you have any questions on setting this up, or encounter any bugs, feel free to message me and let me know!
Relevant Links
Test the chatbot out here.
Link to the open-source code here.
Questions? Comments? Need your own Chat-GPT bot built? Contact me on social media here.
💡 If You Liked This Article...
I publish a new article every Tuesday with actionable ideas on entrepreneurship, engineering, and life.
BONUS Get a free e-book w/ my writing coach's contacts when you subscribe below. (Check the welcome email).

