Knowing how to deal with databases are really important for every developer, so I will guide you through a tutorial on how to create one using MySQL on the terminal.
If you are a little bit lost when it comes to databases, I highly recommend you my first article of this series, where I explain the theory about databases. For now, lets get to the pratical part!
Table of contents
Hands on!
There are many ways of creating a database, but I usually do it using MySQL on the terminal and DBeaver to visualize them when I need it. I decided to approach only MySQL on the terminal, specially because it is pretty simple to learn and very important to know the basics. Maybe one day I can show how DBeaver works. For now, I will show you how to deal with database through terminal, but remember - there are different ways of doing it.
Preparing the environment
First of all, you will have to install MySQL. I recommend you to install the MySQL Installer, which will have a lot of softwares to be downloaded, such as MySQL Workbench, MySQL Shell and many others. You should be able to download it on this link MySQL Installer and run the program. Then you should install MySQL Server, MySQL Workbench and MySQL Shell.
If you use other operational system than windows, or is having some issues you can ask me or try to take a look on some videos or articles more focused on the step-to-step installation.
After doing it, you will have to define the windows variable system. You should go on System's propriety>Advanced and then Environment variables
Find the system variable called "Path" and double click it. Then you should click on "New" and copy the MySQL server's path on it.
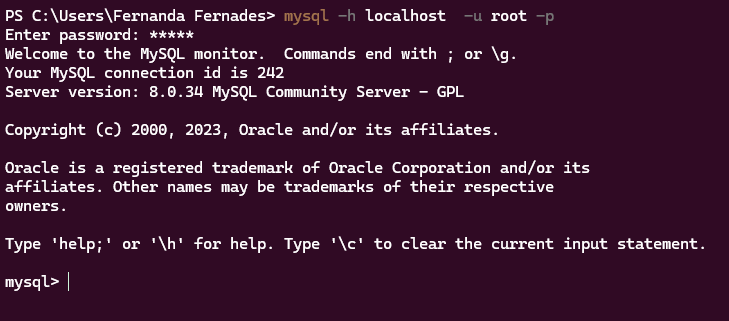
To test if it is working, open the terminal ( command prompt ) and typemysql. If an error saying that you have no access shows up, try te command mysql -h localhost -u root -p. It will ask the password and it will connect on MySQL.
Creating our first database
Now that we had set up our environment, we can work on the database! First of all, since we are going to do it using the terminal, you will have to open it and then connect on MySQL, which can be done with mysql command or mysql -h localhost -u root -p. You should be able to see something similar to the picture below.
Important: every MySQL command must finish with ";", and it is a good practice to write it on capital letters.
After that, it is important to acknowledge some important database commands, such as:
-
CREATE DATABASE <database-name>;: creates the database with the name specified on "database-name"; -
SHOW DATABASES;: shows the databases created; -
DROP DATABASE <database-name>: delete the database informed and its values; -
USE <database-name>: to select the database and be able to work on it.
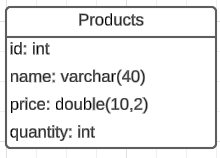
Now the idea is to create a database named "store" and then a table named "products", which will have the fields id (the primary key), name, price and quantity.
To create this database we will use the command on the terminal:
CREATE DATABASE store;
After creating it, we will create the table named "products". We must select and enter the database first and then create the table with its fields, which will be id, name, price and quantity.
USE store; //Selecting the database
CREATE TABLE products
    ( id int auto_increment primary key,
      name varchar(40) NOT NULL,
      price double(10,2) NOT NULL,
      quantity int NOT NULL
    );
Ok, now we have our database and our first table created! To visualize it we can use SHOW DATABASES; or SHOW TABLES; to see the tables created. We can also use DESCRIBE products; if we want to see the table's description.
Datatypes and Properties
Every time we create a table, we have to define the type of our data and some properties like if it is a primary key, a foreign key, if the data can be null, if it is unique... There are many properties and datatypes so We can use what will fit us the best.
One of the most common datatypes are:
- Int : used for integer numbers, allows 4 bytes
- Double: float number with double precision
- Decimal(p,s) : used to store decimal numbers. "p" defines how many numbers will be allowed on the left side of the comma. "s" defines how many will be allowed on the right side of the comma.
- Date : stores a date, which can be from 01/01/0001 to 12/31/9999.
- Timestamp : stores an unique number that will be updated every time a table line is updated or created.
- Varchar(n) : stores characters. "n" shows that we can define the amount of characters we are expecting to receive.
The properties are really important for our database, it will gives us more details. One of the most common ones are:
- Not null : when applied to the data, means it can not be null, so it has to be given an value.
- Auto_increment: mostly applied to primary keys, allows automatic generation of unique numerical values for a columns. Very used to create unique indentifiers.
- Primary key: property used to define the data as primary key of the table
- Foreign key : property used to define the data as foreign key of the table, creating a relationship between tables.
CRUD
After learning all of this about database, we can finally get to create a CRUD on the database. CRUD means create, read, update and delete, and it is really important for every developer, especially the back-end ones, to know how to do it.
In real life, CRUD is made using a programming language to get the data sent and store on the database. However, you need to know the SQL commands used to manipulate a database because even though you are going to use PHP, Java, Node or Python to do it, you probably will have to use the same SQL commands. After this article I will write another one creating a PHP application to show you how it works!
I highly recommend that you do these steps on your terminal to see how MySQL works! And, of course, feel free to try new things.
Create
To create or insert a data on our table we use the command INSERT INTO.
INSERT INTO products VALUES (null, 'Rice', 5, 10); //One way of doing it
INSERT INTO products (name, price, quantity) VALUES ('Rice', 5, 10); //Another way of inserting data
In the first option is important to understand that the values informed must be at the same sequence of the table (id, name, price and quantity). The id can be null because it is an auto_increment data. And in the second option we inform which datas will be given. Also every time we insert a string, we have to use quotes.
Read
To read information of a table we use the command SELECT . There is some ways of selecting information.
SELECT * FROM products; //Example 1
SELECT * FROM products WHERE id = 1; //Example 2
SELECT (name) FROM products WHERE quantity<5; //Example 3
We use ' * ' to say that we want to read all the fields - or columns - of the table, just like example 1. If we do not want it, we can inform which ones we want, like example 3.
We use the clause " WHERE " to filter the information we want to return. For example if we wanted to know which product holds the id equals to number 1, we would use the example 2. It is also possible to use the 'where' to return the products that has less than 5 quantities, just as in example 3. Except for specific situations, we shouldn't do queries without "WHERE".
Update
Is pretty usual to update the data registered, and we use the command UPDATE to do it. We can change the price of a product, for example, and we will use the "WHERE" in here too.
UPDATE products SET price=8, quantity=3 WHERE id=1;
In this example we are updating the product's price and quantity. Note that the WHERE is really important to define which register will be updated.
Delete
The delete operation, as you imagine, delete some register. The WHERE is really important in this type of query since if you do not use it, you will delete all the data from the table. So remember: Always use WHERE!
DELETE FROM products WHERE id=2;
And that's it!
I hope you've learned how to create a database and how to do CRUD operations on it! Remember that there are different ways of doing it, so feel free to research more about it.
If you have any questions you can send me a message! This content was created with my notes during the 100 days of code, in which I learned about database, PHP and Laravel.
And thanks to the people that reviewed my article and helped me to get here:


