Introduction
Welcome to my blog! I'm Dipankar Paul, a frontend developer with a passion for creating efficient and user-friendly web applications. In this article, I will take you through one of my projects, the ReAPI Client. This React-based API request builder simplifies the process of creating, sending, and managing API requests. Whether you're a developer who frequently interacts with APIs or someone looking for a tool to streamline your workflow, the ReAPI Client has a lot to offer.
In this comprehensive blog post, I'll cover the following:
- Inspiration
- Project Overview
- Key Features
- Technical Details
- Step-by-Step Guide with Screenshots
- Challenges and Solutions
- Future Improvements
- Conclusion
Inspiration
The idea for building the ReAPI Client came from my experience using the Thunder Client VS Code extension. I was impressed by its simplicity and efficiency in managing API requests directly within the code editor. This inspired me to develop the ReAPI Client.
Project Overview
The ReAPI Client is designed to be a powerful yet user-friendly tool for developers. Its main goal is to simplify the testing and debugging of API requests. The app supports various HTTP methods, provides real-time and full-screen responses, maintains a history of requests, and allows users to copy and use code snippets. Additionally, users can easily reuse any request from the history, making the ReAPI Client a versatile tool for any developer's toolkit.
Key Features
Let's dive into the key features of the ReAPI Client:
- API Request Builder: Supports GET, POST, PUT, PATCH, and DELETE requests.
- Real-time Response: Displays responses in real-time and in full-screen mode.
- Request History: Keeps a history of all API requests made.
- Code Snippets: Allows users to copy code snippets for API requests.
- Reuse Requests: Users can easily reuse any request from the history.
Technical Details
The ReAPI Client is built using a modern tech stack:
- ReactJS: For the frontend, providing a robust and flexible framework.
- Mantine: For UI components and hooks, offering a customizable and responsive design.
- Zustand: For state management, ensuring efficient and modular state handling.
- Axios: For managing API requests, ensuring smooth data flow throughout the app.
The app’s architecture is designed to be modular and maintainable, with a focus on state management and a seamless user experience.
Step-by-Step Guide with Screenshots
Let's walk through the ReAPI Client step by step, highlighting its features and functionality with screenshots.
1. User Interface
Upon launching the ReAPI Client, you are greeted with a clean and intuitive user interface.
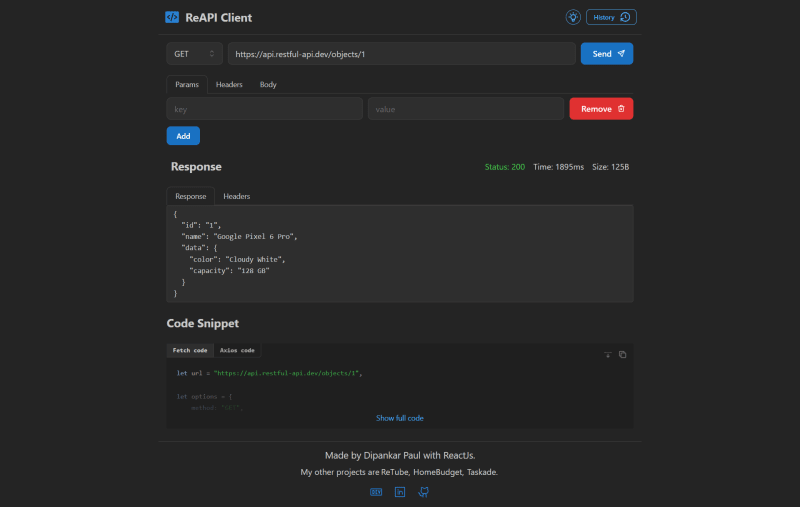
2. Creating an API Request
To create a new API request, select the request type (GET, POST, PUT, PATCH, DELETE), input the endpoint URL, and add any necessary params, headers or body content.
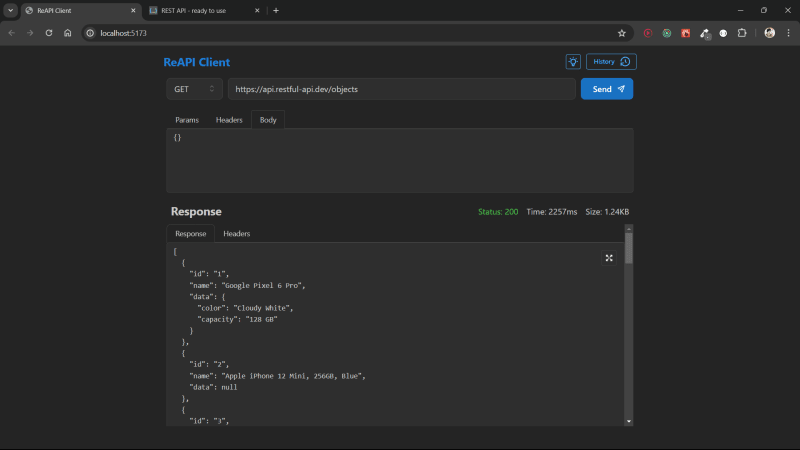

3. Sending the Request
Once you have filled in the request details, click the "Send" button. The app will process the request and display the response in real-time, in a full-screen mode. This feature allows you to view the status and data of the response immediately.

4. Managing Request History
All your API requests are saved in the request history. You can access this history from the main menu. The request history allows you to view and manage past requests, making it easy to keep track of your testing and debugging activities. To reuse a request from the history, just select the request. This feature allows you to resend or modify past requests easily, saving you significant time and effort.

5. Using Code Snippets
One of the standout features of the ReAPI Client is the ability to copy code snippets for API requests. This feature simplifies the process of reusing API calls in your development environment. Simply click the "Copy" button next to the request to get the code snippet.

Challenges and Solutions
During the development of the ReAPI Client, I encountered several challenges. Here are some of the key challenges and how I addressed them:
1. Handling Asynchronous Requests
- Challenge: Ensuring the UI remained responsive while handling asynchronous API requests.
- Solution: I used React hooks and Axios to manage asynchronous requests smoothly. By leveraging React's useEffect and useState hooks, I was able to keep the UI responsive and update it in real-time as requests were processed.
2. Efficient State Management
- Challenge: Managing complex state efficiently.
- Solution: Zustand was the perfect choice for state management. Its lightweight and flexible approach allowed me to manage the app's state efficiently without adding unnecessary complexity. Zustand's API is straightforward, making it easy to implement and maintain.
3. UI/UX Design
- Challenge: Creating an intuitive and user-friendly interface.
- Solution: Mantine provided a set of customizable UI components that made designing the interface straightforward. Its responsive design capabilities ensured that the app looked great on all devices. I focused on creating a clean and simple layout, with easily accessible features and a consistent design language.
Future Improvements
While the ReAPI Client is already a powerful tool, there are several areas for future improvement:
Planned Features
- User Authentication: Adding user authentication to provide personalized experiences and secure access to saved requests.
- Enhanced Error Handling: Improving error handling to provide more detailed and helpful error messages, making debugging easier.
Potential Improvements
- Performance Optimization: Optimizing performance for handling large datasets and complex requests more efficiently.
- Customizable UI: Adding more options for customizing the UI to suit individual preferences and workflows.
Source Code and Live Link
For those interested in exploring the code or trying out the ReAPI Client, you can find the source code on GitHub and the live version hosted online. Check them out through the links below:
- Source Code: GitHub Repository
- Live Demo: Live Version
Feel free to explore the repository, clone the project, and contribute if you'd like. The live demo allows you to experience the ReAPI Client in action and see its features firsthand.
Conclusion
In conclusion, the ReAPI Client is a powerful and user-friendly tool for developers, offering a range of features to simplify API testing and debugging. With its real-time responses, request history, code snippets, and the ability to reuse requests, it streamlines the entire process, making it an essential tool for any developer.
I hope this blog post has given you a comprehensive overview of the ReAPI Client. If you have any questions or feedback, I’d love to hear from you. Feel free to comment.
Thank you for reading, and happy coding!