

As a developer, It is very important to make the application secure. And when we talk about security in any application then user authentication or user management comes at first. And of course, it is one of the challenging tasks for the app developer to secure the data and protect the app with any kind of hacking.
Nowadays, There are so many platforms available which simplify the task of user authentication. A developer doesn't need to think about the user authentication stuff while using these third-party APIs of user authentication. For user authentication task very common third-party service providers are auth0, AWS cognito, Firebase Auth, etc. So we will discuss all about Amazon Cognito User Pools integration in Node.js .
Today we will discuss AWS cognito integration in Node.js Application. Amazon Cognito simplifies the user authentication, user authorization and user management for the developer. It provides APIs for login, register, forgot password and other user management based on Oauth2 specification. APIs of Amazon Cognito supports all the popular platforms related to mobile and web.
When we enter inside amazon Cognito section, We see two categories there:
User Pools: It is an identity provider. We can use this to authenticate users to the mobile app, website and manage users which we will discuss in detail in this article.
Identity Pools: Identity pools are used to authorize users to give access to AWS resources such as IAM, S3 and etc.
Let's Get Started to setup User pools
At first, Need to login into AWS account and go to cognito. It is necessary to have a AWS account for using Amazon cognito.
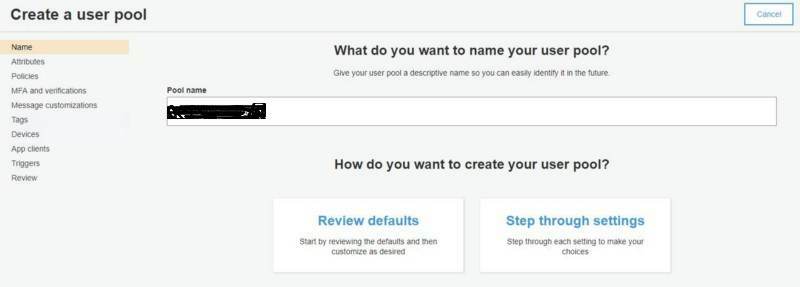
Step 1. Name the pool
Let's Get Started to setup User pools
At first, Need to login into AWS account and go to cognito. It is necessary to have a AWS account for using Amazon cognito.
Step 1. Name the pool
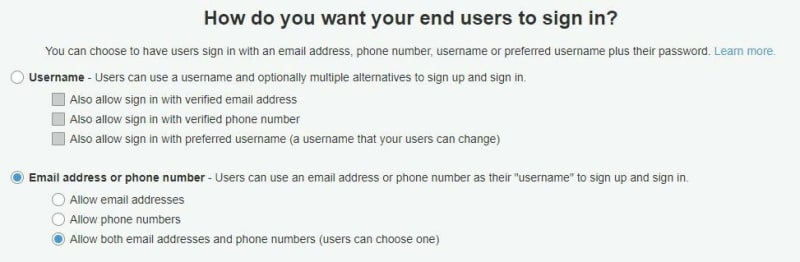
Step2: Choose the authentication method for user either email or phone.
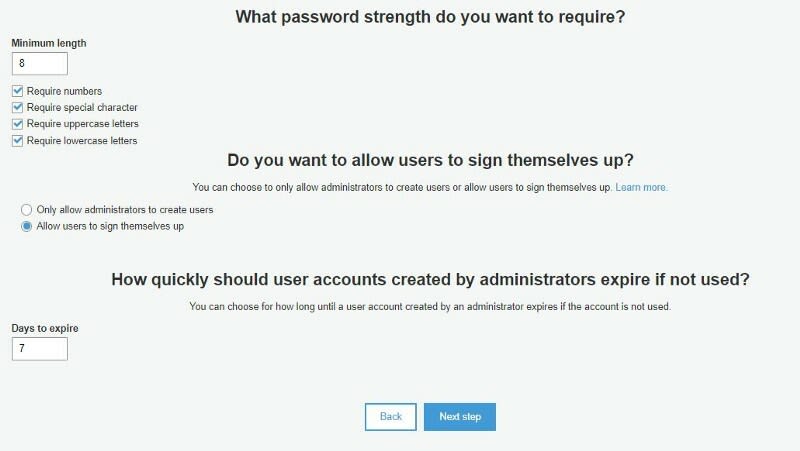
Step 3: Set attributes want to require.

Step 4: Choose signup criteria.
Step 5: Setup multi-factor authentication settings.
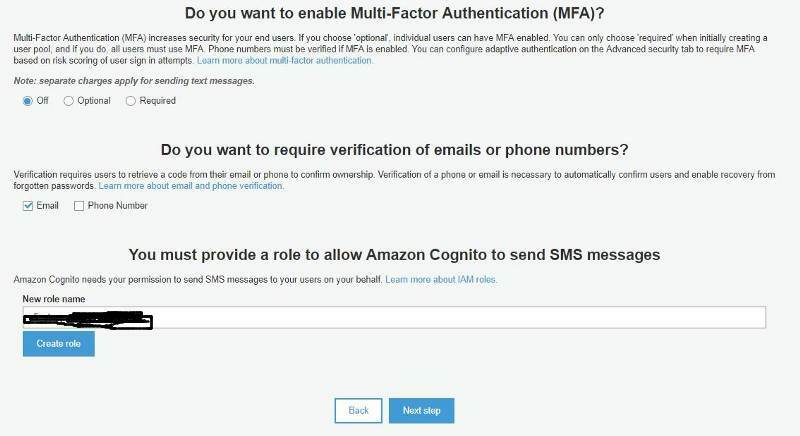
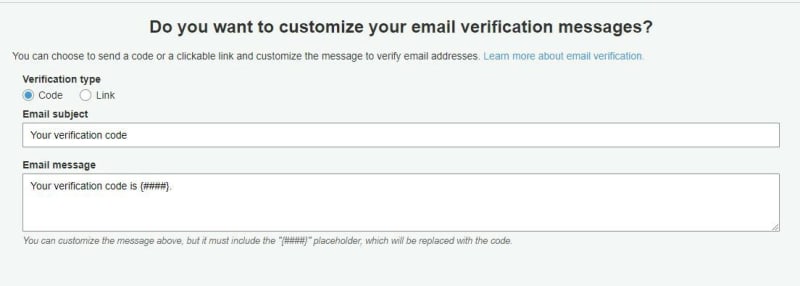
Step 6: Set the user authentication method, When user registers then he will get an email to verify the account.
After that you will get some steps which is optional so skip these steps or press next step.
Step 7: Add an app client. The app client generates an app client Id and it’s used to access the pool from Node.js code. Just uncheck the “Generate client secret” option.

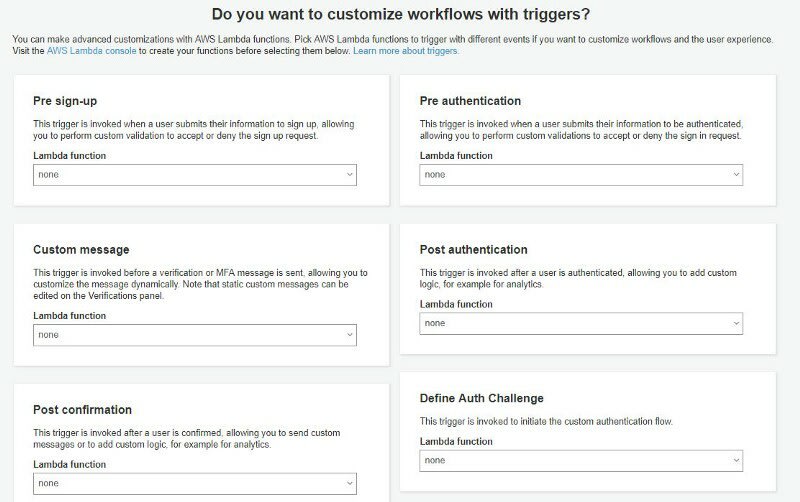
Step 8: If it is needed to execute any defined lambda functions at any point of auth flow, it can be specified those here. Skip it if not needed.
Step 9: Review all and create the user pool.
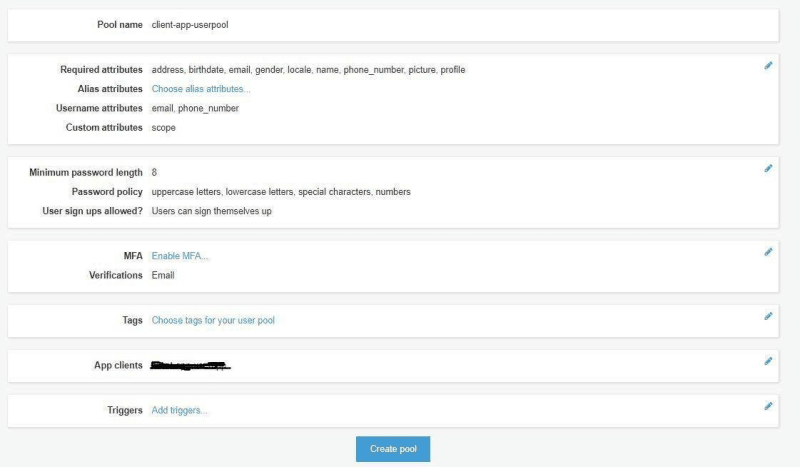
Now finally we have completed all the steps needed to create the user pool. No we can go to pool overview section to get pool id, Go to app client to retrieve the app client id. Now note down the pool region, pool id and app client id, which will be needed at code settings sections.
Step 10. package needed to install for AWS Cognito in Node.js app
amazon-cognito-identity-js

aws-sdk

jsonwebtoken

node-fetch
These are the packages we need in our Nodejs application. after installing these we need to update the configurations in the code.
let config = {
"AWS_ACCOUNT_ID": "088121179151211",
"AWS_REGION": "us-east-2",
"COGNITO_IDENTITY_POOL_ID": "us-east-2_qixEadfdfdfdaogl",
"IAM_ROLE_ARN": "arn:aws:cognito-idp:us-east-2:08829sdfsdf7915601:userpool/us-east-2_tA2EcDIfin",
"COGNITO_DATASET_NAME": "user_data_set",
"COGNITO_KEY_NAME": "congnito_key_name",
"CALLBACKURL": "http://localhost:3000/auth/amazon/callback",
"AMAZON_CLIENT_ID": "5c7l8edubud88tdfdfdfcrgvte3ubh0b",
"AMAZON_CLIENT_SECRET": "r7sb3st4t4ucec05qudfdfifs4l33tacjijhitlj2mdhkjghqrs6fi4"
};
Now I am going to list below the logical code for different basic user related APIs. For complete source code, Please download it from the bottom of this page.
Code for user registration API:
let signup = async (data, callback) => {
if (!data.email || !data.username || !data.password) {
callback({
statusCode: util.statusCode.FOUR_ZERO_ONE,
statusMessage: util.statusMessage.PARAMS_MISSING
});
return;
} else {
try {
let userData = {
email: data.email,
fullName : data.fullName,
birthdate: data.birthdate,
userRole: data.userRole,
username: data.username,
password: data.password,
status: true
};
const addUser = await CongnitoUserDAO.createUser(userData);
if (addUser) {
callback({
statusCode: util.statusCode.OK,
statusMessage: util.statusMessage.USER_REGISTERED_SUCCESSFULLY,
result : addUser
});
return;
} else {
callback({
statusCode: util.statusCode.FOUR_ZERO_ONE,
statusMessage: util.statusMessage.SERVER_BUSY
});
return;
}
} catch (error) {
callback({
statusCode: util.statusCode.FOUR_ZERO_FOUR,
statusMessage: error.message
});
return;
}
}
};
Code for user verification API:
let verifyUser = async (data, callback) => {
if (!data.email) {
callback({
statusCode: util.statusCode.ONE,
statusMessage: util.statusMessage.PARAMS_MISSING
});
return;
} else {
try {
let userData = {email:data.email,token:data.token}
const authenticateUser = await CongnitoUserDAO.verifyUser(userData);
if (authenticateUser) {
callback({
statusCode: util.statusCode.OK,
statusMessage: util.statusMessage.SUCESSFULLY_VERIFIED,
result: authenticateUser
});
} else {
callback({
statusCode: util.statusCode.FOUR_ZERO_ONE,
statusMessage: util.statusMessage.ENTER_VALID_PASS
});
}
return;
} catch (error) {
callback({
statusCode: util.statusCode.FOUR_ZERO_ONE,
statusMessage: error.message
});
return;
}
}
};
Code for Login API:
let login = async (data, callback) => {
if (!data.username || !data.password) {
callback({
statusCode: util.statusCode.ONE,
statusMessage: util.statusMessage.PARAMS_MISSING
});
return;
} else {
try {
let criteria = { username: data.username, password: data.password };
const checkUser = await CongnitoUserDAO.fetchUser(criteria);
if (checkUser) {
callback({
statusCode: util.statusCode.OK,
statusMessage: util.statusMessage.LOGGED_IN,
result: checkUser
});
} else {
callback({
statusCode: util.statusCode.FOUR_ZERO_ONE,
statusMessage: util.statusMessage.ENTER_VALID_PASS
});
}
return;
} catch (error) {
callback({
statusCode: util.statusCode.FOUR_ZERO_ONE,
statusMessage: error
});
return;
}
}
};
Code for change Password API:
let changePassword = async (data, callback) => {
if (!data.username) {
callback({
statusCode: util.statusCode.ONE,
statusMessage: util.statusMessage.PARAMS_MISSING
});
return;
} else {
try {
let criteria = { username: data.username, newPassword: data.newPassword, oldPassword: data.oldPassword };
const checkUser = await CongnitoUserDAO.changePassword(criteria);
if (checkUser) {
callback({
statusCode: util.statusCode.OK,
statusMessage: util.statusMessage.PASSWORD_CHANGED,
result: checkUser
});
} else {
callback({
statusCode: util.statusCode.FOUR_ZERO_ONE,
statusMessage: util.statusMessage.ENTER_VALID_PASS
});
}
return;
} catch (error) {
callback({
statusCode: util.statusCode.FOUR_ZERO_ONE,
statusMessage: error.message
});
return;
}
}
};
Code for forgot password request:
let forgotPassword = async (data, callback) => {
if (!data.username) {
callback({
statusCode: util.statusCode.ONE,
statusMessage: util.statusMessage.PARAMS_MISSING
});
return;
} else {
try {
let criteria = { username: data.username };
const checkUser = await CongnitoUserDAO.forgotPassword(criteria);
if (checkUser) {
callback({
statusCode: util.statusCode.OK,
statusMessage: util.statusMessage.MAIL_SENT_FORGOT_PASSWORD,
result: checkUser
});
} else {
callback({
statusCode: util.statusCode.FOUR_ZERO_ONE,
statusMessage: "FAILED"
});
}
return;
} catch (error) {
callback({
statusCode: util.statusCode.FOUR_ZERO_ONE,
statusMessage: error.message
});
return;
}
}
};
Code for reset password API:
let resetPassword = async (data, callback) => {
if (!data.username) {
callback({
statusCode: util.statusCode.ONE,
statusMessage: util.statusMessage.PARAMS_MISSING
});
return;
} else {
try {
let criteria = { token: data.token,password:data.password,username:data.username };
const checkUser = await CongnitoUserDAO.resetPassword(criteria);
if (checkUser) {
callback({
statusCode: util.statusCode.OK,
statusMessage: util.statusMessage.SUCCESS,
result: checkUser
});
} else {
callback({
statusCode: util.statusCode.FOUR_ZERO_ONE,
statusMessage: "FAILED"
});
}
return;
} catch (error) {
callback({
statusCode: util.statusCode.FOUR_ZERO_ONE,
statusMessage: error.message
});
return;
}
}
};
As I mentioned above also, Download complete source code from this page to get everything working.
Conclusion
So in this demo, We learn to create user pool and integration with Node.js express application. You can find other demos of Node.js sample application here
That’s all for now. Thank you for reading and I hope this demo will be very helpful to understand Amazon Cognito User Pools integration in Node.js .
Let me know your thoughts over the email demo.jsonworld@gmail.com. I would love to hear them and If you like this article, share with your friends.
This article is originally posted over jsonworld


