Want to skip the details? Try out the online demo.
Introduction
MongoDB Stitch is MongoDB's serverless platform which brings the power of MongoDB directly to your client-side application in the browser and on mobile. The serverless platform allows end-users to authenticate and access a subset of the data in your cluster based on the rules you have configured.
One of the core capabilities offered by the MongoDB Stitch platform is authentication with support for several providers: anonymous, email/password, Facebook, Google and Apple. There's also support for custom providers like static API keys, custom functions and custom JWT.
In this blog post we'll be using the Custom JWT Authentication provider to allow users to sign in using Auth0. This will allow your users to sign in only once and then talk to MongoDB Stitch as if it was just one more API used by your applications.
The diagram below illustrates how the JWT authentication provider works. Your user will first sign in using Auth0 after which the user will receive an id_token and an access_token. The access_token is then sent to MongoDB Stitch which will retrieve the public key from Auth0 and validate the tokens signature. If the token is valid, a MongoDB access_token and refresh_token will be returned (this happens using the Stitch SDK). These tokens can then be used to query your database, execute functions, ...
Configuration
Auth0
In Auth0 I started by creating a new application for my test application:
- Application Type: Single Page Application
- Allowed Callback URL: http://localhost:3000
- Allowed Web Origins: http://localhost:3000
- Allowed Origins: http://localhost:3000
I also created an API which represents MongoDB Stitch. The identifier can be whatever you want and you'll use it when configuring your application and MongoDB Stitch.
Once the API is created we'll also write a sample rule to add extra claims to the access_token, which will later be consumed by MongoDB Stitch:
function (user, context, callback) {
  context.accessToken['http://sandrino/email'] = user.email;
  context.accessToken['http://sandrino/email_verified'] = user.email_verified.toString();
  return callback(null, user, context);
}
MongoDB Stitch
In the MongoDB dashboard we need to create the following:
- A MongoDB database cluster
- A MongoDB Stitch application
After creating both of these resources you'll need to link them. This is done in the MongoDB Stitch application under the Clusters section:
You'll see that this link also has a name, my-app in this example.
We'll be building a sample todo application so we'll want to make sure users can only access their data. This is achieved through Rules (not to be confused with Auth0 Rules) where we'll create a role limiting access to documents where the ownerId field mathches the current user ID.
The final step is to configure the JWT authentication provider under the Users section. In this section the following will need to be configured:
- The JWK URI, this will be
https://AUTH0_DOMAIN/.well-known/jwks.json - Any mapping between incoming claims and to which fields in the user profile you want to persist these claims
- The audience, the identifier of the API you created in the Auth0 dashboard
Integrating Auth0 and MongoDB Stitch
Now that both sides have been configured we can integrate them. In this example we'll create a client side application with React and auth0-spa-js.
With the following piece of code our user can sign in with Auth0:
import { Auth0Client } from '@auth0/auth0-spa-js';

const auth0 = new Auth0Client({
  domain: 'sandrino.auth0.com',
  client_id: '0EastzVCcEX1CXXD5usVXGnqnSSzWFMN',
  audience: 'urn:stitch-sandrino',
  scope: 'openid profile email''
});

export default class LoginAuth0 extends React.Component {
  async componentDidMount() {
    if (window.location.search.includes('code=')) {
      await auth0.handleRedirectCallback();

      history.pushState('', document.title, window.location.pathname);

      const user = await auth0.getUser();
      const accessToken = await auth0.getTokenSilently();

      ...
    }
  }

  login = async () => {
    await auth0.loginWithRedirect({
      redirect_uri: window.location.href
    });
  };

  render() {
    return (
      ...
    );
  }
}
After the user has signed in we can initialize the MongoDB Stitch SDK:
import { Stitch, RemoteMongoClient, CustomCredential } from 'mongodb-stitch-browser-sdk';

// The Stitch Application ID, which can be found under SDKs
const client = Stitch.hasAppClient(process.env.MONGO_APPLICATION_ID)
  ? Stitch.getAppClient(process.env.MONGO_APPLICATION_ID)
  : Stitch.initializeAppClient(process.env.MONGO_APPLICATION_ID);

const accessToken = await auth0.getTokenSilently();

const credential = new CustomCredential(accessToken);
await client.auth.loginWithCredential(credential);
And that's all there is to it. Your user has now signed in with Auth0 and used the access_token to authorize with MongoDB Stitch. This now allows you to create a service client and interact with the database from within the browser, eg:
const serviceClient = client.getServiceClient(
    RemoteMongoClient.factory,
    // The Stitch Service name, which can be found under the Clusters section. Eg: my-app
    process.env.MONGO_SERVICE_NAME
  );
};

// Get a collection.
const collection = this.serviceClient
  .db(process.env.MONGO_DATABASE)
  .collection('things');

// Query the collection, where I'm the owner of the record.
const things = await collection
  .find({}, { limit: 20 })
  .asArray();

// Delete items from the collection, where I'm the owner of the record.
const result = await collection
  .deleteOne({ _id: things[0]._id });
Functions
MongoDB Stitch also allows you to define serverless functions which can be called from the client side and in the context of the user. We can for example have a function which will create a record in a collection and set the ownerId field to the current user:
exports = async function doSomething(data) {
  if (!context.user) {
    throw new Error('User not authenticated');
  }

  var collection = context.services.get('my-app').db('development').collection('things');

  var document = await collection.insertOne({
    name: data.name,
    date: data.date,
    ownerId: context.user.id,
    createdOn: new Date()
  });

  return document;
};
The function needs to be configured using Application Authentication which will allow it to run in the context of the current user.
You can now call the function from the client side using the MongoDB Stitch client. Here's an example of how you can call the function from the client to create a record. As you can see the ownerId is not provided here, instead it will be set by the serverless function using the current user ID.
onSaveClick = async () => {
  const result = await serviceClient.callFunction('createThing', [
    {
      name: 'A new record'',
      date: new Date()
    }
  ]);
};
Integrating with Auth0 Role Based Access Control (RBAC)
The advantage of connecting Auth0 as an authentication provider is that you can also leverage other Auth0 capabilities like RBAC. We can for example create a role for our application and assign it to the user:
The goal is to expose this information to the MongoDB Stitch API where it can be used to apply certain authorization logic. First we need to enable the API for RBAC:
By enabling this setting the RBAC authorization policy will run and evaluate role assignments during every login transaction. You can then modify the Rule we had initially created to also add the user's roles to the access token:
function (user, context, callback) {
  context.accessToken['http://sandrino/roles'] =  context.authorization.roles;
  context.accessToken['http://sandrino/email'] =  user.email;
  context.accessToken['http://sandrino/email_verified'] =  user.email_verified.toString();
  return callback(null, user, context);
}
As users sign in again they will now have their role assignments added to the access token. Here's an example:
{
  "http://sandrino/roles": ["things_app_admin"],
  "http://sandrino/email": "sandrino@auth0.com",
  "http://sandrino/email_verified": "true",
  "iss": "https://sandrino.auth0.com/",
  "sub": "auth0|593b80d5f8a341400599ce4f",
  "aud": ["urn:stitch-sandrino"],
  "iat": 1589756749,
  "exp": 1589843149,
  "azp": "0EastzVCcEX1CXXD5usVXGnqnSSzWFMN",
  "scope": "openid profile email"
}
With this information now available in the token we can also update the metadata mapping on the authentication provider:
The user's role memberships will be persisted in the user's profile and will be made available in the current user context. This means you could update your createThing function to now also require the user to be assigned a specific role, eg:
exports = async function doSomething(data) {
  var collection = context.services.get('my-app').db('development').collection('things');
  if (!context.user) {
    throw new Error('User not authenticated');
  }

  if (!context.user.data || !context.user.data.roles || context.user.data.roles.indexOf('things_app_admin') === -1) {
    throw new Error('User is not allowed to create new things');
  }

  var document = await collection.insertOne({
    name: data.name,
    date: data.date,
    ownerId: context.user.id,
    createdOn: new Date()
  });

  return document;
};
Users that don't have this role assigned will not be able to create any new documents.
MongoDB Charts
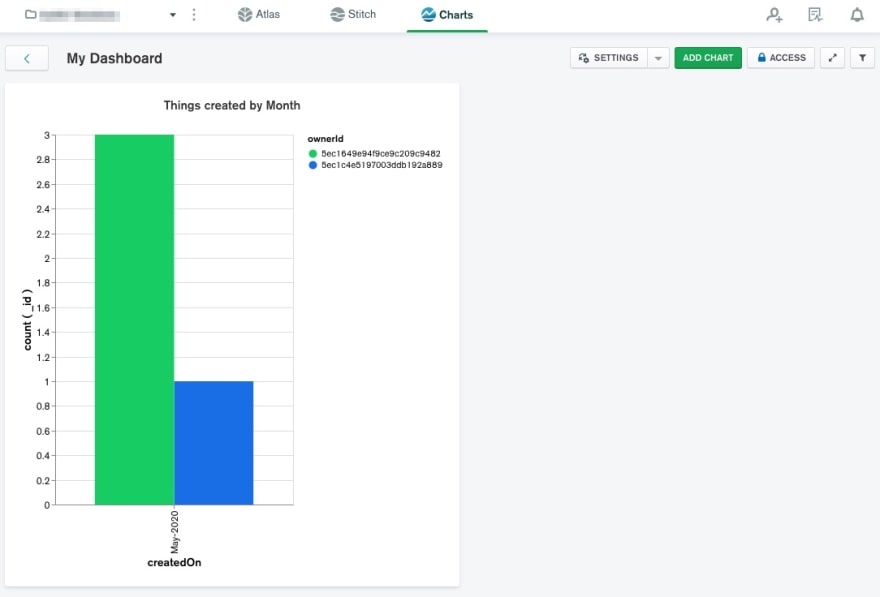
Since your users are now creating data in your application it's time to create some reports. MongoDB Charts allows you to easily create reports over your data in MongoDB Atlas.
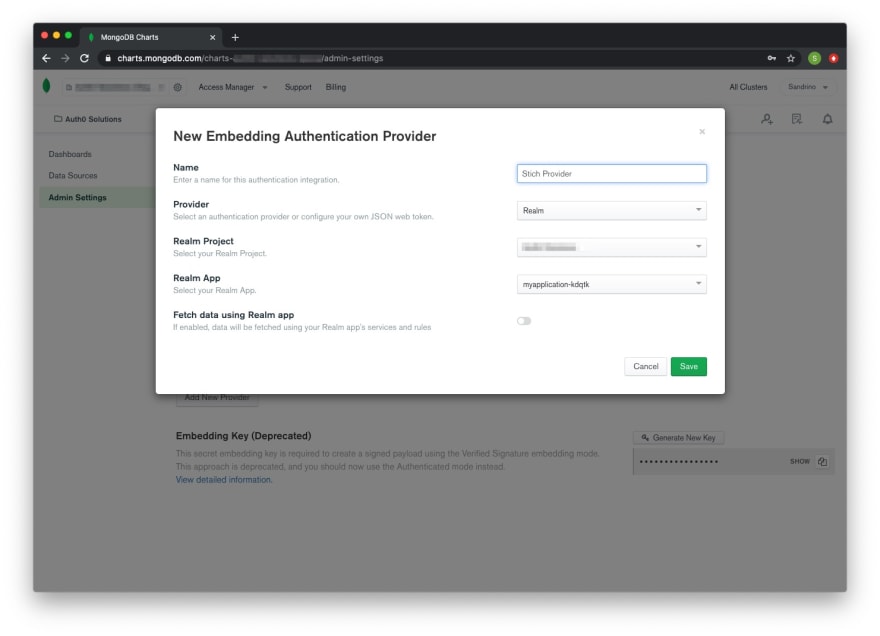
MongoDB Charts allows you to use your MongoDB Stitch application as an authentication provider (which in turn has the Custom JWT Authentication provider configured), allowing you to embed these charts in your client applications. When configuring the provider you can choose if the data has to be fetched using the rules you have configured in MongoDB Stitch (eg: fetch data in the context of the user).
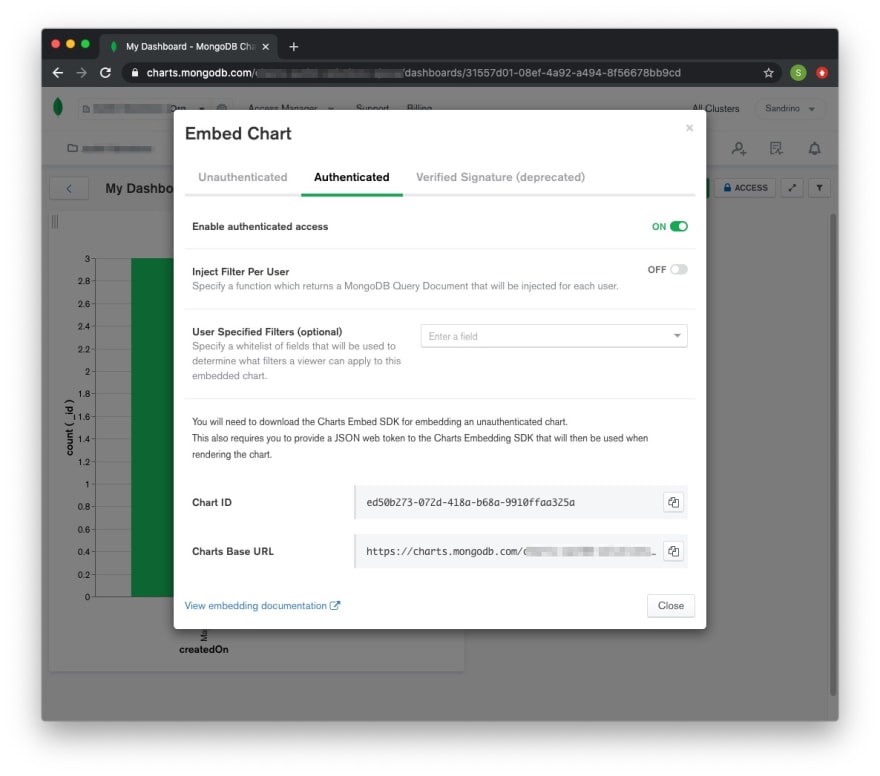
For charts you wish to embed in your applications you'll be able to enable authenticated access.
The only thing left to do is then simply render them using the MongoDB access token, the Chart ID and the Carts Base URL:
import ChartsEmbedSDK from '@mongodb-js/charts-embed-dom';

export default class MongoChart extends React.Component {
  constructor(props) {
    super(props);

    this.state = {
      height: 0
    };
  }

  onClickBtn = async (e) => {
    e.preventDefault();

    try {
      this.setState({
        height: 500
      });

      // Get the access token from the Stitch client.
      const { accessToken } = client.auth.activeUserAuthInfo;

      const sdk = new ChartsEmbedSDK({
        baseUrl: 'https://charts.mongodb.com/your-charts-app',
        getUserToken: () => MongoClient.getAccessToken()
      });

      const chart = sdk.createChart({
        chartId: 'ed50b273-072d-418a-b68a-9910ffaa325a'
      });

      // render the chart into a container
      await chart.render(document.querySelector('#chart'));
    } catch (error) {
      console.error(error);
    }
  };

  render() {
    return (
      ...
      <div id="chart" style={{ height: `${this.state.height}px` }} />
    );
  }
}
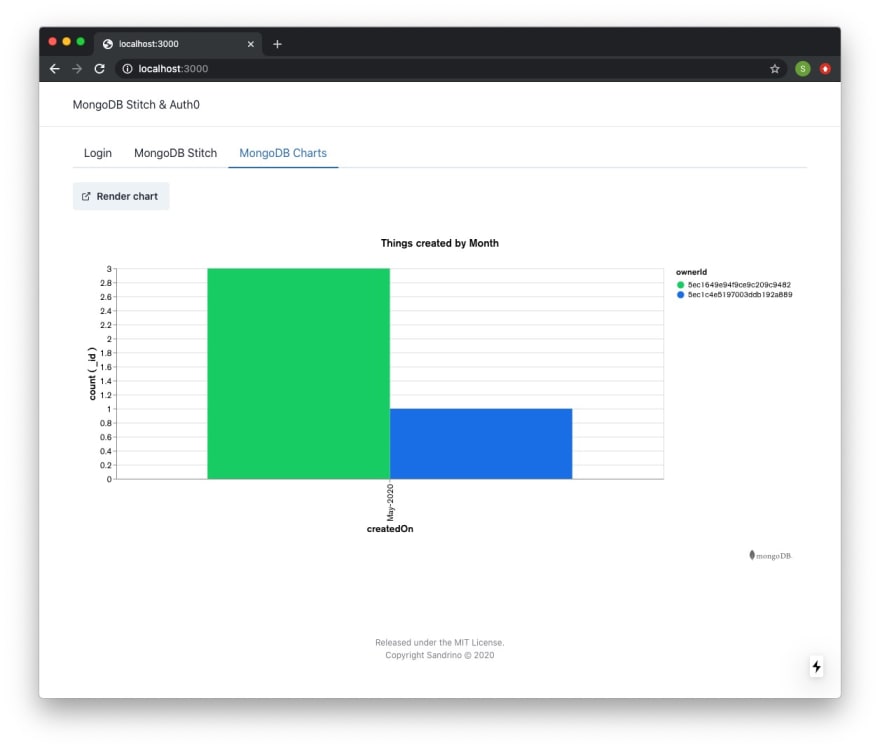
As users sign in they'll now be able to access these embedded charts in the client application:
The power of MongoDB in your browser
It's amazing to see how MongoDB Stitch can bring the MongoDB experience we know to browsers and mobile applications in a secure way. This post focused only on browser applications, but everything you see here is also possible on mobile.
A fully working demo application is available here https://mongodb-stitch-auth0-example.now.sh/ (source code).


