
by Joseph Chege
Next.js is a database-agnostic web-based framework. This way, you can use any database with Next.js. You can use ORM to model your database data structure when working with databases. Next.js uses Prisma as an ORM to manage your database with no hustle. This article will integrate Next.js with Prisma to build a post with the comments app.
For this article, it is helpful to have:
- Node.js installed on your computer.
- Prior knowledge of JavaScript.
- Basic understanding of Prisma ORM.
- Basic knowledge of how to create applications using Next.js
Setting up the application
In your preferred working directory, run the following command to bootstrap the application:
npx create-next-app posts_app
Note: The above command will create your Next.js using Yarn as the default package manager. To use an alternative package manager, use the following command:
- For NPM add
--use-npmflag:
npx create-next-app --use-npm posts_app
- For pnpm add
--use-pnpmflag:
npx create-next-app --use-pnpm posts_app
To test if the app is working as expected, navigate to the newly created directory:
cd posts_app
Start the development server:
npm run dev
Setting up Prisma
First, install the Prisma dependencies to your Next.js project:
npm install prisma --save-dev
To use Prisma, you need to initialize Prisma Client for your project. This will Bootstrap a basic Prisma setup: To do so, run the following command:
npx prisma init
The above command will create two files:
-
prisma/schema.prisma: The main Prisma configuration file will host the database configuration. -
.env: Will host the database connection URL and other environment variables.
Connecting Prisma with your Database
Prisma supports databases such as PostgreSQL, MySQL, SQLite, SQL server, MongoDB, and cockroach DB. Prisma comes in handy when running such databases with your application. With just a few lines of code, you switch to any database of your choice without affecting your codebase. Let's see how that works with Prisma.
Open .env your file. This contains the connection URL of your database. Note by default, Prisma creates PostgreSQL to connect to your Postgres database.
Now to connect to any database of your choice, all you need is the database connection URL that accesses your database server host. Each database has its connection URL format. Check this guide and learn how you would structure a URL for your database. Once you have your connection URL reader, use DATABASE_URL inside the .env file and paste it into your URL.
In this case, we will use MySQL database, so go ahead and add the URL as follows:
DATABASE_URL = "mysql://your_username:your_password@localhost:3306/your_db_name"
For example:
DATABASE_URL = "mysql://root:kimafro@localhost:3306/posts"
When using Prisma, you don't have to create your_db_name. Just add it to the URL, and Prisma will auto-handle this.
Note: Because Prisma is an ORM, you can use any database. All you have to do is ensure the connection string reflects as such.
Next, navigate to the prisma/schema.prisma file. To use your database with Prisma, you need to set the provider of the data source block. A data source determines how Prisma connects your database. It takes the parameter provider of the Prisma schema. The provider defines the database you are using. Therefore, based on your connection string, the provider should reflect the database name you are using.
Check this guide and learn more about Prisma Providers.
Prisma comes with the postgresql as the default provider. In this case, we are using MySQL, and the provider should reflect as such:
// schema.prisma
datasource db {
  provider = "mysql"
  url
= env("DATABASE_URL")
}
Creating Prisma Models
Models Represent the entities of your application domain. A model describes how data will be represented in your database. Prisma uses a Model to create a database, tables, and all the required fields. This way, you can create tables and insert fields in your databases without manually creating any tables and inserting fields in your databases. Prisma handles this for you and minimizes any error that you could unknowingly introduce when doing such operations manually.
In this guide, we will create two tables, Post and Comment. We will use a Prisma schema to describe these tables using a few lines of code. Define this database schema as below in the prisma/schema.prisma right after the datasource block:
model Post {
  id
String    @id @default(cuid())
  title
String
  content
String?   @db.LongText
  published Boolean   @default(false)
  comments
Comment[]

  @@map(name: "posts")
}

model Comment {
  id
String  @id @default(cuid())
  content
String?
  post
Post?   @relation(fields: [postId], references: [id])
  postId
String?
  published Boolean @default(false)
}
Let's digest what's happening here. From above, we will have two tables: Post and Comment. We are defining every field that each table will have. Using the Prisma schema, we can introduce the relationship between these tables.
The relations between the tables will be one-to-many relations. This means a Post can have more than one comment. This is denoted by the comments Comment[] field. It defines a relation type of another model.
Each comment can have one post. Therefore post Post? @relation(fields: [postId], references: [id]) field handles that. This mapping will be done on the postId field on the Post model referencing the id on the Comment model.
We will use this relation within Next.js and Prisma Client to create the application.
It's good to note that there is a difference between NoSQL and a relational database enforcement integrity constraint. The Models can be slightly different if you use a NoSQL MongoDB database. MongoDB is JSON based, and it uses collections and documents. To better understand how to write MongoDB models using Prisma schemas, check out this guide and learn more.
Sync Database with Prisma Model
Once you have the Prisma Model ready, it's time to Sync it to your database. Sync the database with the above-defined models by running this command:
npx prisma db push
Running prisma db push to turn your Prisma schema into a database schema.

You can confirm these changes right in your database.

Alternatively, you can visualize your database using Prisma Studio.
npx prisma studio

Connecting Prisma to Next.js
First, to connect to Prisma using Next.js, we need Prisma Client dependencies ready. This way, we can create a Next.js server to access Prisma. Install the Prisma client:
npm install @prisma/client
Generate the client from the Prisma schema file:
npx prisma generate
Once you run the above command, you can use Prisma Client in the Next.js code.
On the project root directory, create a lib folder. Inside it, create a prisma.js file. The file will host the client connection. Add the following to the file:
import { PrismaClient } from '@prisma/client';

let prisma;

if (process.env.NODE_ENV === 'production') {
    prisma = new PrismaClient();
} else {
    if (!global.prisma) {
        global.prisma = new PrismaClient();
    }
    prisma = global.prisma;
}

export default prisma;
Using this connection, we will access the Prisma client and perform database operations using Prisma as the ORM. Let's node dive and consume this connection to the Next.js app.
Setting up Next.js Components
In the project's root directory, create a components directory. Inside the components directory, create two files:
-
Navbar.js: Navigation bar:
import React from 'react';
export default function Navbar() {
    return (
        <div>
            <nav className="navbar">
                <div className='navbar-brand'>
                    Posts App
                </div>
                <div className='nav-links'>
                    <ul>
                        <li>
                            <a href="/">Posts</a>
                        </li>
                        <li>
                            <a href="/drafts">Drafts</a>
                        </li>
                        <li>
                            <a href="/create">Add Post</a>
                        </li>
                    </ul>
                </div>
            </nav>
            <style jsx>{`
                    .navbar{
                        width:100%;
                        display:flex;
                        padding:10px;

justify-content:space-between;
                        width:500px;
                        margin:0px auto;
                    }
                    .navbar-brand{
                        font-weight:bold;
                        padding-left:20px;
                        margin-top:14px;
                    }
                    .nav-links ul{
                        padding:0px;
                        list-style-type:none;
                        display:flex;
                    }
                    .nav-links ul li{
                        margin-right:15px;
                        margin-top:0px;
                        padding:0px;
                    }
                    `}</style>
        </div>
    );
}
-
Layout.js: The general app layout:
import React from "react";
import Navbar from "./Navbar";

export default function Layout(props) {
    return (
        <div>
            <Navbar />
            <div className="container">
                {props.children}
            </div>
            <style jsx>{`
                    .container{
                        width:500px;
                        margin:10px auto;
                        padding:22px;
                    }
                    `}</style>
        </div>
    );
}
These components will allow us to navigate through the application front end and access different routes to the application. These include:
-
"/"- Accessing the application home page -
"/drafts`` - accessing added posted waiting to be published -
"post/create"- accessing a page for adding new posts.
Let's now consume Prisma and perform database CRUD operations using Next.js.
Open Source Session Replay
OpenReplay is an open-source, session replay suite that lets you see what users do on your web app, helping you troubleshoot issues faster. OpenReplay is self-hosted for full control over your data.

Start enjoying your debugging experience - start using OpenReplay for free.
Adding posts
Next.js allows you to create serverless API routes without creating an entire backend server. API routes provide a solution to build your API with Next.js. Next.js uses server-side bundles that treat server code as an API endpoint instead of a page. It does that using alias pages/api path. This way, any file under api will be treated as an endpoint. This provides an easy solution to build your API within the same codebase.
pages/api will create all API handler functions using Next.js. This handler will act as the API endpoint to excite Prisma CRUD methods.
Create a 'post' directory in the pages/api directory. Inside the post directory, create an index.js file. In this index.js, add the handler for adding posts as follows:
`javascript
import prisma from '../../../lib/prisma'
export default async function handle(req, res) {
const { title, content, published } = req.body;
const result = await prisma.post.create({
data: {
title: title,
content: content,
published: published
},
});
res.json(result);
}
`
First, import the Prisma connection from the lib/prisma.js file. To add data, use the create() method and add the data you want to send when executing the POST payload to the API request body.
In the pages directory, create a posts directory. Inside the pages/posts directory, create a create.js file. Here we will create the page for adding posts that map to the "/add-post" we created earlier.
In the create.js file:
- Import the necessary packages:
`javascript

import React, { useState } from "react";

import Head from "next/head";

import Router from 'next/router';

import Layout from "../../components/Layout";

`
- Render a function with a form and its POST API handler:
`javascript
export default function Create() {
const [title, setTitle] = useState("");
const [content, setContent] = useState("");
const [error, setError] = useState("");
const [message, setMessage] = useState("");

const handleSubmit = async e => {
    e.preventDefault();
    setError("");
    setMessage("");
    if (title && content) {
        // send a request to the server.
        try {
            const body = { title, content, published: false };
            await fetch(`/api/post`, {
                method: "POST",
                headers: {"Content-Type": "application/json"},
                body: JSON.stringify(body),
            });
            await Router.push("/drafts");
        } catch (error) {
            console.error(error);
        }
    } else {
        setError("All fields are required");
        return;
    }
}

return (
    <Layout>
        <Head>
            <title>Create Post</title>
        </Head>
        <div>
            <form onSubmit={handleSubmit}>
                {
                    error ? (
                        <div className=" error form-group">
                            {error}
                        </div>
                    ) : null
                }
                {
                    message ? (
                        <div className= "message form-group">
                            {message}
                        </div>
                    ) : null
                }
                <div className="form-group">
Title
setTitle(e.target.value)} />
Content
<textarea
cols={50}
name= "content"
placeholder= "Content"
rows={8}
value={content}
onChange={(e) => setContent(e.target.value)}
/>
Add Post
{`<br> .form-group{<br> width:100%;<br> display:block;<br> margin-bottom:10px;<br> }<br> .form-group label{<br> display:block;<br> margin-bottom:10px;<br> }</p> <div class="highlight"><pre class="highlight plaintext"><code> .form-group input[type="text"]{ padding:10px; width:100%; } .form-group textarea{ padding:10px; width:100%; } .error{ color:red; text-align:center; } .message{ color:green; text-align:center; } `}</style> </Layout> ) </code></pre></div> <p>}<br> <code></code>`</p> <p>When the above form is submitted, it will hit the <code>api/post</code> route. This will execute the Prisma <code>create()</code> method and instruct the database to add new records to the posts table.</p> <p>Once the post is created, it will be saved as a draft. We will need to create a drafts page where you can view and publish it.</p> <p>It's good to note that publishing a post will involve an UPDATE request to the database. Therefore, execute an <code>update()</code> method to handle this operation as such. To do so, create <code>edit.js</code> inside the <code>pages/api/post</code> folder and add an API handle for sending update requests using Prisma as follows:</p> <p>`<code></code>javascript<br> import prisma from '../../../lib/prisma'</p> <p>export default async function handle(req, res) {<br> const { published } = req.body;<br> const result = await prisma.post.update({<br> where: {<br> id: req.query.id,<br> },<br> data: {<br> published: published,<br> }<br> });<br> res.json(result);<br> }<br> <code></code>`</p> <p>Inside <code>pages</code> create a <code>drafts.js</code> and handle draft posts as such:</p> <p>`<code></code>javascript<br> import Head from 'next/head';<br> import { useRouter } from 'next/router';<br> import prisma from '../lib/prisma';<br> import Layout from '../components/Layout';<br> import { useState } from 'react';</p> <p>export default function Home({ feed }) {</p> <div class="highlight"><pre class="highlight plaintext"><code>const [loading, setLoading] = useState(false); const router = useRouter(); const publishPost = async postId => { try { setLoading(true); const body = { 'published': true }; await fetch('/api/post/edit?id=' + postId, { method: "POST", headers: {"Content-Type": "application/json"}, body: JSON.stringify(body), }); setLoading(false); await router.push("/"); } catch (error) { console.log("error", error); setLoading(false); } } return ( <Layout> <Head> </code></pre></div> <p><title>Drafts</title><br> <meta name= "description" content=" Generated by create next app"/><br> <link rel="icon" href="/favicon.ico" /><br> </Head><br> {<br> feed.length > 0 ? (<br> feed.map((item, index) => (<br> <div className='post-card' key={index}><br> <span style={{ fontWeight: 'bold' }}>{item.title}</span></p> <p>{item.content}</p> <div class="highlight"><pre class="highlight plaintext"><code> <div className='post-card-action'> <button onClick={() => publishPost(item.id)}>{loading ? "Loading...": "Publish"}</button> </div> </div> )) ) : ( <div> <p>No draft posts found.</p> </div> ) } <style jsx>{` .post-card{ border:1px solid #d4d4d5; padding:10px; } `} </style> </Layout> ) </code></pre></div> <p>}</p> <p>export const getStaticProps = async () => {<br> const feed = await prisma.post.findMany({<br> where: { published: false },<br> });<br> return {<br> props: { feed },<br> revalidate: 10,<br> };<br> }<br> <code></code>`</p> <p>This will execute Prisma <code>findMany()</code> method and fetch the posts where the <code>published</code> value is false.</p> <p>Once a post is submitted, you will be redirected to the drafts page. Publish it from there, and then you will be redirected to the home page. Let's now create a home page for handling that.</p> <h2> <a name="loading-dynamic-posts" href="#loading-dynamic-posts" class="anchor"> </a> Loading dynamic posts </h2> <p>In the <code>pages/index.js</code>, we will change it to load data from the database.</p> <ul> <li>Start by importing the Prisma client connection and the layout defined prior:</li> </ul> <p><code>`javascript<br> import Head from 'next/head';<br> import prisma from '../lib/prisma';<br> import Layout from '../components/Layout';<br> import { useState } from 'react';<br> import { useRouter } from 'next/router';<br> `</code></p> <ul> <li>Add a <code>getStaticProps</code> function as below to get the posts:</li> </ul> <p><code>`javascript<br> export const getStaticProps = async () => {<br> const feed = await prisma.post.findMany({<br> where: { published: true },<br> });<br> return {<br> props: { feed },<br> revalidate: 10,<br> };<br> }<br> `</code></p> <p>Once we get the published posts, we will create a simple method for executing delete posts. Add a function for deleting a post:</p> <p>`<code></code>javascript<br> export default function Home({ feed }) {</p> <p>const [loading, setLoading] = useState(false);<br> const router = useRouter();<br> const deletePost = async postId => {<br> try {<br> setLoading(true);<br> await fetch('/api/post/delete?id=' + postId, {<br> method: "DELETE",<br> headers: {"Content-Type": "application/json"}<br> });</p> <div class="highlight"><pre class="highlight plaintext"><code> setLoading(false); await router.push("/"); } catch (error) { console.log("error", error); setLoading(false); } </code></pre></div> <p>}<br> }<br> <code></code>`</p> <ul> <li>Update the render function inside <code>Home()</code> to display the fetched posts:</li> </ul> <p><code>`javascriptx<br> return (<br> <Layout><br> <Head><br> <title>Posts</title><br> <meta name= "description" content=" Generated by create next app"/><br> <link rel="icon" href="/favicon.ico" /><br> </Head><br> {<br> feed.length > 0 ? (<br> feed.map((item, index) => (<br> <div className='post-card' key={index}><br> <span style={{ fontWeight: 'bold' }}>{item.title}</span><br> <p>{item.content}</p><br> <div><br> <button onClick={() => deletePost(item.id)}>{<br> loading ? "Loading": "Delete"<br> }</button><br> </div><br> </div><br> ))<br> ) : (<br> <div><br> <p>No published posts found.</p><br> </div><br> )<br> }<br> <style jsx>{`<br> .post-card{<br> border:1px solid #d4d4d5;<br> padding:10px;<br> margin:10px;<br> }<br> `}<br> </style><br> </Layout><br> )<br> `</code></p> <p>On this home page, we are also executing a delete function. Therefore, go ahead and create an API handle to delete a post. To do so, create <code>delete.js</code> inside the <code>pages/api/post</code> folder and add an API handle for sending update requests using Prisma as follows:</p> <p>`<code></code>javascript<br> import prisma from '../../../lib/prisma'</p> <p>export default async function handle(req, res) {<br> const result = await prisma.post.delete({<br> where: {<br> id: req.query.id,<br> }<br> });<br> res.json(result);<br> }<br> <code></code>`</p> <h2> <a name="testing-posts" href="#testing-posts" class="anchor"> </a> Testing Posts </h2> <p>Let's test what we have built so far. Ensure your development server is running (<code>npm run dev</code>) and check your home page. It should be similar to the following:</p> <p><img src="https://blog.openreplay.com/images/working-with-databases-in-next-js-using-prisma/images/image04.png" alt="4 Home page"></p> <p>Great, we have no posts yet. Let's navigate to <strong>Add Post</strong> and create one.</p> <p><img src="https://blog.openreplay.com/images/working-with-databases-in-next-js-using-prisma/images/image05.png" alt="5 Add post"></p> <p>Click Submit to add the post. The posts will be added to the draft as unpublished posts.</p> <p><img src="https://blog.openreplay.com/images/working-with-databases-in-next-js-using-prisma/images/image06.png" alt="6 Draft page"></p> <p>At this point, the post should be available in your database. Go ahead and check that or use the:</p> <p><code>`bash<br> npx prisma studio<br> `</code></p> <p><img src="https://blog.openreplay.com/images/working-with-databases-in-next-js-using-prisma/images/image07.png" alt="7 Prisma studio"></p> <p>To update the post, click the <strong>Publish</strong> button and update the post to published and displayed on the home page.</p> <p><img src="https://blog.openreplay.com/images/working-with-databases-in-next-js-using-prisma/images/image08.png" alt="8 Home page"></p> <p>And if you want to erase the post, click the <strong>Delete</strong> button. All these changes should also reflect in the database as such.</p> <h2> <a name="handling-post-comments" href="#handling-post-comments" class="anchor"> </a> Handling Post Comments </h2> <p>We have the posts ready; let's now create a comment section for every post added. To add comments, we first need to access the single post. We have one too many relations here. Therefore, the user has to access each post to leave a comment. First, let's create and handle the page for loading a single post.</p> <h3> <a name="loading-a-single-post" href="#loading-a-single-post" class="anchor"> </a> Loading a single post </h3> <p>To access the content of a single post, we will create a page for handling that. In the <code>pages/posts/</code> directory, create a <code>[id]</code> directory, and then inside it, create an <code>index.js</code>:</p> <ul> <li>Import the necessary modules:</li> </ul> <p>`<code></code>javascript<br> import prisma from '../../../lib/prisma';<br> import Layout from '../../../components/Layout';</p> <p><code></code>`</p> <ul> <li>On the <code>getServerSideProps()</code> function, change it to query the record from the database:</li> </ul> <p>`<code></code>javascript<br> export default function PostPage(props) {</p> <div class="highlight"><pre class="highlight plaintext"><code>return ( <Layout> <div> </code></pre></div> <h1>{props.title}</h1> <div class="highlight"><pre class="highlight plaintext"><code> <h5>{props.content}</h5> <h6>Comments</h6> <a href={`${props.id}/comment`}>Leave a comment</a> { props.comments.length > 0 ? ( <ul> { props.comments.map((comment, index) => ( <li key={index}> </code></pre></div> <p>{comment.content}<br> </li><br> ))<br> }<br> </ul><br> ) : (<br> <p>No comments</p><br> )<br> }<br> </div><br> </Layout><br> )<br> }<br> <code></code>`</p> <p>Each post has a unique id. We are mapping the post id to the page and executing the details of that single post. Prisma makes this possible by using the <code>findUnique()</code> method that allows you to pass the id parameter out of the box.</p> <p>We have the single post ready. The user must click the post itself to access it so that Next.js can load this page. Head to the home page (<code>pages/index.js</code>) and add the following changes.</p> <p>Update the <code>findMany()</code> as follows:</p> <p><code>`bash<br> export const getStaticProps = async () => {<br> const feed = await prisma.post.findMany({<br> where: { published: true },<br> include: {<br> comments: {<br> select: { content: true },<br> },<br> },<br> });<br> return {<br> props: { feed },<br> revalidate: 10,<br> };<br> }<br> `</code></p> <p>Add a <code>href</code> tag to the postcard. This way, the single post will be loaded as such when a post is clicked. Also, add a counter to the home page that should list the number of comments available to each post. To implement these changes, update the <code>pages/index.js</code> return function as follows:</p> <p>`<code></code>javascript<br> return (<br> <Layout><br> <Head><br> <title>Posts</title><br> <meta name= "description" content=" Generated by create next app"/><br> <link rel="icon" href="/favicon.ico" /><br> </Head><br> {<br> feed.length > 0 ? (<br> feed.map((item, index) => (<br> <a href={`posts/${item.id}`}><br> <div className='post-card' key={index}><br> <span style={{ fontWeight: 'bold' }}>{item.title}</span></p> <p>{item.content}</p> <p>{item.comments.length} Comments</p> <div class="highlight"><pre class="highlight plaintext"><code> <div> <button onClick={() => deletePost(item.id)}>{ loading ? "Loading": "Delete" </code></pre></div> <p>}</button><br> </div><br> </div><br> </a><br> ))<br> ) : (<br> <div><br> <p>No published posts found.</p><br> </div><br> )<br> }<br> <style jsx>{<code><br> .post-card{<br> border:1px solid #d4d4d5;<br> padding:10px;<br> margin:10px;<br> }<br> </code>}<br>
)
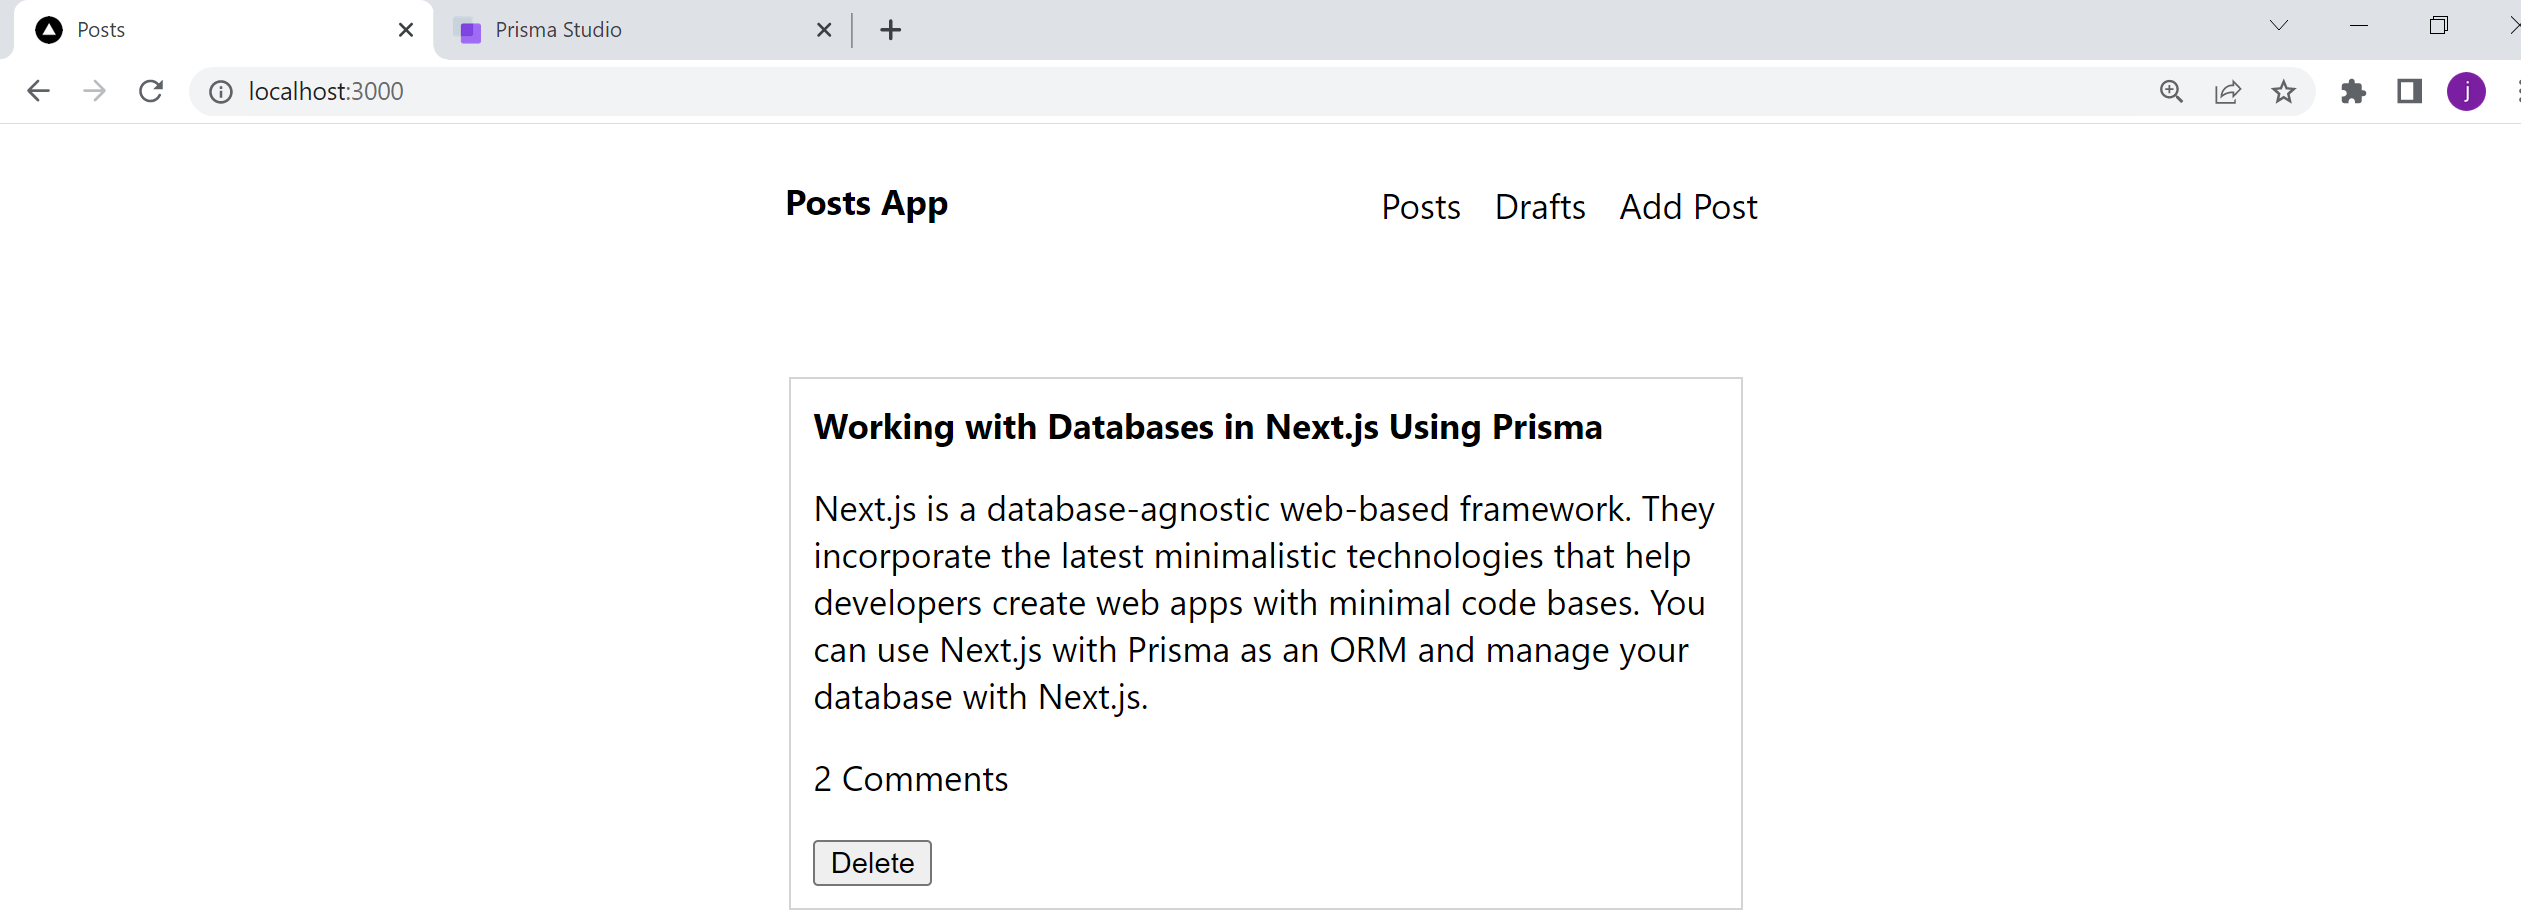
Ensure that the development server is running. This is the new look of the home page:

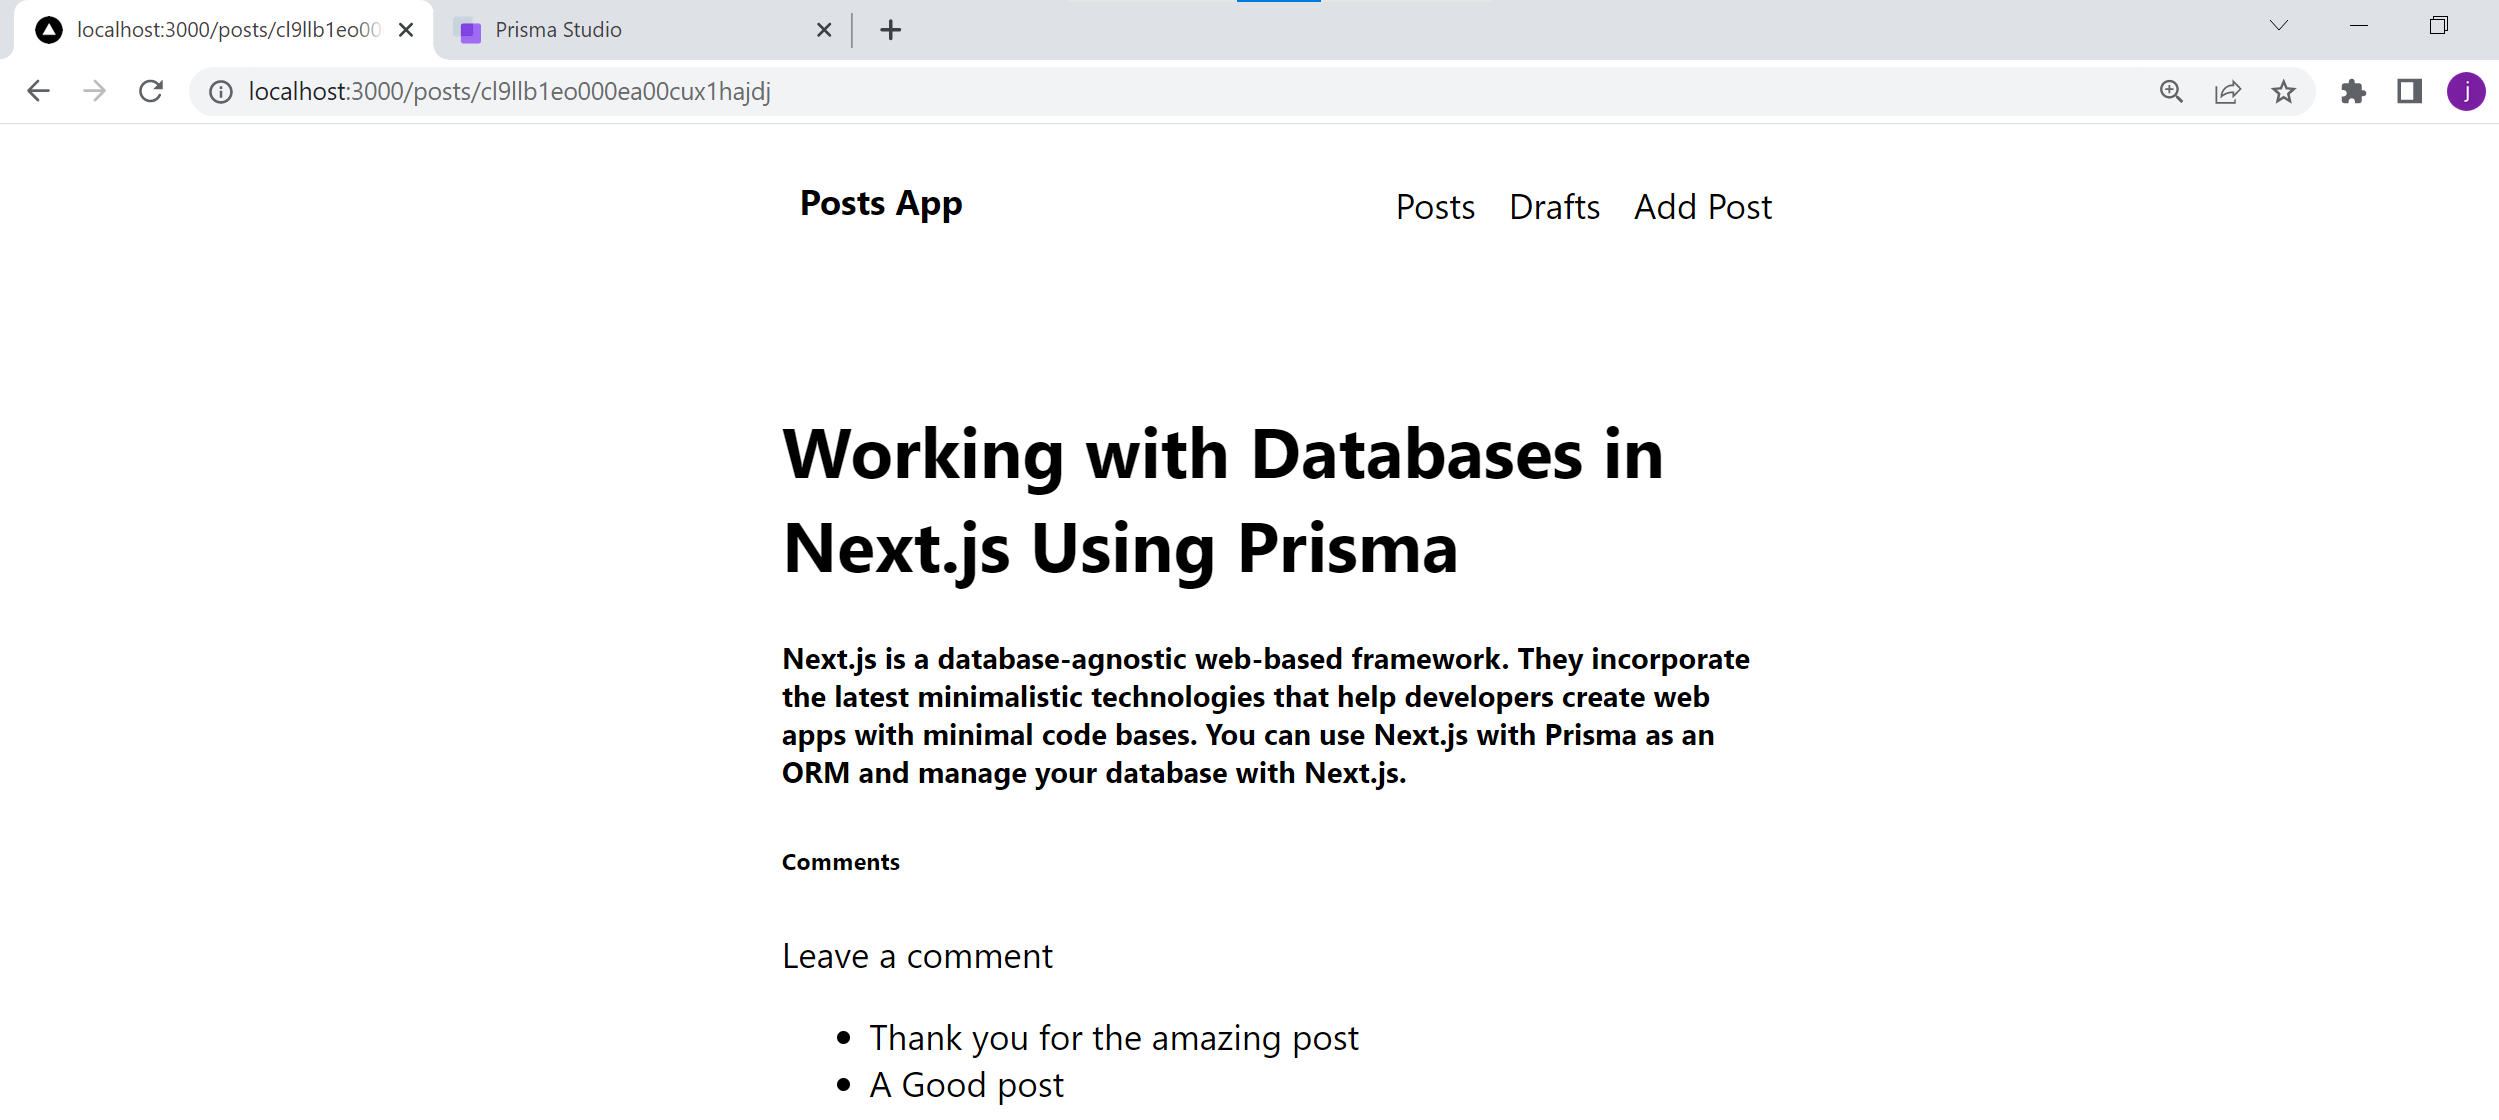
Click on any post. This should load the individual post as follows:

Note that the post URL has the post id. This created the pages that access each post. Great! Let's now add comments.
Adding a comment
This consumes the api from pages/api/post/comment. Create the comment.js file in the pages/api/post directory and add the following:
`javascript
import prisma from '../../../lib/prisma'
export default async function handle(req, res) {
const { comment, postId } = req.body;
const result = await prisma.comment.create({
data: {
content: comment,
postId: postId
},
});
res.json(result);
}
`
In the pages/posts/[id] directory, create a comment.js file. In this comment.js file:
- Import the necessary modules:
`javascript

import React, { useState } from "react";

import Head from "next/head";

import { useRouter } from 'next/router';

import Layout from "../../../components/Layout";

`
- Get the post id from the
getServerSidePropsfunction:
`javascript

export const getServerSideProps = async ({ params }) => {

    return {

        props: {

            id: params?.id

        },

    };

};

`
- Render a form in the view for adding a comment:
`javascript
export default function Comment(props) {
const [comment, setComment] = useState("");
const [error, setError] = useState("");
const [message, setMessage] = useState("");
const router = useRouter();

const handleSubmit = async e => {
    e.preventDefault();
    setError("");
    setMessage("");
    if (comment) {
        // send request to server.
        try {
            const body = { comment, postId: props.id, published: false };
            let res = await fetch(`/api/post/comment`, {
                method: "POST",
                headers: {"Content-Type": "application/json"},
                body: JSON.stringify(body),
            });
            await router.push("/");
        } catch (error) {
            console.error(error);
        }
    } else {
        setError("All fields are required");
        return;
    }
}

return (
    <Layout>
        <Head>
            <title>Create Comment</title>
        </Head>
        <div>
            <form onSubmit={handleSubmit}>
                {
                    error ? (
                        <div className=" error form-group">
                            {error}
                        </div>
                    ) : null
                }
                {
                    message ? (
                        <div className= "message form-group">
                            {message}
                        </div>
                    ) : null
                }
                <div className="form-group">
Comment
setComment(e.target.value)} />
Submit
{`<br>
.form-group{<br>
width:100%;<br>
display:block;<br>
margin-bottom:10px;<br>
}<br>
.form-group label{<br>
display:block;<br>
margin-bottom:10px;<br>
}</p>
<div class="highlight"><pre class="highlight plaintext"><code> .form-group input[type="text"]{
padding:10px;
width:100%;
}
.form-group textarea{
padding:10px;
width:100%;
}
.error{
color:red;
text-align:center;
}
.message{
color:green;
text-align:center;
}
`}&lt;/style&gt;
&lt;/Layout&gt;
)
</code></pre></div>
<p>}<br>
<code></code>`</p>
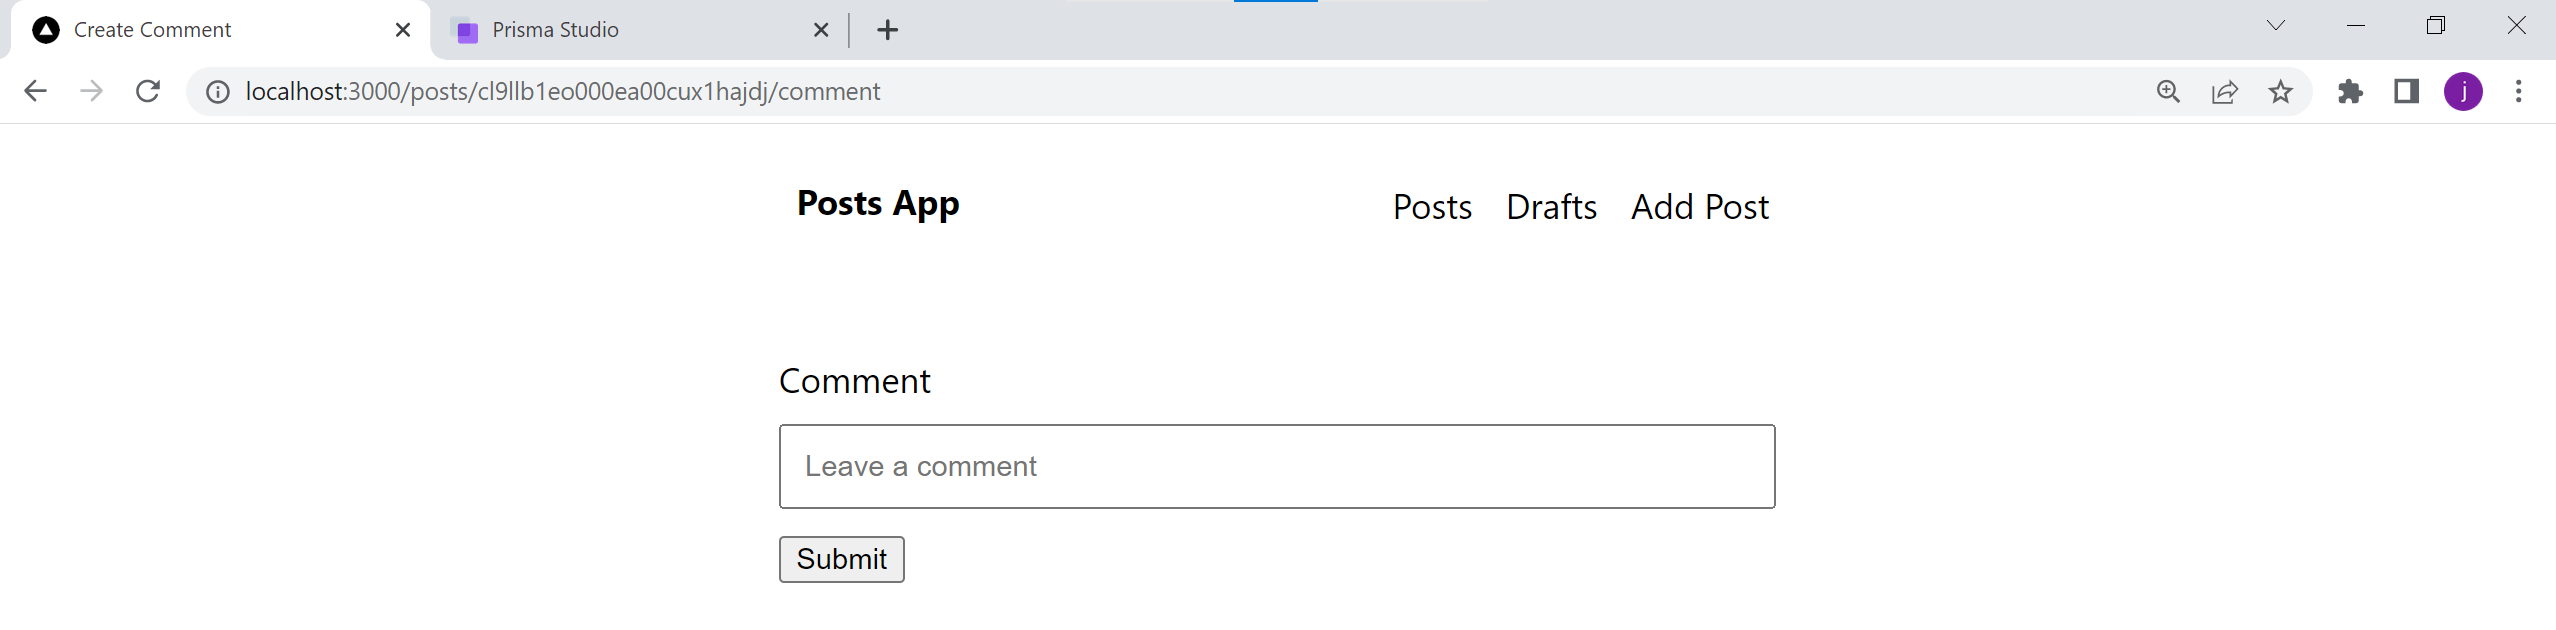
<p>Click <strong>Leave a comment</strong> on the single post page. This will load a form to add a comment as such:</p>
<p><img src="https://blog.openreplay.com/images/working-with-databases-in-next-js-using-prisma/images/image11.png" alt="11 Add a comment"></p>
<p>Go ahead and add comments:</p>
<p><img src="https://blog.openreplay.com/images/working-with-databases-in-next-js-using-prisma/images/image12.png" alt="12 Home page comments"></p>
<p>And indeed, the comments are available as you add them:</p>
<p><img src="https://blog.openreplay.com/images/working-with-databases-in-next-js-using-prisma/images/image13.png" alt="13 Post comments"></p>
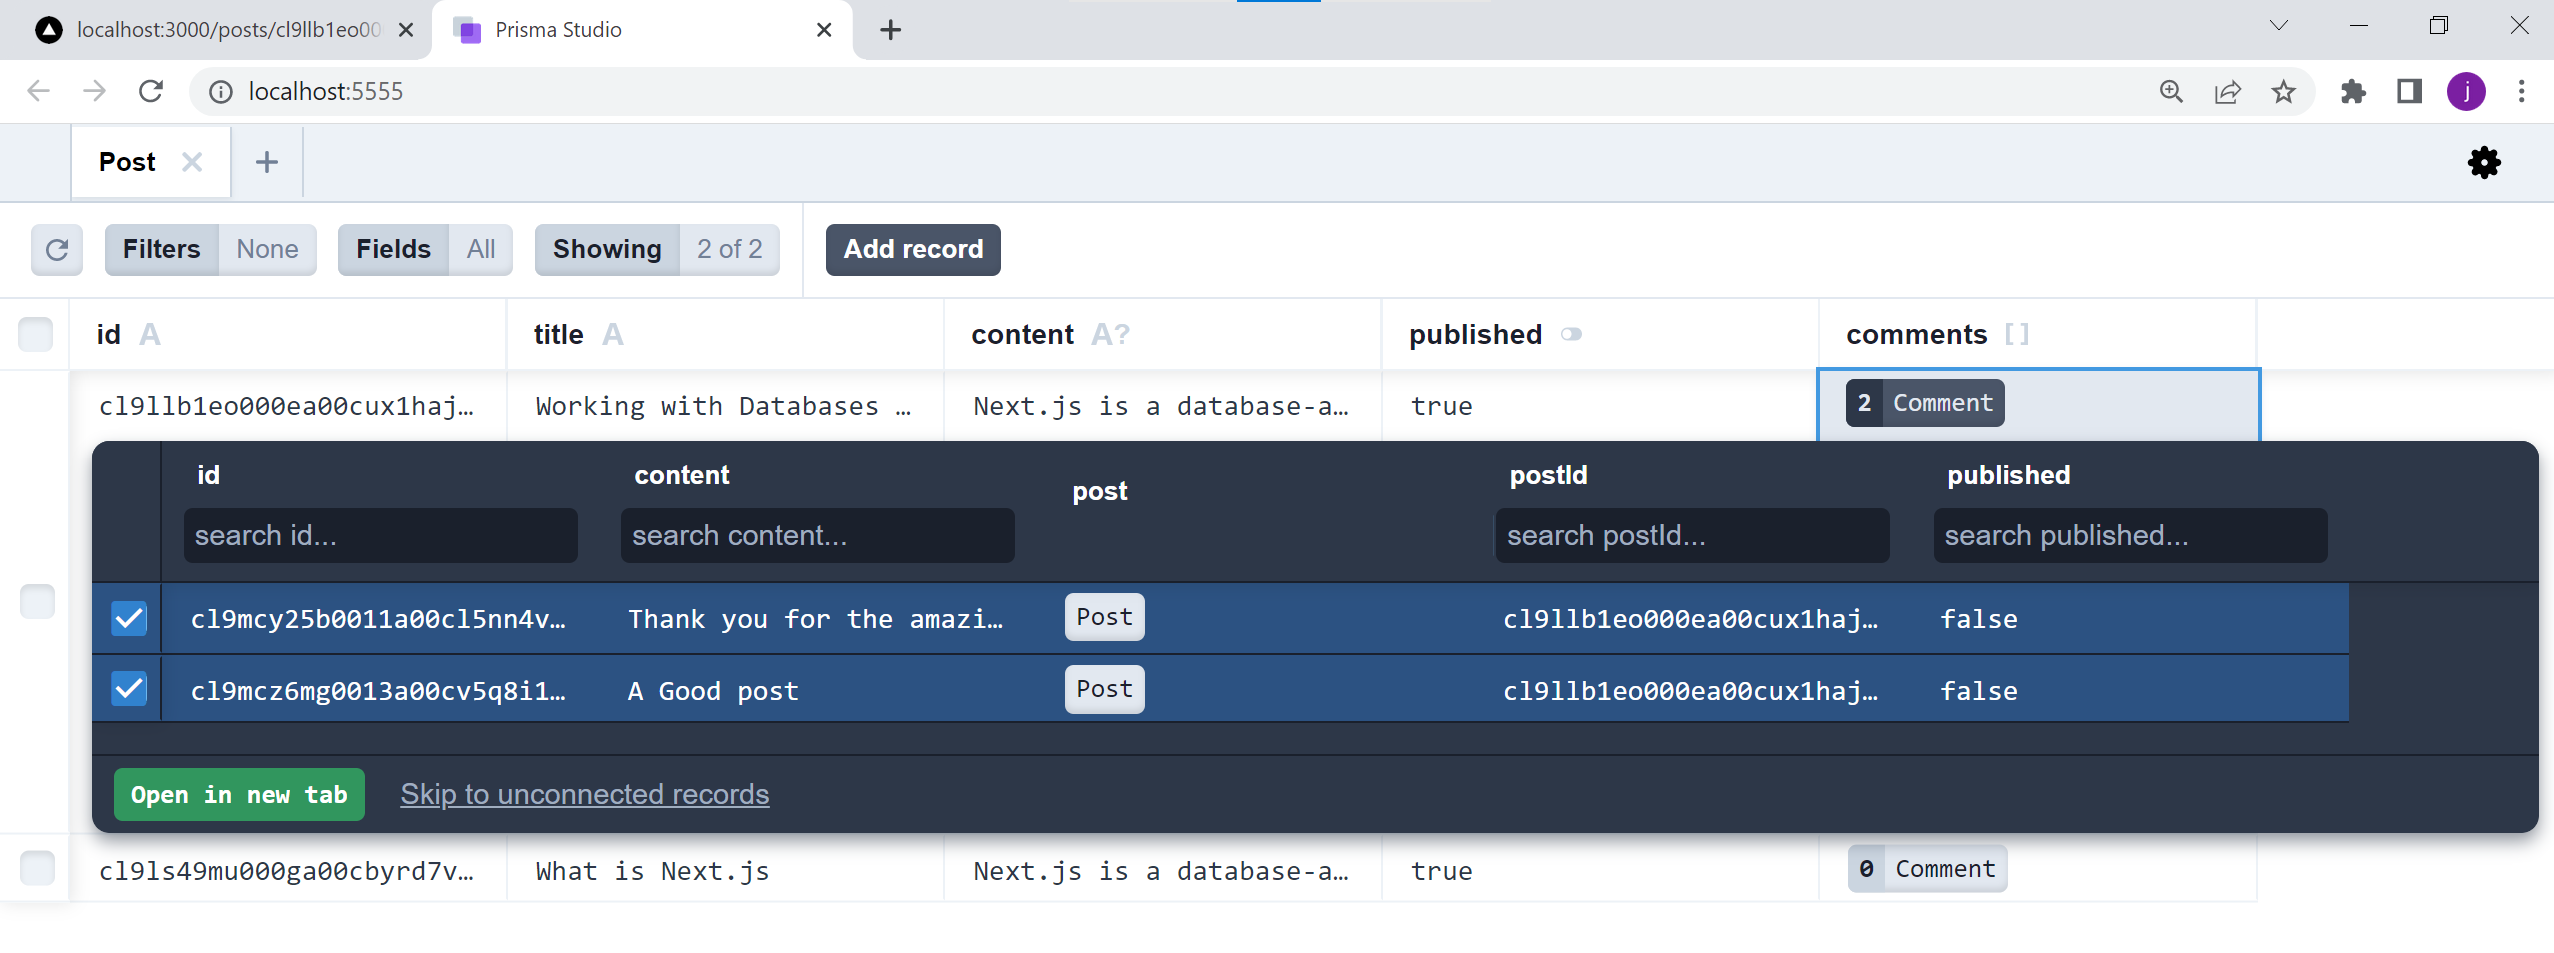
<p><img src="https://blog.openreplay.com/images/working-with-databases-in-next-js-using-prisma/images/image14.png" alt="14 Prisma studio comment table"></p>
<h2>
<a name="conclusion" href="#conclusion" class="anchor">
</a>
Conclusion
</h2>
<p>That's a wrap for this guide. You can now comfortably execute any operations to your database exclusively using Prisma and Next.js. For code references, check the application on <a href="https://github.com/kimkimani/Next.js-post-app">this GitHub repository</a>.</p>
<p>I hope you found this helpful. Happy coding!</p>
<blockquote>
<p>A TIP FROM THE EDITOR: For more on Prisma and Next.js, see how to manage authentication at <a href="https://blog.openreplay.com/authentication-and-db-access-with-next-prisma-and-mongodb/">Authentication And DB Access With Next, Prisma, And MongoDB</a>.</p>
</blockquote>
<p><a href="https://newsletter.openreplay.com/"><img src="https://blog.openreplay.com/newsletter_Z1P0UIP.png" alt="newsletter"></a> </p>


