This article was originally posted on Everything DevOps.
An engineer just joined their first company. While debugging an issue, their co-worker shared a patch (also known as diff) file to apply changes listed in the file to their local branch of the same Git repository.
The engineer could go line by line to retype and apply the changes, but doing so, will subject the code to human error. How can that engineer apply the changes easily?
In this article, you will learn:
- what a patch file is,
- how the co-worker created the patch file with the
git diffcommand, and - how the engineer can apply the changes using
git applycommand.
GitHub repository
This article will show screenshots of commands run on a cloned Git repository. Here is the GitHub repository.
What is a patch file?
A patch file is a file that contains changes to be applied to another file or files. A patch file records all the way files are different from each other. Patch files are sometimes called diff files and use .patch or .diff extension.
The git diff command and its use cases:
The git diff command works by outputting the changes between two sources inside a Git repository. The sources can be two different files, commits, branches, etc.
To understand the above explanations better, below are common use cases of the git diff command.
$ git diff
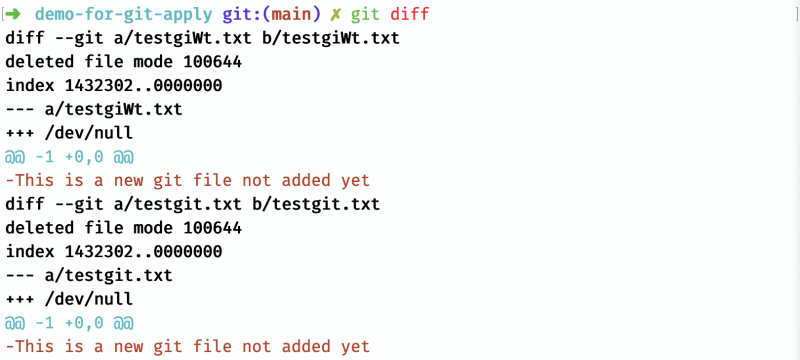
When you run the $ git diff command, it outputs all the modified changes which are you yet to add to Git.
See the image of $ git diff in use below:
$ git diff
When you run the $ git diff <filename> command, it will output the changes of the file (<filename>) to its previous committed state.
See image of $ git diff <filename> in use below:
$ git diff
When you run $ git diff <branch_1_name> <branch_2_name> command, it will output the modifications between the two branches.
See image of $ git diff <branch_1_name> <branch_2_name> in use below:
Also, you can output the changes of your current branch to the mentioned branch to its previous committed state using just $ git diff branch_name. See the example image below:
$ git diff --staged path/to/file
When you add changes to Git or move the change to staging, you will not be able to see the difference between the files. You can use the git diff command with --staged or --cached option to see the staged changes.
$ git diff commit_id1 commit_id2
When you want to see the difference between any two commits, you can use the $ git diff commit_id1 commit_id2 command.
To get the id's of the commits you want to see the difference in, use the $ git log command to see the list of commits (starting from the latest commit) made in the Git repo and their respective commit ids.
Creating a Git patch file with git diff
For the co-worker to create the Git patch file they shared with the engineer, they used any git diff commands you saw above to get the changes. And then save the changes to a patch file using >, as you can see below.
$ git diff > patch_file.diff
Or
$ git diff commit_id1 commit_id2 > patch_file.diff
Or
$ git diff <filename> > patch_file.diff
, etc.
The above command will create the patch file in the current working directory, as seen in the image below.
Also, remember that the file can also have a .patch extension.
Applying a Git patch file using git apply
After the created patch file has been shared with the engineer, they can apply it in the directory of the Git repository that requires the change using the command below.
$ git apply patch_file.diff
For more information about the git apply, check out its man page.
Conclusion
This article showed you how Git patch files are created using git diff and how the patch changes can be applied using git apply.
There are other ways to apply changes from a patch file. To learn more about them, check out this conversation on stackoverflow.


