This article was originally posted on Everything DevOps.
cron is a time-based scheduling utility program. With cron, you can launch routine background jobs at specific times, days, months, etc., on an ongoing basis. The jobs launched are referred to as cron jobs.
The cron utility program is driven by a configuration file called /etc/crontab (cron table), which contains various shell commands that need to be run at scheduled times.
There are two types of crontab files, the system-wide crontab files, and the individual user crontab files. Each line of a crontab file represents a job and is composed of a cron expression, followed by a shell command to execute.
In this article, you will:
- see some uses of the
cronutility, - understand the structure of a crontab file, and then
- learn how to schedule a periodic task on Linux with
cron.
Prerequisite
To follow this article, you need access to a Linux distribution terminal window. This article uses a Linux Ubuntu 22.04 (LTS) x64 distibution.
Uses of cron
There are several cases where you, as a Linux user, would want to schedule tasks with cron; a few of them are:
- To schedule automated updates.
- To back up data at a specific time of the hour, day, month, year, etc.
- And so much more.
Understanding a crontab file
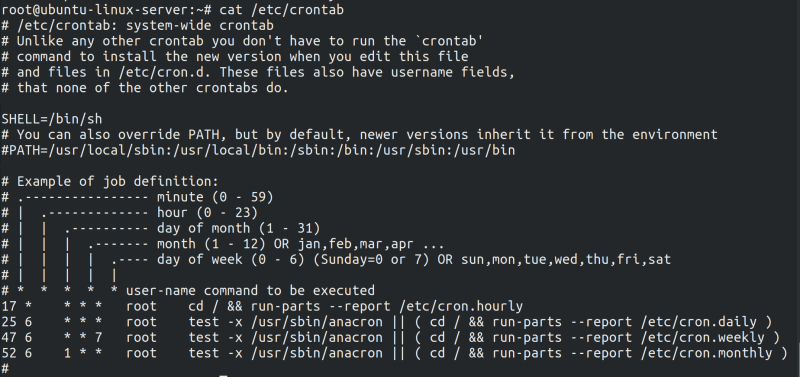
To understand a crontab file, in the terminal window of your Linux machine, run the command below to print out the content of /etc/crontab configuration file.
$ cat /etc/crontab
After running the command, you will get an output similar to the image below.
The above image is a crontab file. And each line uncommented out with the # symbol is a cron job, as you can see in the annotated image below.
There are several sections for each cron job in the annotated part above, and each section is responsible for a specific aspect of scheduling the job.
Structure of a **cron** job
To explain the sections in a cron job, here is the first job on the above crontab file:
17 * * * * root cd / && run-parts --report /etc/cron.hourly
In the above cron job, the time interval 17 * * * * (a cron expression) means to run at 17 minutes past every hour. And the job is to change into the / (the root of the filesystem) directory. Then, as the root user, run the run-parts binary to execute all jobs in the /etc/cron.hourly file.
As seen above, in cron jobs, time intervals are denoted by numbers and operators filled in place of each asterisk. From left to right, the asterisks represent:
- Minute set as a number from 0 to 59.
- Hour set as numbers from 0 to 23.
- Day of the month set a number from 1 to 31.
- Month set as numbers from 1 to 12 OR jan, feb, mar, apr etc.
- Day of the week set as numbers from 0 to 7, with Sunday = (0 or 7) OR sun, mon, tue, wed, thu, fri, sat.
To learn more about cron expressions, see the man page of crontab.
Creating a cron job
To create and manage cron jobs, you need to edit the crontab file using the crontab command — a dedicated command for the crontab system.
To create a cron job, in the terminal window, run the command below to edit the crontab file:
$ crontab -e
After running the above command, you will be prompted to choose the editor you’d like to use to edit the crontab file, as in the image below.
Press enter to choose the default editor — nano, the easiest to use editor option.
Editing the crontab file to create **cron** jobs
After pressing enter, the crontab file of the logged-in user will open up in the nano editor, as in the image below.
The annotated part in the above image /tmp/crontab.YgyqTN/crontab shows that you are currently editing a temporary file that will become an actual crontab file when saved.
Next, scroll down to the end of the crontab to create a cron job in the line with the blinking cursor (caret) similar to the image below:
Next, you will add a cron job to the crontab.
Adding a **cron** job to the crontab
For demo purposes, below is a cron job to execute a command at 11:13 AM every day.
13 11 * * * echo "this is a test job" > testfile.txt
The command in the above cron job is to create and write "this is a test job" to a testfile.txt.
After adding a cron job to a crontab, you use CTRL + O to save the file and then CTRL + X to exit the nano editor, as in the image below.
At the time of writing this article, the time is 11:09 AM:
And when I run the list files command ls, there is no testfile.txt file:
But once it reaches or passes the 11:13 AM time, I can see that the testfile.txt file has been created and written.
Viewing cron jobs in a crontab file
To view cron jobs in the crontab file for the current logged in user, in your terminal, run:
$ crontab -l
After running the above command, you will see the cron jobs similar to the image below at the tail end of the file.
Conclusion
In this article, you learned about the cron command-line utility, the crontab file, and how to create cron jobs to schedule periodic tasks. There is much more you can do in cron, like running jobs as other users, redirecting cron job messages, etc.
Resources
To learn more about cron, check out the following resources:


