Table of Contents
- Introduction
- Why are you getting data just by visiting the API site?
- Postman 📬
- Thinking further about APIs
- More resources
- Conclusion
Introduction
This is the 2nd part of a tutorial series of 3 articles, and it assumes that you have read the previous article (you can refer to the series navigation list above!).
If you have not, head over there now 🏃🏃🏃
In the last episode...
We learnt how to inspect elements on the frontend in the previous episode (be sure to read it), so this time we will do more backend related stuff!
In Part 2 (this article), we will cover the bolded sections below in the learning objectives checklist.
Learning Objectives Checklist
- [ ] Web Project Navigation Skills using the Browser Inspector
- [ ] Inspect Elements
- [ ] Inspect Network
- [ ] Debugger
- [ ] Learn to use Postman to
- [ ] Make requests to an API
- [ ] Make documentation for API and publish it
- [ ] Use the API data you retrieved to populate a simple website
Questions
And also, I have previously left you with the following questions regarding the API
- But why are you getting data just by visiting the API site?
- And how do you get more specific resources?
In this article, we will address these questions in detail! 🥁
Why are you getting data just by visiting the API site?
Whenever you visit any site, you are making a GET request to that site to get resources that are available at that site.
As a warmup, let's think about what data is in the context of web development.
Consider the following types of entities:
-
cutePicture.jpeg- a picture -
index.html- a HTML file -
public/static- a folder -
env.json- a JSON file -
string someText;- a primitive data type -
file.js- a Javascript file -
{"key": "value"}- an object
Which of these are data? Which of these are resources?
all of them! Data is a very generic term for anything that represents information. But what about resources 🤔? Combining a few definitions found online, this is the definition of a web resource. A web resource is any identifiable thing, whether digital, physical, or abstract that can be obtained from the World Wide Web (WWW). If we follow this definition, then all of the above fits the bill as well!The answer is ...
Now let's understand how your web browser obtains such resources through requests.
What is a GET request?
The common HTTP request methods are:
- GET - get something! It's the most common HTTP request used online.
- POST - package something and send it off! Perhaps this method is why there is POST in Postman 😉
- PATCH - modify something!
- DELETE - byebye something!
If you're interested to know more about the HTTP request methods beyond the simple description that I've given, you can refer to the link from MDN Web Docs below.
Now, to know precisely what kind of data you are getting from the web while you're on the browser, let's learn to inspect the network.
Inspecting the network
Visit the completed product of our hands-on (yes, spoiler — but not really 😆), and now we will go into the steps for inspecting the network.
-
Go to the Inspector but this time, switch from the Elements tab to the Network tab.
-
Initially you will only see a text of
Recording network activity...
Perform a request or click Ctrl+R to record the refresh -
Let's follow what the browser tell us and refresh the page with
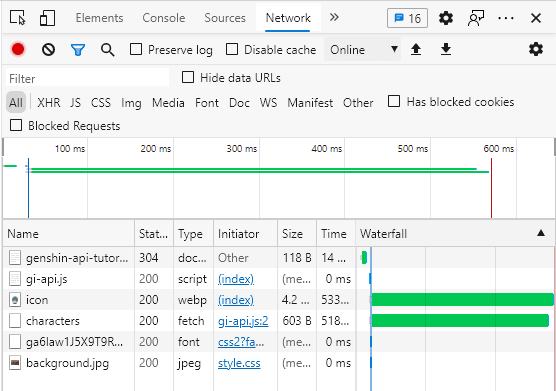
Ctrl+R. Do this without closing the Network tab of the Inspector. After refreshing, you can see different types of files being retrieved - documents, scripts, font and etc. You can also see the initiator - the file that requested the resource. For example, the
gi-api.jsand theiconare both requested by theindex.htmldocument.
Remember, this is the completed demo, and for now, we haven't created the JavaScript file in our project. But it is important to understand how to read the network tab where you get different kinds of resources.
To improve your understanding of how you are getting different data whenever you are visiting different sites, we will compare the result of inspecting the network on 2 sites: api.genshin.dev & the completed demo.
- While you're still on the completed demo, click on the genshin-api-tutorial document.
-
In the Headers tab, you can see that the Request method is GET, and under the Response tab, you can see the
index.htmlthat we worked on. -
On the other hand, if we inspect the network for api.genshin.dev, we can see that there is only 1 document retrieved.
When we click that document, similarly it shows us that the document is retrieved with the GET method, but the response only contained JSON data (the same as what we see in the previous lesson)
{"types":["artifacts","characters","domains","elements","materials","nations","weapons"]
Can I get the same data without using a web browser?
Of course! That's where Postman comes into play! 🌟
You can read here for specific use cases of Postman. In this tutorial series, what I'm essentially doing by teaching you Postman are parts of the use case of Developer Onboarding. The cyan highlighted parts are covered in this tutorial series, and I call it the **Lite* version*.
Annotated Screenshot of *How to use Postman to onboard developers by Postman*
Following the highlighted steps, we will:
- Explore the API
- Save API Calls with examples
- Write use case documentation
- Publish documentation and embed it with the Run in Postman button
Beware, learning how to use the Postman tool as a newbie is not going to be easy! 💦 But the good news is that the Genshin Impact API is very simple 🌻 - it only has endpoints for GET requests.
Endpoints refer to the request URL that we make the request to, and the most upvoted stackflow answer for answering what is an endpoint has great examples to illustrate that.
Let's begin!
Postman 📬
1. Explore the API 👀
{"types":["artifacts","characters","domains","elements","materials","nations","weapons"]
From the JSON that we have gotten previously by making a GET request to "https://api.genshin.dev", you can see that there are various types of resources available. Let's try to request for them using Postman.
-
Open up the Postman app, and you will see that by default we will be at the Collections tab, and in this tutorial, that is where we will be at for the whole time.
-
Click on the "New" button and you will see a popup for what kind of new item you want to create.
-
Create a new request. Name it "Test" and add it to a new collection, say "api.genshin.dev", then click the Save button.
You will see a new request window in your Postman app, with the default GET method.
Enter "https://api.genshin.dev/characters" into the request URL, then click the Send button. This is how you make a request in Postman!
-
If successful, you will see a JSON response with the type of characters available.
-
Now let's try getting the data of a specific character, say Klee (the cute girl you saw in the banner of the previous article)
- while the various text descriptions of the character will be helpful to add meaning to our site, ultimately people are most attracted to the visuals when they first visit the site 👀
- Although this is not explicit in any of the request responses and the
README.md, it is possible to obtain the character icon and image as well!
-
To obtain the character icon, make a request to "https://api.genshin.dev/characters/klee/icon".
-
To obtain the character portrait, make a request to "https://api.genshin.dev/characters/klee/portrait"
-
For both types of images, they are by default of .webp file extension. You can convert it to other file formats by adding the filetype behind when you make the request. For example, "https://api.genshin.dev/characters/klee/icon.jpg" will give you a .jpg file resource. Notice the black background in the photo now.
-
Now, let's try getting the data of Xingqiu. You can get similar data by following steps 5-8 and replace the character's name in the request URL.
- You will see the same values as the hard-coded values demo. This was where I copied and pasted the values from 😆
- But of course, we want to be more efficient in getting this data to display on our website rather than copy pasting every time. Is there a way to get our project to do the GET request like Postman? Yes there is and it will be addressed in the Part 3 article. This article focuses on API testing with Postman, so the skills you learn here will be applicable to other projects beyond the demo project. 😉
Try playing around with the other types of characters and other resources as well! Get comfortable making requests to different URLs.
For the image-related steps, you might be wondering how I knew the request URLs that I can make a request to - I just asked the developers of this repository!
- As mentioned earlier, this API is pretty new and maintained by only a few developers, so the documentation was not extensive.
- However, they do have a support channel in the form of discord for questions (you can see this on https://genshin.dev/).
- And that is the beauty of open-sourced community APIs! You could always read around their documentation or repository README.md to see how to reach out to get help or even contribute.
- However, the fact still stands that the lack of documentation and examples is a hindrance for potential users to try out APIs. Hence we will try to build the use cases of "Saving API calls with examples" and "Write use case documentation" with Postman! ✨
2. Saving API calls with examples 📁
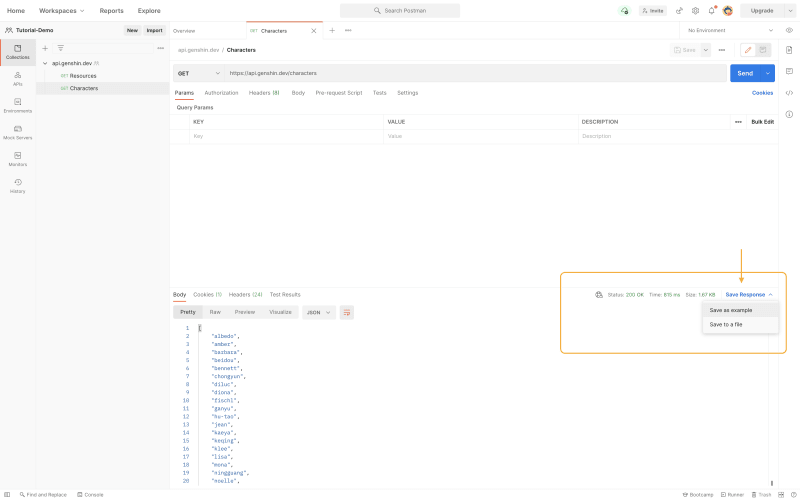
If you were vigilant while you are exploring the API using Postman, you might have already caught a glimpse of a special button that helps you save the call as an example!
Screenshot of the location of the "Save Response" button
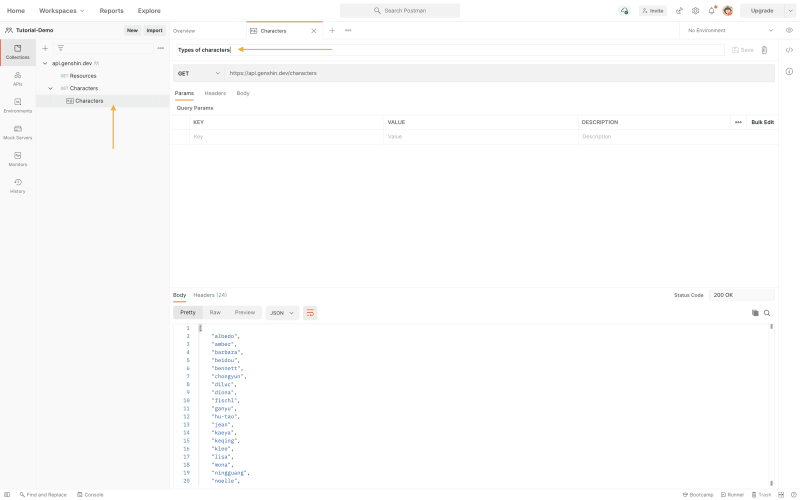
Afterwards, for each of the requests that you have saved you will have a dropdown for the examples corresponding to that API. You can name your example
This will help users that have the same collection of requests as you to see quickly at a glance how to use the API directly. For example, they can first click on the example named "Types of characters" to see what characters are available and then proceed to the next example named "Specific character information" to see how to form the specific request URL to perform the GET request.
3. Write use case documentation ✏️
There are a few places that you can add documentation for a Postman collection.
- The collection's description
- Specific requests in the collection
You can add description to specific requests by finding and clicking the Pencil icon ✏️, usually located next to the name of collection/request.
Some possible documentation that a developer could add for an API include:
- Who made this documentation
- Who developed the API
- The purpose of the API (e.g. this API complements XXX feature)
- Version of API (e.g. you can have v2 for
/charactersand v5 for/artifacts) - Date of when the documentation is last updated
But since we are just experimenting with this feature of Postman, feel free to put down anything 😆
For any API documentation, it's really up to the development team what they want to show the public and*/or* for the internal team.
4. Publish documentation and embed it with the Run in Postman button
In traditional documentation many many years ago, you had to manually write down the request URL and any necessary parameters, headers or body. That was pretty laborious and probably still is the process for certain APIs (I am unable to give you any of such examples 😅). But now many more tools exist to help you generate documentation. Postman is one of them!
After you have finished saving the examples and writing the documentation, you can publish it to the world! These are the steps to do it.
At the collection page, click the options button, then go to View Documentation

At the View Documentation page, click Publish.
-
You will see a new window open in your browser for publish settings. Let's leave them as default for now.
-
Click Publish, and you will see that your documentation is published and how you can access it.
-
Go to the documentation and have a look around! Some noteworthy things at the navigation bar:
- Run with Postman button: this allows users to easily have a copy of your collection and run it in their own Postman! Yes, that means they don't need to remake the requests that you already have made!
- Language: You can change the language you are using to make the request, and you will see that the example request change instantly for all the example calls you have created. This is very useful for developers coming from different backgrounds and technical skillsets to use the API!
If you have reached this step, GREAT JOB!!! 👏 👏
We have cleared the Developer Onboarding Lite journey together! Although we have just covered the surface of what Postman has to offer, what you have learnt will benefit you through many web developent projects that you will work on in the future!
For your own reflection, refer back to the Learning Objectives Checklist to see if you have understood and able to apply the technical concepts that you have learnt. But with that, we should have checked most of our learning objectives checklist for this tutorial series.
Learning Objectives Checklist
- [ ] Web Project Navigation Skills using the Browser Inspector
- [x] Inspect Elements
- [x] Inspect Network
- [ ] Debugger
- [x] Learn to use Postman to
- [x] Make requests to an API
- [x] Make documentation for API and publish it
- [ ] Use the API data you retrieved to populate a simple website
In the next article, we will cover the last bit on the Browser Inspector Debugger and how to use this API data to populate our project site!
Thinking further about APIs
- I have mentioned the ideal scenario 🌻 that if the API is open-source and has some documentation or support channel, you can utilize them.
- But if neither is present and for some reason you really really want to use the API (stares at some of the Amazon Command Line Tools... 👀), it is possible to dig into the source code to figure out how to use it.
- Of course, do it at your own risk. Lack of documentation could be a sign that the API is not production-ready and is not meant for you to use yet.
- Extra: After you figure out how to use it, you could even submit a Pull Request (PR) to improve the API documentation✨ Do remember to read the repository's
CONTRIBUTING.mdif there is any to follow their guidelines of submitting a PR!
- It is actually easy to make and use an API. Whether the API will be well-designed, well-maintained or well-documented though, those are separate questions altogether 😃 Always consider your use cases for the APIs.
- If you are using an API, it is important to know what the API offers and the limitations of the APIs. Many APIs offer different price plans for different usages.
More resources
- The MDN Web Docs is your go-to portal for web development related knowledge, it has content clearly written from the fundamentals to the advanced level.
- If you are keen on exploring what are APIs and how to design them in more depth, I would recommend API in plain english by freeCodeCamp (thanks @quincylarson !)
- A relevant podcast you should listen to is since we are on the topic of Postman: CodeNewbie Podcast S15:E5 - What you need to know about APIs (Sue Smith)
Conclusion
GET /readers?feeling=enlightened,happy,proud,satisfied
😁 I hope your name is returned in the response of this request. Part 3 will be coming soon and it will be the finale of this series! We will learn to finally populate our demo project with actual API data!
Thank you very much for staying through this tutorial! 🌟
Leave a heart 💌 and a unicorn 🦄 if you enjoyed the article! If you have any feedback on my writing style or how the tutorial can be improved, please leave a comment below 😄


