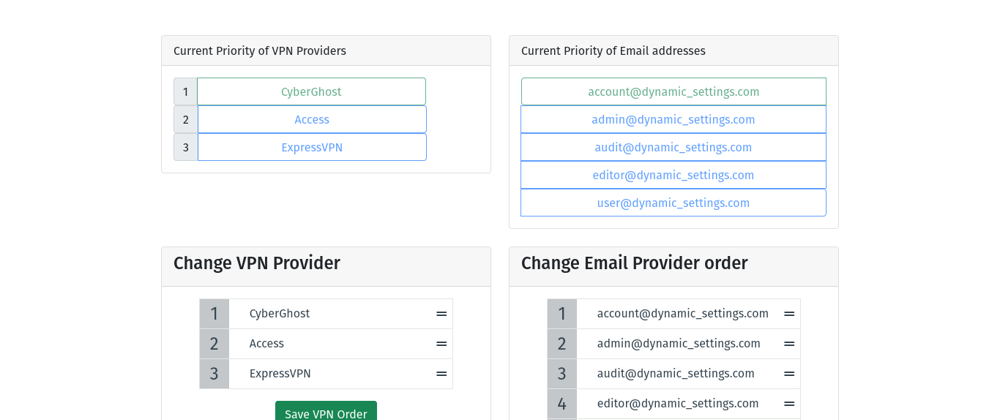
The user interface has been updated to include sortable list using HTML5 drag-and-drop feature with some bunch of JavaScript. As a result, the codes in core/views.py and by effect, core/tests.py have been modified. All these changes are available in this article's GitHub repository.
Motivation
I worked on a task a while ago where I was to make some Django's global setting's variables dynamic. With the contraint that data persistence is important and that the persisted setting's data shouldn't have more than one occurrence throughout the app. These setting's variables should be accompanied with an interface where their values can be changed/updated dynamically and the updated values should immediately be available to other modules requiring their usage. After a couple of research or googling, I found 1, 2, and 3 among others. I also came across Django packages such as constance and co., which help make Django settings dynamic. The settings can then be updated via Django's Admin's interface. Using these packages was an overkill for my use case and I also need more flexibility and control on its implementation so as to have 100% code testing coverage. So, I decided to roll out my implementation, standing on the shoulders of these blog posts and packages.
Assumptions
It is assummed that readers are pretty familiar with Django and JavaScript as well as the typed extension of Python using mypy, typing built-in module, and PEP8.
You should also be familiar with writing tests for Django models,methods, views and functions. I didn't mean you should be militant at that though.
I also assumed that you have gone through at least, this blog post, 1, to get more acquainted with the pattern being discussed and the formal problem being solved.
And, of course, HTML, and CSS (and its frameworks — Bootstrap for this project) knowledge is needed.
Source code
The entire source code for this article can be accessed via:
A simple demonstration of changing django global settings dynamically at runtime without server restart
dynamic_settings
This repository accompanies this tutorial on dev.to. It has been deployed to heroku and can be accessed live via this link.
Run locally
It can be run locally by first editing dynamic_settings/settings.py to reflect your PostgreSQL database configuration or create a .env file in your root directory and put the following in:
DB_NAME=your database name
DB_USER=your database user's usernameDB_PASSWORD=your database password
Then, create a virtual environment using any of venv, poetry, virtualenv, and pipenv. I used virtualenv while developing the app. Having created the virtual environment, activate it and install the project's dependencies by issuing the following command in your terminal:
Ensure you have activated your virtual environment, installed Django, created a Django project with a suitable name (I called mine, dynamic_settings), and proceeded to create a Django app. From my end, my app's name is core. Open up your settings.py file and append your newly created app to your project's INSTALLED_APPS:
# dynamic_settings -> settings.py
...INSTALLED_APPS=['django.contrib.admin','django.contrib.auth','django.contrib.contenttypes','django.contrib.sessions','django.contrib.messages','django.contrib.staticfiles','core.apps.CoreConfig',# add this line
]...
Also, using this opportunity, configure your templates directory and change your database to PostgreSQL. PostgreSQL was chosen because I needed to use it's special ArrayField in our model definition.
# dynamic_settings -> settings.py
...TEMPLATES=[{'BACKEND':'django.template.backends.django.DjangoTemplates','DIRS':[BASE_DIR/'templates'],# make this line look like this
'APP_DIRS':True,'OPTIONS':{'context_processors':['django.template.context_processors.debug','django.template.context_processors.request','django.contrib.auth.context_processors.auth','django.contrib.messages.context_processors.messages',],},},]...DATABASES={'default':{'ENGINE':'django.db.backends.postgresql_psycopg2','NAME':'database name','USER':'database username','PASSWORD':'database user password','HOST':'localhost','PORT':5432,},}...
Because of this, you need to install psycopg2-binary so that Django can talk effortlessly with your PostgreSQL database.
To wrap up the preliminaries, create a urls.py file in your newly created Django app and link it to your project's urls.py.
# dynamic_settings -> urls.py
...urlpatterns=[path('admin/',admin.site.urls),path('',include('core.urls',namespace='core')),# this line added
]...
Now to the main deal.
Step 2: Singleton Model
Open up your app's models.py and fill it with the following:
# core -> models.py
fromtypingimportAnyfromdjango.contrib.postgres.fieldsimportArrayFieldfromdjango.dbimportmodelsdefget_default_vpn_provider()->list[str]:"""Return a list of providers."""return[gvp[0]forgvpinGenericSettings.VPN_PROVIDERS]defget_from_email()->list[str]:"""Return a list of email addresses."""return[gea[0]forgeainGenericSettings.FROM_EMAIL_ADDRESSES]classGenericSettings(models.Model):VPN_PROVIDER_ACCESS='Access'VPN_PROVIDER_CYBERGHOST='CyberGhost'VPN_PROVIDER_EXPRESSVPN='ExpressVPN'VPN_PROVIDERS=[(VPN_PROVIDER_ACCESS,'Access'),(VPN_PROVIDER_CYBERGHOST,'CyberGhost'),(VPN_PROVIDER_EXPRESSVPN,'ExpressVPN'),]ADMIN_FROM_EMAIL='admin@dynamic_settings.com'USER_FROM_EMAIL='user@dynamic_settings.com'FROM_EMAIL_ADDRESSES=[(ADMIN_FROM_EMAIL,'From email address for admins'),(USER_FROM_EMAIL,'From email address for users'),]default_vpn_provider=ArrayField(models.CharField(max_length=20),default=get_default_vpn_provider)default_from_email=ArrayField(models.CharField(max_length=50),default=get_from_email)defsave(self,*args,**kwargs):# type: ignore
"""Save object to the database. All other entries, if any, are removed."""self.__class__.objects.exclude(id=self.id).delete()super().save(*args,**kwargs)def__str__(self)->str:"""String representation of the model."""returnf'GenericSettings for {self.id}'@classmethoddefload(cls)->Any:"""Load the model instance."""obj,_=cls.objects.get_or_create(id=1)returnobj
This model basically has two fields namely, default_vpn_provider and default_from_email, both are ArrayFields of strings. In Python terms, they are simply lists of strings, list[str]. What makes this model a singleton is the save overide method:
defsave(self,*args,**kwargs):# type: ignore
"""Save object to the database. All other entries, if any, are removed."""self.__class__.objects.exclude(id=self.id).delete()# This line does the magic
super().save(*args,**kwargs)
It ensures that only one row is allowed to be saved. Any other ones are deleted. A nifty classmethod, load() was also defined to get or create a model instance whose id is 1. Still in conformity with the above claim. Make migrations and then migrate your models.
Step 3: Test the model
Now to our tests. Open up tests.py file and make it look like the following:
# core -> tests.py
fromdjango.testimportTestCasefromcore.modelsimportGenericSettingsclassModelGenericSettingsTests(TestCase):defsetUp(self)->None:"""Create the setup of the test."""self.generic_settings=GenericSettings.objects.create()deftest_unicode(self)->None:"""Test the representation of the model."""self.assertEqual(str(self.generic_settings),f'GenericSettings for {self.generic_settings.id}',)deftest_first_instance(self)->None:"""Test first instance function."""self.assertEqual(self.generic_settings.id,1)deftest_load(self)->None:"""Test the load function."""self.assertEqual(GenericSettings.load().id,1)deftest_many_instances(self)->None:"""Test many instances of the model."""deftest_for_instance()->None:"""Test each instance of the model."""new_settings=GenericSettings.objects.create()self.assertEqual(new_settings.default_vpn_provider,['Access','CyberGhost','ExpressVPN'],)self.assertEqual(new_settings.default_from_email,['admin@dynamic_settings.com','user@dynamic_settings.com'],)test_for_instance()test_for_instance()test_for_instance()self.assertEqual(GenericSettings.objects.count(),1)
They ensure our claims are properly tested and validated and the model has 100% coverage. To know our code coverage, install coverage.py and run the tests:
(env) sirneij@pop-os ~/D/P/T/dynamic_settings (main)> pip install coverage

(env) sirneij@pop-os ~/D/P/T/dynamic_settings (main)> coverage run  manage.py test core

(env) sirneij@pop-os ~/D/P/T/dynamic_settings (main)> coverage html
The source code contains some configs that help coverage know the files to exclude from reports. The last command generates an htmlcov/ folder in your root directory. Open it up and locate index.html. View it in the browser. You can click on the files listed and check where you have covered and not covered. For these our tests, we have a 100% code coverage!!! Next, let's implement the view logic of our app.
Step 4: View and API logic
Make your views.py look like this:
# core -> views.py
fromdjango.http.responseimportJsonResponsefromdjango.shortcutsimportrenderfrom.modelsimportGenericSettingsdefindex(request):"""App's entry point."""generic_settings=GenericSettings.load()context={'generic_settings':generic_settings,'vpn_providers':GenericSettings.VPN_PROVIDERS,'email_providers':GenericSettings.FROM_EMAIL_ADDRESSES,}returnrender(request,'index.html',context)defchange_settings(request):"""Route that handles post requests."""ifrequest.method=='POST':provider_type=request.POST.get('provider_type')ifprovider_type:ifprovider_type.lower()=='vpn':generic_settings=GenericSettings.load()vpn_provider=request.POST.get('default_vpn_provider')default_vpn_provider=generic_settings.default_vpn_provider# put the selected otp provider at the begining.
default_vpn_provider.insert(0,default_vpn_provider.pop(default_vpn_provider.index(vpn_provider)),)generic_settings.save(update_fields=['default_vpn_provider'])response=JsonResponse({'success':True})elifprovider_type.lower()=='email':generic_settings=GenericSettings.load()selected_email_provider=request.POST.get('default_from_email')default_email_provider=generic_settings.default_from_email# put the selected sms provider at the begining.
default_email_provider.insert(0,default_email_provider.pop(default_email_provider.index(selected_email_provider)),)generic_settings.save(update_fields=['default_from_email'])response=JsonResponse({'success':True})returnresponsereturnJsonResponse({'success':False})returnJsonResponse({'success':False})
They're pretty simple views. The first, index, just loads our index.html file and make available the context values defined. As for change_settings, it does exactly what its name implies — change the settings variable. It returns JsonResponse, setting success to be either True or False. Though lame or HTTP status codes should have been returned instead. Add these views to your app's urls.py: