This article originally appeared on my personal blog.
All code on Github.
In previous articles (1 and 2) I walked through how to add Webpack and Typescript to a Visual Studio ASP.NET Core MVC project.
It turned out to be quite a cumbersome and error prone process and it is not something you wish for your worst enemy to go through twice (or maybe you do - I don't know).
Luckily, it is quite easy to create your own project templates for Visual Studio so that you can repeatedly create new projects with the same setup.
As you probably know, you can create new projects for Visual Studio by using the dotnet new command. For example you can create a new ASP.NET Core MVC project by running
dotnet new mvc -n "MyFacebookKillerApp"
Type dotnew new to list all available templates.
Wouldn't it be nice if we could do the same thing for our ASP.NET MVC with Webpack and Typescript thingy project? Fortunately, we can (otherwise this would be a very uinteresting article).
First step is to configure our template.
Configuring the Template
Start by creating a folder named ".template.config" at the root folder of your solution. This is typically where the .sln file is sitting.
Create a file named "template.json" inside the ".template.config" folder. Insert the following into the file and change the relevant properties (such as author, identity, shortName, and sourceName):
{
  "author": "Jakob Christensen",
  "classifications": [ "Web" ],
  "name": "ASP.NET MVC Core with Knockout/Webpack/TypeScript",
  "identity": "t4rzsan.MvcKnockoutTypeScript", // Unique name for this template
  "shortName": "mvcknockouttypescript", // Short name that can be used on the CLI
  "tags": {
    "language": "C#"
  },
  "sourceName": "CoreWebApplication2", // Will replace the string 'CoreWebApplication2' with the value provided via -n.
  "preferNameDirectory": true,
  "exclude": [ "**/[Bb]in/**", "**/[Oo]bj/**", ".template.config/**/*", "**/*.filelist", "**/*.user", "**/*.lock.json", "**/node_modules/**/*" ]
}
Choose something brief but meaningful for "shortName". This is the name that you will use when running the dotnet new command.
The property "sourceName" is important. When the template runs, the string "CoreWebApplication2" will be replaced by whatever the user specifies for the -n(ame) parameter for dotnet new. The text will be replaced in all files. That includes namespaces in .cs files and renaming of .csproj files. So you must change "CoreWebApplication2" to whatever you used as project name for the solution, you are using as template for your template (if you know what I mean).
I have set "preferNameDirectory" to true which means that dotnet new will use the name of the current folder as project name if -n has not been specified.
When you are done with the configuration it is time to register the template.
Registering the Template
You install the template by running the command dotnet new --install [folder] where [folder] is the path to the parent folder of ".template.config". So, for me that would be
dotnet new --install C:\Users\Jakob\Source\Repos\CoreWebApplication2
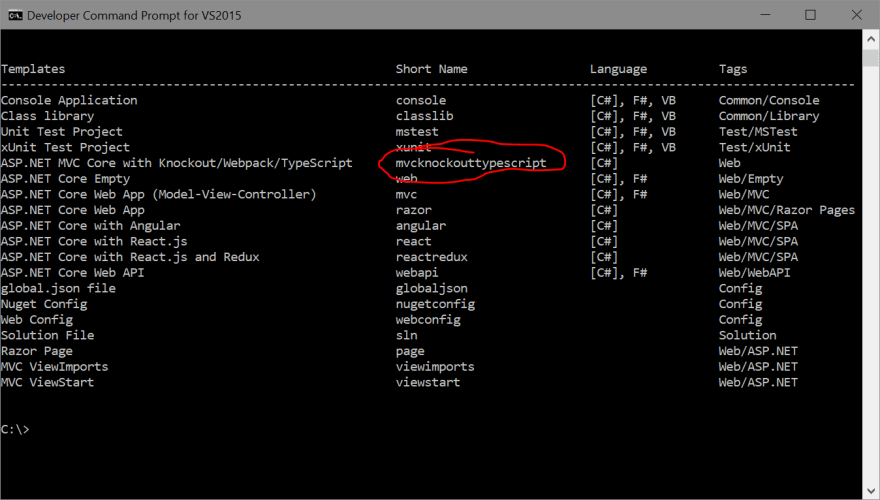
When listing the installed templates you will we your own short name in the list:
Finally, let's see if it works.
Using the Template
Create a new folder somewhere for your new project and CD your way to the folder in the command prompt. Start by typing (insert your own short template name):
dotnet new mvcknockouttypescript
That's it. Very cool!
By the way, Don't forget to update npm and install all dependencies for the new project (if you are like me you always forget this).
npm update npm@latest -g
npm install
npm run build


