Intro
In this blog, I’m going to be showing you step-by-step how to configure your Starship prompt to look as close as possible to powerlevel10k.
If you don't like reading, check out the Youtube video instead:
Step-by-step setup
First of all, if you don't have Warp installed, you can install it by running:
brew install warp
You're also going to want a Nerd Font, which will allow you to see all the cool icons & glyphs included in the prompt. I'm using DroidSanMono, which you can download here.
Once you download this, open up the zip folder. Extract the files. Then type CMD + Space, and search up "Font Book". Paste your files into your Font Book directory.
Once you do that, open up your Warp terminal.
Go to Settings > Appearance > Text > Terminal Font, and set your font to DroidSansMono Nerd Font.
Let’s starting with setting up Starship. The first thing you’re gonna do is download Starship by running this command:
curl -sS [https://starship.rs/install.sh](https://starship.rs/install.sh) | sh
Once that’s done, you want to run:
vi ~/.zshrc
This is so that we can edit the ~/.zshrc file. Feel free to do this in whatever code editor you like (e.g. VS Code).
And scroll to the bottom, and add this line to the end of your ~/.zshrc file:
eval "$(starship init zsh)"
In Warp, you’ll need to go to:
Settings > Features > Session > Honor user’s custom prompt
Which will override Warp’s default out-of-box prompt with your Starship prompt.
Once you do that, you’ll see that Starship prompt is now your prompt. But it doesn’t look great, yet.

To customize Starship to look like p10k, you’re going to run this command:
mkdir -p ~/.config && touch ~/.config/starship.toml
Then you’re going to run:
vi ~/.config/starship.toml
and go to this link and copy paste the contents of this file into your starship.toml file.
Don't forget to save your changes!
You’ll see that now our prompt is looking fantastic.
To pull it all together, let’s download the theme that goes really well with this setup!
To do this, run:
cd ~/.warp/themes/
And then run:
vi coolnight.yaml
and go to this link and copy paste the contents of this file into your coolnight.yaml file.
Shoutout to Josean for the original creation of this theme for iTerm2
In Warp, go into Settings > Appearance, Theme, and type in “coolnight”. Click the theme that appears.
And there you have it! You now have a perfectly awesome powershell10k dupe in your terminal!
Conclusion
Here's a comparison of the end result.
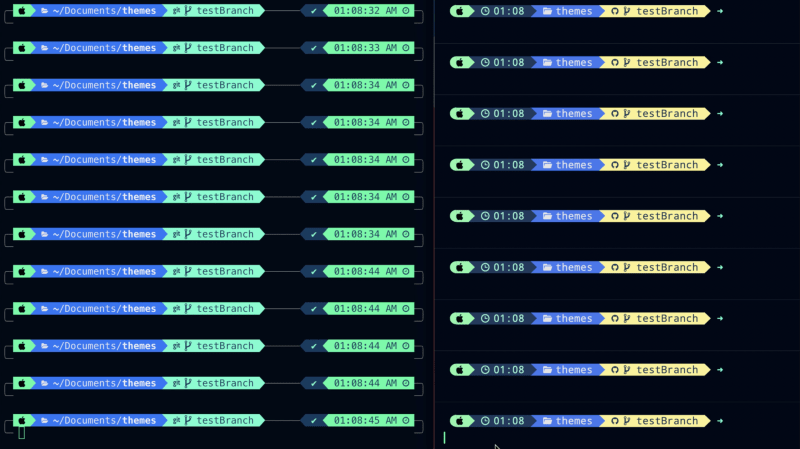
On the left is what my P10k setup looks like running on iTerm2. On the right is what my Starship setup looks like running on my Warp terminal.