In the previous post, we viewed an introduction to Tekton and a brief overview through its main components: Steps, Tasks and Pipelines.
Now, let's keep exploring the Tekton building blocks as we see a complete journey from development to production.
💡 First things first
We've been using the kubectl CLI and, despite it's good enough to work and visualize Tekton components, Tekton provides its own CLI that makes the job a little easier:
$ tkn pipelinerun list

NAME                   STARTED          DURATION   STATUS
hello-pipeline-x2s8p   26 minutes ago   8s         Succeeded
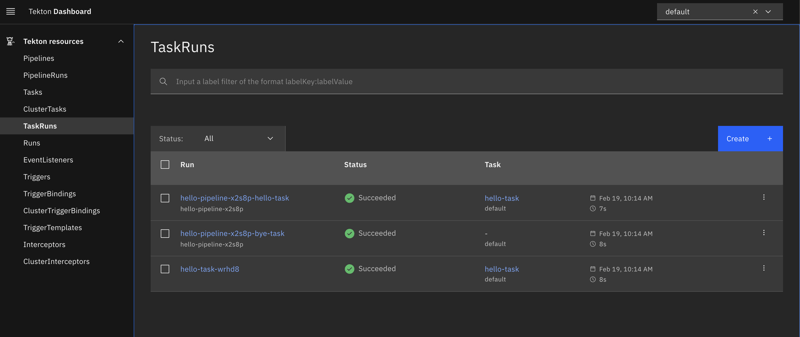
Even better, Tekton provides a nice UI dashboard so we can have a better user experience:
The good part is that we can port-forward the Dashboard since to localhost it's a service in Kubernetes. Furthermore, we could deploy an Ingress and create our own DNS in production environments.
For me, that's a great advantage, as I'm having my own CI/CD system under my own DNS.
❤️ Community matters
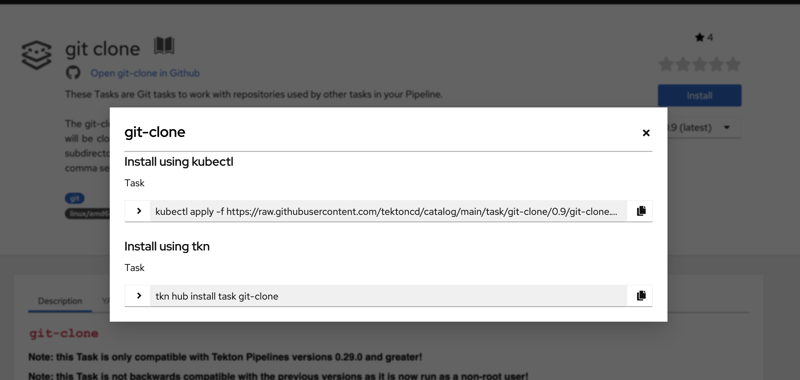
Because the Tekton community takes very seriously its adoption and development, many tasks can be reused by the community, so Tekton Hub was created.
One such common task is cloning an arbitrary Git repository, then it's time to add this Task to our cluster:
Using kubectl:
$ kubectl apply -f https://raw.githubusercontent.com/tektoncd/catalog/main/task/git-clone/0.9/git-clone.yaml
Or simply tkn:
tkn hub install task git-clone
Cool, but how do we use this task?
A simple pipeline
Our pipeline will be defined by two main tasks:
- git clone (using the Task we imported form the Tekton Hub)
- list directory after clone, issuing a dead simple
lscommand
apiVersion: tekton.dev/v1beta1
kind: Pipeline
metadata:
  name: my-pipeline
spec:
  params:
  - name: repo-url
    type: string
  - name: revision
    type: string
  tasks:
  - name: fetch-source
    taskRef:
      name: git-clone
    params:
      - name: url
        value: $(params.repo-url)
      - name: revision
        value: $(params.revision)
  - name: list-source
    runAfter: ["fetch-source"]
    taskRef:
      name: list-source
- Pipelines and Tasks allow to declare params, that are sent by PipelineRuns in runtime. In our case, the
repo-urlto clone from and therevision(commit or branch) - The first task is called
fetch-sourcewhich refers to thegit-clonewe imported - The second task runs after
fetch-sourceand is calledlist-source, which refers to another Task calledlist-source
Let's check out the Task list-source:
apiVersion: tekton.dev/v1beta1
kind: Task
metadata:
  name: list-source
spec:
  steps:
  - name: ls
    image: ubuntu
    script: >
      ls
It's just a Pod having an ubuntu container which issues the ls command. Very simple, uh?
Tasks need to share information through Volumes
But remember one important thing: Pods don't share Volumes by default. Therefore, different tasks do not share information. By which means the task list-source won't "see" the cloned repository from the fetch-source Task.
How does Tekton solve this problem? Enter Workspaces.
📦 Workspaces
Workspaces in Tekton are similar to Volumes in Kubernetes and Docker. Different Tasks can share workspaces so data goes over the Pipeline.
According to its documentation, the git-clone Task requires two params at least: a url for fetching the repository and a Workspace named output.
The pipeline/task usually declares the workspace and at runtime (through a PipelineRun or a TaskRun) the workspace is mounted in Kubernetes.
Workspaces can be ConfigMaps, Secrets, Persistent Volumes or even a volume EmptyDir which is discarded when the TaskRun completes.
📝 A note to emptyDir
This kind of volume only works through steps within a Task, but they do not work across different Tasks within a Pipeline. For Pipelines use Persistent Volumes instead.
Let's change our pipeline and task definitions. Add the following to the spec node in Pipeline:
  ...
  workspaces:
    - name: shared-data
It basically declares that the Pipeline will use a workspace called shared-data.
Next, in the tasks node, declare the workspace required by the task git-clone as follows:
    ...
    workspaces:
      - name: output
        workspace: shared-data
The name of the task workspace is output and it refers to the workspace shared-data declared in the pipeline section.
Repeat the previous step for the list-source task definition, but in this case, let's name the task workspace as source, pointing to the shared-data workspace declared in the pipeline:
    ...
    workspaces:
      - name: source
        workspace: shared-data
And now, within the Task list-source, we must declare the workspace source which will come through the pipeline. So, the Task yaml looks like this:
apiVersion: tekton.dev/v1beta1
kind: Task
metadata:
  name: list-source
spec:
  workspaces:
    - name: source
  steps:
  - name: ls
    image: ubuntu
    workingDir: $(workspaces.source.path)
    script: >
      ls
🏃 Time to run!
As for now, we apply all the changes but we only have declarations, pipeline and tasks. In order to perform a PipelineRun, we must declare how the pipeline workspace shared-data will look like.
In this case, we cannot use emptyDir, that's why we'll provide a volumeClaimTemplate which uses the standard storage class configured in our cluster, requesting 1Gb of space.
apiVersion: tekton.dev/v1beta1
kind: PipelineRun
metadata:
  generateName: my-pipeline-
spec:
  pipelineRef:
    name: my-pipeline
  params:
  - name: repo-url
    value: https://github.com/leandronsp/chespirito.git
  - name: revision
    value: main
  workspaces:
  - name: shared-data
    volumeClaimTemplate:
      spec:
        accessModes:
        - ReadWriteOnce
        resources:
          requests:
            storage: 1Gi
- providing the
repo-url, which points to the repositoryhttps://github.com/leandronsp/chespirito.git - also provising the
revision, so the Task performs checkout from the main branch - and least, but very important, the pipeline workspace
shared-data, using avolumeClaimTemplate
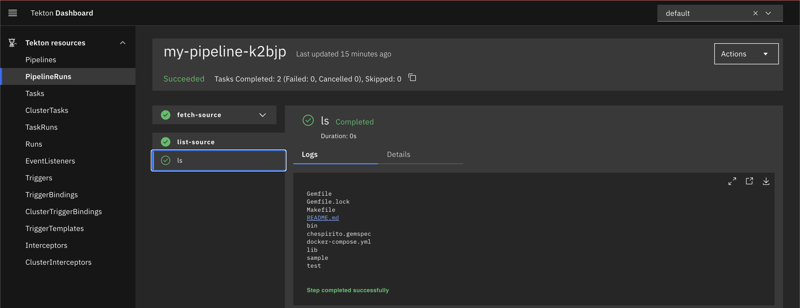
Run the pipeline and...
🚀 How cool is that? 🚀
In this post we've got into the Tekton CLI, Dashboard and Tekton Hub, going through a simple pipeline that uses a Task built by the community to clone an arbitrary repository from Github and list its files in the screen.
During the journey we learned about Workspaces and how they solve the problem of sharing information through Steps and Tasks within a Pipeline.
Stay tuned because the upcoming posts will explore how to listen to Github events and trigger our Pipeline instead of running it manually.


