What is Larapex?
It is a Laravel package that provides a wrapper to create apexcharts with only PHP.
What we are going to build?
An eloquent example to create charts from eloquent queries
Lets start
First create a project
In valet
laravel new yourproject
With composer
composer create-project --prefer-dist laravel/laravel yourproject
Then add the LarapexChart Package
Go to your app directory and in your console/terminal/cmd/bash type:
composer require arielmejiadev/larapex-charts
About the project.
It will simulate a TODO app with users that creates TODOS, this tutorial will show all commands and code in every file, so just follow the steps.
I will create a TODO model and assign TODOS to users (with default User model from a fresh Laravel installation).
To create a model with migrations, factories and seeders you can use the flag "a" with the make model artisan command:
php artisan make:model Todo -a
The TODO Model file content will look like this:
namespace App;

use Illuminate\Database\Eloquent\Model;

class Todo extends Model
{
    protected $fillable = [
        'title', 'state', 'user_id'
    ];

    protected $casts = [
        'status' => 'boolean',
    ];

    public function user()
    {
        return $this->belongsTo(User::class);
    }
}
The User model file content:
namespace App;

use Illuminate\Contracts\Auth\MustVerifyEmail;
use Illuminate\Foundation\Auth\User as Authenticatable;
use Illuminate\Notifications\Notifiable;

class User extends Authenticatable
{
    use Notifiable;

    /**
     * The attributes that are mass assignable.
     *
     * @var array
     */
    protected $fillable = [
        'name', 'email', 'password',
    ];

    /**
     * The attributes that should be hidden for arrays.
     *
     * @var array
     */
    protected $hidden = [
        'password', 'remember_token',
    ];

    /**
     * The attributes that should be cast to native types.
     *
     * @var array
     */
    protected $casts = [
        'email_verified_at' => 'datetime',
    ];

    public function todos()
    {
        return $this->hasMany(Todo::class);
    }
}
The TODO migration file content:
use Illuminate\Database\Migrations\Migration;
use Illuminate\Database\Schema\Blueprint;
use Illuminate\Support\Facades\Schema;

class CreateTodosTable extends Migration
{
    /**
     * Run the migrations.
     *
     * @return void
     */
    public function up()
    {
        Schema::create('todos', function (Blueprint $table) {
            $table->bigIncrements('id');
            $table->string('title');
            $table->boolean('status')->default(false);
            $table->unsignedBigInteger('user_id');
            $table->foreign('user_id')->references('id')->on('users');
            $table->timestamps();
        });
    }

    /**
     * Reverse the migrations.
     *
     * @return void
     */
    public function down()
    {
        Schema::dropIfExists('todos');
    }
}
TODO Factory content:
/** @var \Illuminate\Database\Eloquent\Factory $factory */

use App\Todo;
use App\User;
use Faker\Generator as Faker;

$factory->define(Todo::class, function (Faker $faker) {
    return [
        'title'     => $faker->title,
        'status'    => $faker->boolean,
        'user_id'   => factory(User::class),
    ];
});
The TODO Seeder content:
use App\User;
use App\Todo;
use Illuminate\Database\Seeder;

class TodoSeeder extends Seeder
{
    /**
     * Run the database seeds.
     *
     * @return void
     */
    public function run()
    {
        $userOne = factory(User::class)->create([
            'name' => 'John Doe'
        ]);

        $userTwo = factory(User::class)->create([
            'name' => 'Anne Doe'
        ]);

//        TODOS by this month

        factory(Todo::class, 15)->create([
            'user_id' => $userOne,
            'status' => true
        ]);

        factory(Todo::class, 20)->create(['user_id' => $userOne]);

        factory(Todo::class, 14)->create([
            'user_id' => $userTwo,
            'status' => true
        ]);

        factory(Todo::class, 23)->create(['user_id' => $userTwo]);

//        TODOS ONE MONTH AGO

        factory(Todo::class, 5)->create([
            'user_id' => $userOne,
            'status' => true,
            'created_at' => now()->subMonth()
        ]);

        factory(Todo::class, 10)->create(['user_id' => $userOne, 'created_at' => now()->subMonth()]);

        factory(Todo::class, 4)->create([
            'user_id' => $userTwo,
            'status' => true,
            'created_at' => now()->subMonth()
        ]);

        factory(Todo::class, 13)->create(['user_id' => $userTwo, 'created_at' => now()->subMonth()]);

//        TODOS TWO MONTHS AGO

        factory(Todo::class, 8)->create([
            'user_id' => $userOne,
            'status' => true,
            'created_at' => now()->subMonths(2)
        ]);

        factory(Todo::class, 16)->create(['user_id' => $userOne, 'created_at' => now()->subMonths(2)]);

        factory(Todo::class, 14)->create([
            'user_id' => $userTwo,
            'status' => true,
            'created_at' => now()->subMonths(2)
        ]);

        factory(Todo::class, 23)->create(['user_id' => $userTwo, 'created_at' => now()->subMonths(2)]);


    }
}
Add Todo seeder
Go to database/seeds/DatabaseSeeders.php and add the Todo seeder in run method as the code below:
use Illuminate\Database\Seeder;

class DatabaseSeeder extends Seeder
{
    /**
     * Seed the application's database.
     *
     * @return void
     */
    public function run()
    {
        $this->call(TodoSeeder::class);
    }
}
Now run the migrations
Go to your terminal/console/bash/cmd and type the next commands:
php artisan migrate
php artisan db:seed
Add a route
For this tutorial I will create a controller for charts, executing the artisan command:
php artisan make:controller ChartController
Then go to routes/web.php and add the next route:
Route::get('chart', ChartController::class);
- This controller will only have one method so in Route get method I can pass as second param the controller class and Laravel will load the __invoke method if it exists.
The controller content:
namespace App\Http\Controllers;

use App\Todo;
use App\User;
use ArielMejiaDev\LarapexCharts\Facades\LarapexChart;
use Illuminate\Http\Request;

class ChartController extends Controller
{
    /**
     * Display a listing of the resource.
     *
     * @return \Illuminate\Http\Response
     */
    public function __invoke()
    {
        $user        = User::first();
        $userTwo     = User::find(2);
        $todosDone   = Todo::where('user_id', $user->id)->whereStatus(true)->count();
        $todosNotYet = Todo::where('user_id', $user->id)->whereStatus(false)->count();

        $chart = LarapexChart::setTitle('Your Todos Stats')
            ->setLabels(['Done', 'Not Yet'])
            ->setDataset([$todosDone, $todosNotYet]);


        return view('chart', compact('chart'));
    }


}
Create a view file
Next is necesary to create a blade file to render the chart, go to resources/views and create a file called "chart.blade.php"
add the next code to your view:
<!doctype html>
<html lang="en">
<head>
    <meta charset="UTF-8">
    <meta name="viewport"
          content="width=device-width, user-scalable=no, initial-scale=1.0, maximum-scale=1.0, minimum-scale=1.0">
    <meta http-equiv="X-UA-Compatible" content="ie=edge">
    <title>Todos Chart</title>
</head>
<body>

    {!! $chart->container() !!}


    <script src="{{ $chart->cdn() }}"></script>
    {!! $chart->script() !!}

</body>
</html>
Now open your project
In the browser with your project basepath and "/chart" you will see:
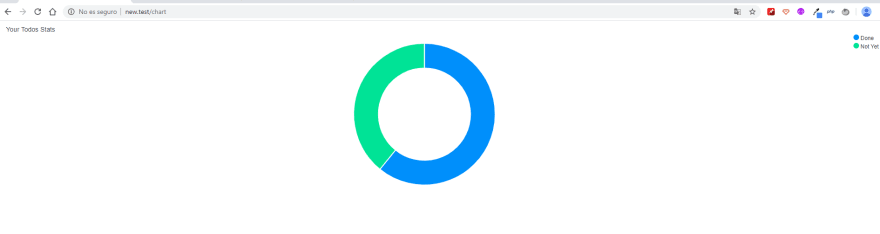
Congrats! now you are implementing apex charts in your Laravel project.
More?
This is a simple example but, maybe you really want to create more complex charts, so go on this.
In your ChartController.php change the last content with this:
namespace App\Http\Controllers;

use App\Todo;
use App\User;
use ArielMejiaDev\LarapexCharts\Facades\LarapexChart;
use Illuminate\Http\Request;

class ChartController extends Controller
{
    /**
     * Display a listing of the resource.
     *
     * @return \Illuminate\Http\Response
     */
    public function __invoke()
    {

        $user = User::first();
        $userTwo = User::find(2);

        $usercurrentMonthTodos = Todo::where('user_id', $user->id)->whereStatus(true)->whereMonth('created_at', '=', now()->month)->count();
        $userTodosAMonthAgo = Todo::where('user_id', $user->id)->whereStatus(true)->whereMonth('created_at', '=', now()->subMonth()->month)->count();
        $userTodosTwoMonthAgo = Todo::where('user_id', $user->id)->whereStatus(true)->whereMonth('created_at', '=', now()->subMonths(2)->month)->count();

        $userTwocurrentMonthTodos = Todo::where('user_id', $userTwo->id)->whereStatus(true)->whereMonth('created_at', '=', now()->month)->count();
        $userTwoTodosAMonthAgo = Todo::where('user_id', $userTwo->id)->whereStatus(true)->whereMonth('created_at', '=', now()->subMonth()->month)->count();
        $userTwoTodosTwoMonthAgo = Todo::where('user_id', $userTwo->id)->whereStatus(true)->whereMonth('created_at', '=', now()->subMonths(2)->month)->count();

        $chart = LarapexChart::setType('line')
            ->setLabels([$user->name, $userTwo->name])
            ->setXAxis(['Now', 'A month ago', '2 months ago'])
            ->setDataset([
            [
                'username' => $user->name,
                'data' => [
                    $usercurrentMonthTodos, $userTodosAMonthAgo, $userTodosTwoMonthAgo
                ]
            ],
            [
                'username' => $userTwo->name,
                'data' => [
                    $userTwocurrentMonthTodos, $userTwoTodosAMonthAgo, $userTwoTodosTwoMonthAgo
                ]
            ]
        ]);


        return view('chart', compact('chart'));
    }


}
This will load a line chart with two different series of data

You can change the value in setType() method to add this types:
- area
- bar
- heatmap
You can even change the colors of the chart by adding the method setColors(), to the chart instance like this:
$chart = LarapexChart::setType('line')
            ->setLabels([$user->name, $userTwo->name])
        ->setXAxis(['Now', 'A month ago', '2 months ago'])
        ->setColors(['#ffc73c', '#f5746f'])
To get more examples and documentation of LarapexCharts go to LarapexCharts Documentation site