
Written by Onuorah Bonaventure✏️
Effectively implementing animations is crucial to creating a mobile app that distinguishes itself. Animations have the power to breathe life into various elements and sections of the screen, enhancing the overall user experience and fostering user loyalty to our app.
To seamlessly set up animations, we need to accurately capture user gestures on elements without compromising our application's performance or introducing awkward animations.
We can use React Native Gesture Handler to capture a variety of user gestures in our app, but some calculations and other actions might not be available in this package. In those cases, the React Native Redash package is available to fill in the gaps.
In this article, we’ll compare React Native Redash with React Native Gesture Handler to understand the different purposes of each package. To deepen our understanding of React Native animations, we’ll also explore related concepts like the native gesture handler, React Native Reanimated, and the Animated API.
Jump ahead:
- What is React Native Gesture Handler?
- Exploring key features of React Native Gesture Handler
- What is React Native Redash?
- Exploring key features of React Native Redash
- React Native Gesture Handler vs. React Native Redash
- React Native Reanimated vs. React Native Gesture Handler
- How Reanimated interacts with the Animated API
- How React Native Gesture Handler interacts with the Gesture Responder System
- Which library should you use for animation?
Ideally, you should have some basic knowledge about the React Native Reanimated library, which we use to create the animations. If you are not familiar with it, check out our article on using React Native Reanimated for seamless UI transitions for a brief overview.
Are you ready? Let’s begin.
What is React Native Gesture Handler?
React Native Gesture Handler is a powerful library you can use to handle gestures like swiping, dragging, tapping, and more in a React Native application.
Generally, this library does not use the Gesture Responder System built into React Native. Instead, it uses the UIGestureRecognizer for iOS devices and implements a custom gesture responder system for Android devices.
Rather than spending time discussing how React Native Gesture Handler works under the hood, let’s dive right into exploring its key features.
Exploring key features of React Native Gesture Handler
In a nutshell, the React Native Gesture Handler library provides handlers for the following kinds of gestures:
To use any of the handlers in a React Native project, we must first set up a React Native project. For the purposes of this tutorial, you can clone the starter project I have prepared.
Once we have our code ready, we can install the dependencies we need — including React Native Gesture Handler and React Native Reanimated — by running either of the following commands in the terminal:
//npm
npm install && npm install react-native-gesture-handler react-native-reanimated

//Yarn
yarn && npm install react-native-gesture-handler react-native-reanimated
At this moment, we should ensure that our file structure matches what we have below:
react-native-gestures
 ┣ .expo
 ┃ ┣ README.md
 ┃ ┗ devices.json
 ┣ assets
 ┃ ┣ adaptive-icon.png
 ┃ ┣ favicon.png
 ┃ ┣ icon.png
 ┃ ┗ splash.png
 ┣ components
 ┃ ┗ examples-with-rngh-and-rnr
 ┃ ┃ ┣ FlingGesture.jsx
 ┃ ┃ ┣ ForceTouchGesture.jsx
 ┃ ┃ ┣ LongPressGesture.jsx
 ┃ ┃ ┣ ManualGesture.jsx
 ┃ ┃ ┣ NativeGesture.jsx
 ┃ ┃ ┣ PanGesture.jsx
 ┃ ┃ ┣ RotationGesture.jsx
 ┃ ┃ ┗ TapGesture.jsx
 ┣ .gitignore
 ┣ App.js
 ┣ app.json
 ┣ babel.config.js
 ┣ package-lock.json
 ┣ package.json
 ┗ yarn.lock
To ensure that our application will capture gestures, we need to wrap the root component with a GestureHandlerRootView. In this case, the App.js is the root file and it should look similar to this:
// App.js

import { StatusBar } from 'expo-status-bar';
import { Platform, SafeAreaView, StyleSheet, View } from 'react-native';
import { GestureHandlerRootView } from 'react-native-gesture-handler';
import PanGesture from './components/examples-with-rngh-and-rnr/PanGesture';

export default function App() {
  return (
    <SafeAreaView style={{ flex: 1 }}>
      <GestureHandlerRootView style={{ flex: 1 }}>
        <View style={styles.container}>
          <StatusBar style='auto' />
          <PanGesture />
        </View>
      </GestureHandlerRootView>
    </SafeAreaView>
  );
}

const styles = StyleSheet.create({
  container: {
    flex: 1,
    backgroundColor: '#fff',
    marginTop: Platform.OS === 'android' ? '10%' : '3%',
  },
});
We also need to add the React Native Reanimated plugin to our babel.config.js file:
// babel.config.js
module.exports = function (api) {
  api.cache(true);
  return {
    presets: ['babel-preset-expo'],
    plugins: ['react-native-reanimated/plugin'],
  };
};
Once we have done that, we can explore the various gesture handler methods to get a practical understanding of how React Native Gesture Handler works.
Pan gesture handler
The pan gesture handler captures the action of dragging a finger across the screen. This includes vertical, horizontal, and even diagonal movement across the screen.
Below, we will use the pan gesture handler to set up three draggable shapes on the screen — a square, a circle, and a rectangle. We will also use the React Native Reanimated library to handle the smooth movement of these objects across the screen.
Let’s start by opening the components/examples-with-rngh-and-rnr/PanGesture.jsx file and importing the components we need:
// components/examples-with-rngh-and-rnr/PanGesture.jsx
import React from 'react';
import { StyleSheet, View } from 'react-native';
import { GestureDetector, Gesture } from 'react-native-gesture-handler';
import Animated, { useAnimatedStyle, useSharedValue } from 'react-native-reanimated';
The React Native Gesture Handler provides two important components:
-
GestureDetector— Wraps the elements that will be performing the gestures -
Gesture— A class that contains different kinds of gestures, including the pan gesture
Likewise, the React Native Reanimated library offers the following:
- An
Animatedclass, which enables us to configure a component for animation capabilities - The
useAnimatedStyleHook, which we can use like the nativeStyleSheet.create({})to create style objects - The
useSharedValueHook, which acts like the nativeuseRefHook to avoid re-renders when we update states
We’ll use the useSharedValue Hook in three blocks of code. In the first block shown below, we use it to initialize the background color for each of the shapes:
const PanGestureExample = () => {
  const squareColor = useSharedValue(styles.square.backgroundColor);
  const circleColor = useSharedValue(styles.circle.backgroundColor);
  const rectangleColor = useSharedValue(styles.rectangle.backgroundColor);
To ensure some level of control, we reference the background colors we defined in the styles block in the App.js file, such as styles.square.backgroundColor.
The second block deals with the set of states that we use to remember the last position of each shape. This ensures that we prevent each of the shapes from snapping to the initial position any time we try to drag it:
  const squareLastOffset = useSharedValue({ horizontal: 0, vertical: 0 });
  const circleLastOffset = useSharedValue({ horizontal: 0, vertical: 0 });
  const rectangleLastOffset = useSharedValue({ horizontal: 0, vertical: 0 });
Each of the states contains an object with horizontal and vertical properties with an initial value of 0.
The third block is similar to the second block. We use the states defined within to store the current location of each shape:
  const squarePosition = useSharedValue({ horizontal: 0, vertical: 0 });
  const circlePosition = useSharedValue({ horizontal: 0, vertical: 0 });
  const rectanglePosition = useSharedValue({ horizontal: 0, vertical: 0 });
As mentioned earlier, we can use the useAnimatedStyle Hook to define styles that will be animated when we apply them to a component. Hence, in our component, we are using three instances of useAnimatedStyle to provide two main styles — transform and backgroundColor — for each shape:
  const squareAnimatedStyle = useAnimatedStyle(() => ({
    transform: [
      { translateX: squarePosition.value.horizontal },
      { translateY: squarePosition.value.vertical },
    ],
    backgroundColor: squareColor.value,
  }));

  const circleAnimatedStyle = useAnimatedStyle(() => ({
    transform: [
      { translateX: circlePosition.value.horizontal },
      { translateY: circlePosition.value.vertical },
    ],
    backgroundColor: circleColor.value,
  }));

  const rectangleAnimatedStyle = useAnimatedStyle(() => ({
    transform: [
      { translateX: rectanglePosition.value.horizontal },
      { translateY: rectanglePosition.value.vertical },
    ],
    backgroundColor: rectangleColor.value,
  }));
The transform style accepts an array of objects that includes the styles and their corresponding values, such as translateX. We can pass the appropriate values from the squareAnimatedStyle, circleAnimatedStyle, or rectangleAnimatedStyle variables, respectively.
The styles object we will create below contains the styles for the View that wraps the whole component as well as the styles for each of the shapes — square, circle, and rectangle.
In the next code block, we’ll use the Pan gesture handler. Note that to use any gesture handler, we first need to call the Gesture class and then call the handler we want, such as Gesture.Pan() or Gesture.Tap():
  const squareGesture = Gesture.Pan()
    .onStart((e) => {
      squareColor.value = '#000080';
    })
    .onUpdate((e) => {
      squarePosition.value = {
        horizontal: squareLastOffset.value.horizontal + e.translationX,
        vertical: squareLastOffset.value.vertical + e.translationY,
      };
    })
    .onEnd((e) => {
      squareLastOffset.value = {
        horizontal: squarePosition.value.horizontal,
        vertical: squarePosition.value.vertical,
      };
    })
    .onFinalize((e) => {
      squareColor.value = styles.square.backgroundColor;
    });

  const circleGesture = Gesture.Pan()
    .onStart((e) => {
      circleColor.value = '#228C22';
    })
    .onUpdate((e) => {
      circlePosition.value = {
        horizontal: circleLastOffset.value.horizontal + e.translationX,
        vertical: circleLastOffset.value.vertical + e.translationY,
      };
    })
    .onEnd((e) => {
      circleLastOffset.value = {
        horizontal: circlePosition.value.horizontal,
        vertical: circlePosition.value.vertical,
      };
    })
    .onFinalize((e) => {
      circleColor.value = styles.circle.backgroundColor;
    });

  const rectangleGesture = Gesture.Pan()
    .onStart((e) => {
      rectangleColor.value = '#C0362C';
    })
    .onUpdate((e) => {
      rectanglePosition.value = {
        horizontal: rectangleLastOffset.value.horizontal + e.translationX,
        vertical: rectangleLastOffset.value.vertical + e.translationY,
      };
    })
    .onEnd((e) => {
      rectangleLastOffset.value = {
        horizontal: rectanglePosition.value.horizontal,
        vertical: rectanglePosition.value.vertical,
      };
    })
    .onFinalize((e) => {
      rectangleColor.value = styles.rectangle.backgroundColor;
    });
Each method has general callbacks such as onStart, onBegin, onEnd, etc. Also, there are callbacks that are specific to each method. For the Gesture.Pan() method, these include minDistance, maxPointers, and more.
Generally, the onStart, onUpdate, onEnd and onFinalize are the most frequently used callbacks:
- The
onStartcallback is called when the gesture is recognized. In our case, we are changing thebackgroundColorof the affected item - In the
onUpdatecallback, we are calculating and setting thepositionandlastOffsetstate for each item, such asrectanglePositionusingrectangleLastOffset, and the currenttranslateXortranslateYfrom the event - In the
onEndcallback, we are setting thelastOffsetstate, such asrectangleLastOffsetwithrectanglePosition, so that we can remember the last position of each item - In each
onFinalizecallback, we are resetting the background color of each item to their initial values
Finally, we can render everything we have written on a screen in the return statement. We start by wrapping the whole component with a View. Then, wrap the GestureDetector with the corresponding gesture for each shape around an Animated.View:
  return (
    <View style={styles.container}>
      <GestureDetector gesture={squareGesture}>
        <Animated.View style={[styles.square, squareAnimatedStyle]} />
      </GestureDetector>
      <GestureDetector gesture={circleGesture}>
        <Animated.View style={[styles.circle, circleAnimatedStyle]} />
      </GestureDetector>
      <GestureDetector gesture={rectangleGesture}>
        <Animated.View style={[styles.rectangle, rectangleAnimatedStyle]} />
      </GestureDetector>
    </View>
  );
};
export default PanGestureExample;

const styles = StyleSheet.create({
  container: {
    flex: 1,
  },
  square: {
    height: 50,
    width: 50,
    backgroundColor: 'blue',
  },
  circle: {
    height: 50,
    width: 50,
    borderRadius: 25,
    backgroundColor: 'green',
    marginTop: 10,
  },
  rectangle: {
    height: 50,
    width: 100,
    backgroundColor: 'orange',
    marginTop: 10,
  },
});
Note that each Animated.View contains the appropriate style and animatedStyle for each shape, such as styles.circle and circleAnimatedStyle for the circle.
At this moment, our app should function like in the image below: 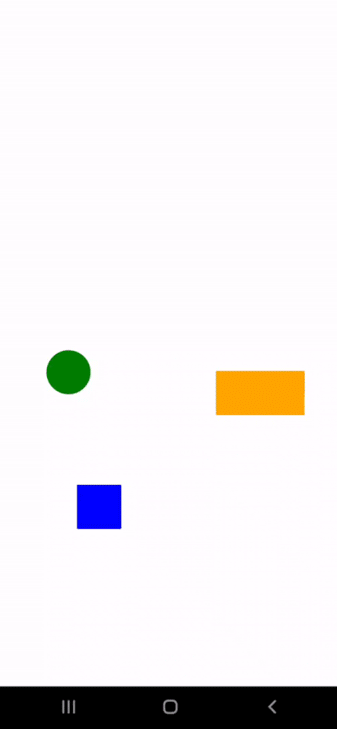 You can see the complete source code for this example on GitHub.
Tap gesture handler
We can use the tap gesture handler to capture different kinds of short presses on the screen, including single, double, and triple taps on an object. We’ll set up our components/examples-with-rngh-and-rnr/TapGesture.jsx file in a similar way to the pan gesture file:
// components/examples-with-rngh-and-rnr/TapGesture.jsx

import { Button, StyleSheet, Text, View } from 'react-native';
import React from 'react';
import { Gesture, GestureDetector } from 'react-native-gesture-handler';
import Animated, {
  useAnimatedStyle,
  useSharedValue,
} from 'react-native-reanimated';
The tap gesture handler uses a similar API to the pan gesture handler. We simply need to replace the Gesture.Pan() method with Gesture.Tap() method.
In this case, we are using the useSharedValue Hook to define three states — singleTapCount, doubleTapCount, and tripleTapCount — to hold the number of taps:
const TapGestures = () => {
  const singleTapCount = useSharedValue(0);
  const doubleTapCount = useSharedValue(0);
  const tripleTapCount = useSharedValue(0);
Then, we use the useAnimatedStyle Hook to define the distance each object will move when clicked the number of times defined in its numberOfTaps variable. We do this by simply adjusting each object’s marginLeft value:
  const singleTapAnimatedStyles = useAnimatedStyle(() => ({
    marginLeft: singleTapCount.value * 30,
  }));
  const doubleTapAnimatedStyles = useAnimatedStyle(() => ({
    marginLeft: doubleTapCount.value * 30,
  }));
  const tripleTapAnimatedStyles = useAnimatedStyle(() => ({
    marginLeft: tripleTapCount.value * 30,
  }));

  const singleTap = Gesture.Tap()
    // .maxDuration(250)
    .numberOfTaps(1)
    .onStart(() => {
      singleTapCount.value = singleTapCount.value + 1;
    });
  const doubleTap = Gesture.Tap()
    // .maxDuration(250)
    .numberOfTaps(2)
    .onStart(() => {
      doubleTapCount.value = doubleTapCount.value + 1;
    });
  const tripleTap = Gesture.Tap()
    // .maxDuration(250)
    .numberOfTaps(3)
    .onStart(() => {
      tripleTapCount.value = tripleTapCount.value + 1;
    });
Note that we can also set other configurations for the tap gesture handler, such as the maxDuration of the interaction set above.
We also have a clearState function available to use. In this case, we connected this function to a button that resets the values of the state:
  const clearState = () => {
    singleTapCount.value = 0;
    doubleTapCount.value = 0;
    tripleTapCount.value = 0;
  };
Next, we render each component in our return statement and update the App.js file:
  return (
    <View style={styles.container}>
      <GestureDetector gesture={singleTap}>
        <View style={[styles.itemWrapper]}>
          <Text>Single Tap to move </Text>
          <Animated.View style={[styles.square, singleTapAnimatedStyles]} />
        </View>
      </GestureDetector>
      <GestureDetector gesture={doubleTap}>
        <View style={styles.itemWrapper}>
          <Text>Double Tap to move</Text>
          <Animated.View style={[styles.circle, doubleTapAnimatedStyles]} />
        </View>
      </GestureDetector>
      <GestureDetector gesture={tripleTap}>
        <View style={styles.itemWrapper}>
          <Text>Triple Tap to move</Text>
          <Animated.View style={[styles.rectangle, tripleTapAnimatedStyles]} />
        </View>
      </GestureDetector>
      <Button title='Clear state' onPress={clearState} />
    </View>
  );
};
export default TapGestures;

const styles = StyleSheet.create({
  container: {
    flex: 1,
  },
  itemWrapper: {
    borderWidth: 1,
    margin: 20,
  },
  square: {
    height: 50,
    width: 50,
    backgroundColor: 'blue',
  },
  circle: {
    height: 50,
    width: 50,
    borderRadius: 25,
    backgroundColor: 'green',
    marginTop: 10,
  },
  rectangle: {
    height: 50,
    width: 100,
    backgroundColor: 'orange',
    marginTop: 10,
  },
});
Once we have done all of the above, we should see a screen that functions as shown in the image below: 
Long press handler
We can configure the long press handler using the Gesture.LongPress() method. It accepts minDuration and maxDistance values, which we need to configure it properly.
In the sample below, we will build a simple component that renders an Animated.Text component and two buttons.
When the user presses the first button and holds it down for a minimum of 3000 milliseconds, or three seconds, we will change the isLongPressed useSharedValue to true and then display the Animated.Text component.
We will set up the last button so that it resets the value of the isLongPressed state when tapped.
See the code below:
// components/examples-with-rngh-and-rnr/LongPressGesture.jsx

import { Button, StyleSheet, Text, View } from 'react-native';
import React from 'react';
import Animated, {
  useAnimatedStyle,
  useSharedValue,
} from 'react-native-reanimated';
import { Gesture, GestureDetector } from 'react-native-gesture-handler';

const LongPressGesture = () => {
  const isLongPressed = useSharedValue(false);
  const animatedStyle = useAnimatedStyle(() => ({
    display: isLongPressed.value ? 'flex' : 'none',
  }));

  const longPressHandler = Gesture.LongPress()
    .minDuration(3000)
    .maxDistance(10)
    .onStart((e) => {})
    .onEnd((e) => {
      isLongPressed.value = true;
      // User has pressed for the minimum duration(3000 milliseconds or 3 seconds) we set
    });

  const clearStates = () => {
    isLongPressed.value = false;
  };

  return (
    <View style={styles.container}>
      <GestureDetector gesture={longPressHandler}>
        <View style={{ marginVertical: 50 }}>
          <Animated.Text style={[animatedStyle]}>
            Yay!!! You pressed and held for 3 seconds
          </Animated.Text>
          <Button title='Press and hold me' />
        </View>
      </GestureDetector>
      <Button title='Clear' onPress={clearStates} />
    </View>
  );
};
export default LongPressGesture;
const styles = StyleSheet.create({
  container: {
    flex: 1,
  },
});
The result of this code should look like the GIF below: 
Rotation gesture handler
The rotation gesture handler captures a particular gesture that requires the user to hold down two or more fingers on an object and, keeping their fingers on the screen, move around an axis. You can see an example of this behavior in the image below: 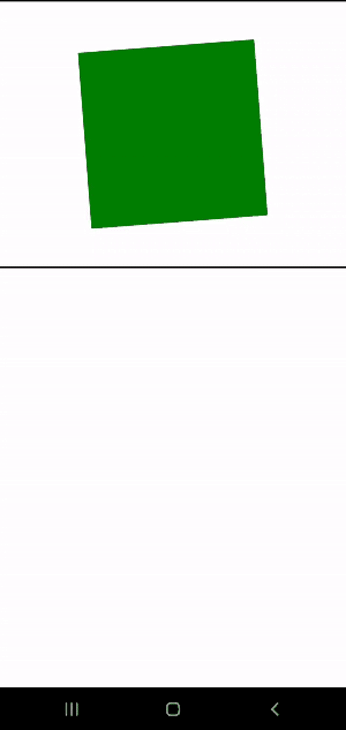 Let’s see how to generate the screen above. Similar to what we’ve been doing with the other components, we’ll need to wrap a simple
 Animated.View component with a GestureDetector.
We’ll initialize the rotationHandler with a Gesture.Rotation() method, which also accepts the callbacks we discussed in the pan gesture handler example above. We’ll also initialize two useSharedValue states: rotationPoint and lastRotation.
Note that each callback contains an event that matches the list of RotationGesture event attributes. However, in the onUpdate callback, we set the rotationPoint to the lastRotation and the rotation value coming from the event. Then, we set the rotationPoint to the lastRotation in the onEnd callback. This ensures that we never see a jerky movement when rotating the object.
We also define an animatedStyle variable, which simply sets the value of rotationZ in a transform style property by dividing the rotationPoint with Pi and multiplying it by 180deg. Finally, we pass the animatedStyle to the Animated.View and rotate our component.
See the full code below:
// components/examples-with-rngh-and-rnr/RotationGesture.jsx

import { StyleSheet, Text, View } from 'react-native';
import React from 'react';
import Animated, {
  useAnimatedStyle,
  useSharedValue,
} from 'react-native-reanimated';
import { Gesture, GestureDetector } from 'react-native-gesture-handler';

const RotationGesture = () => {

  const rotationPoint = useSharedValue(0);
  const lastRotation = useSharedValue(0);

  const rotationHandler = Gesture.Rotation()
    .onBegin((e) => {
      console.log({ begin: e });
    })
    .onStart((e) => {
      console.log({ start: e });
    })
    .onUpdate((e) => {
      rotationPoint.value = lastRotation.value + e.rotation;
    })
    .onEnd(() => {
      lastRotation.value = rotationPoint.value;
    });

  const animatedStyle = useAnimatedStyle(() => ({
    transform: [{ rotateZ: `${(rotationPoint.value / Math.PI) * 180}deg` }],
  }));

  return (
    <View style={{ borderWidth: 2 }}>
      <GestureDetector gesture={rotationHandler}>
        <Animated.View style={[styles.square, animatedStyle]} />
      </GestureDetector>
    </View>
  );
};
export default RotationGesture;
const styles = StyleSheet.create({
  square: {
    width: 200,
    height: 200,
    backgroundColor: 'green',
    marginLeft: 'auto',
    marginRight: 'auto',
    marginVertical: 50,
  },
});
Fling gesture handler
This handler captures quick or sudden dragging movements on an object. Unlike the other handlers discussed above, the fling gesture handler requires a direction property set to Right, Left, Top or Bottom. We can pass more than one direction per parameter if necessary.
Let’s see an example that illustrates how the fling gesture handler works:
// components/examples-with-rngh-and-rnr/FlingGesture.jsx

import { StyleSheet, Text, View } from 'react-native';
import React from 'react';
import Animated, {
  useAnimatedStyle,
  useSharedValue,
  withTiming,
} from 'react-native-reanimated';

import {
  Directions,
  Gesture,
  GestureDetector,
} from 'react-native-gesture-handler';

const FlingGesture = () => {
  const position = useSharedValue(0);

  const flingGesture = Gesture.Fling()
    .direction(Directions.RIGHT)
    .onStart((e) => {
      position.value = withTiming(position.value + e.x, { duration: 100 });
    });

  const animatedStyle = useAnimatedStyle(() => ({
    transform: [{ translateX: position.value }],
  }));

  return (
    <View style={{ borderWidth: 2 }}>
      <GestureDetector gesture={flingGesture}>
        <Animated.Image
          source={{ uri: 'https://image.pngaaa.com/46/2182046-middle.png' }}
          style={[styles.box, animatedStyle]}
          width={100}
          height={50}
        />
      </GestureDetector>
    </View>
  );
};
export default FlingGesture;
const styles = StyleSheet.create({
  square: {
    width: 40,
    height: 40,
    objectFit: 'contain',
  },
});
One thing to note is that we are using the Gesture.Fling() method and passing a compulsory direction value. Another is that, unlike the other gesture handlers, this handler does not contain an onUpdate callback. Instead, it uses the onStart method.
This is a good reminder that, in some cases, there may be callbacks specific to each method. Make sure you check the docs regarding which callbacks the method you’re using accepts and which events they produce.
To perform the actual fling, we simply use a withTiming method from the Reanimated library to dynamically calculate and set the displacement of the objects. Finally, we can set the style in the animatedStyle and pass it into the Animated.Image we are rendering on the screen.
You can see the result below: 
Pinch gesture handler
The pinch gesture handler uses the Gesture.Pinch() method. It captures the continuous movement of two fingers placed on an element and moved closer or further apart. This movement scales the element either up or down.
For this demonstration, we will simply build a component that can be scaled up or down from the middle. Note that our example follows the same logical pattern as the rotation gesture handler we built above:
// components/examples-with-rngh-and-rnr/PinchGesture.jsx

import { StyleSheet, Text, View } from 'react-native';
import React from 'react';
import Animated, {
  useAnimatedStyle,
  useSharedValue,
} from 'react-native-reanimated';
import { Gesture, GestureDetector } from 'react-native-gesture-handler';

const PinchGestureExample = () => {
  const scalePoint = useSharedValue(1);
  const savedScale = useSharedValue(1);

  const pinchHandler = Gesture.Pinch()
    .onUpdate((e) => {
      scalePoint.value = savedScale.value * e.scale;
    })
    .onEnd(() => {
      savedScale.value = scalePoint.value;
    });

  const animatedStyle = useAnimatedStyle(() => ({
    transform: [{ scale: scalePoint.value }],
  }));

  return (
    <View style={{ borderWidth: 2 }}>
      <GestureDetector gesture={pinchHandler}>
        <Animated.Image
          source={{
            uri: 'https://images.unsplash.com/photo-1670184900611-434255d918ac?ixlib=rb-4.0.3&ixid=M3wxMjA3fDB8MHxwaG90by1wYWdlfHx8fGVufDB8fHx8fA%3D%3D&auto=format&fit=crop&w=2942&q=80',
          }}
          style={[styles.square, animatedStyle]}
        />
      </GestureDetector>
    </View>
  );
};
export default PinchGestureExample;
const styles = StyleSheet.create({
  square: {
    width: 400,
    height: 200,
    marginLeft: 'auto',
    marginRight: 'auto',
    marginVertical: 50,
    objectFit: 'cover',
  },
});
The code above produces the result below:  If you want to learn more, you can check out this complete guide to using React Native Gesture Handler. Otherwise, let’s dive into React Native Redash next.
What is React Native Redash?
The React Native Redash library is a utility library for React Native Gesture Handler and React Native Reanimated. It contains tools that make creating, controlling, and customizing animations and gestures really easy.
Generally, it contains helper functions that can be used to handle:
- Animations
- Coordinates
- Math
- String
- Transitions
- Vectors
- Paths
- Physics
- Colors
Generally, each of the helper functions listed above deals with animation handlers that can’t be used alone. Instead, they are meant to be used in conjunction with React Native Gesture Handler or React Native Reanimated. Let’s explore this in more detail below.
Exploring the key features of React Native Redash
Let’s set up an animated view and two buttons to see how to use React Native Redash features in a practical example. We’ll start by importing the components we need:
// /components/examples-with-rngh-rnredash-reanimated/withPauseHelper.jsx

import React, { useEffect } from 'react';
import Animated, {
  Easing,
  useAnimatedStyle,
  useSharedValue,
  withRepeat,
  withTiming,
} from 'react-native-reanimated';

import { Button, StyleSheet, View } from 'react-native';
import { withPause } from 'react-native-redash';
We’ll define a useSharedValue for a rotation variable that holds the state for the rotation of the box. Meanwhile, the paused state holds the state for starting or stopping the animation with the help of React Native Redash:
const duration = 2000;
const easing = Easing.bezier(0.25, -0.5, 0.25, 1);

const WithPauseHelper = () => {
  const rotation = useSharedValue(0);
  const paused = useSharedValue(false);

  const animatedStyle = useAnimatedStyle(() => ({
    transform: [{ rotate: `${rotation.value * 360}deg` }],
  }));
Then, we’ll create stopAnimation and startAnimation functions where we change the value of paused as appropriate:
  const stopAnimation = () => {
    paused.value = true;
  };
  const startAnimation = () => {
    paused.value = false;
  };
Generally, we can define a looping animation with React Native Reanimated using withRepeat() alone. However, we can enhance this behavior using the withPause method from Redash to start or stop the animation as shown in the useEffect Hook below:
  useEffect(() => {
    rotation.value = withPause(
      withRepeat(withTiming(1, { duration, easing }), -1),
      paused
    );
  }, []);
This essentially means that with React Native Redash, we can start or stop an animation at will. All that’s left is our return statement:
  return (
    <View style={styles.container}>
      <Animated.View style={[styles.box, animatedStyle]} />
      <Button title='Cancel' onPress={stopAnimation} />
      <Button title='Start' onPress={startAnimation} />
    </View>
  );
};
export default WithPauseHelper;
const styles = StyleSheet.create({
  container: {
    flex: 1,
    alignItems: 'center',
    height: '100%',
    gap: 70,
  },
  box: {
    height: 100,
    width: 100,
    backgroundColor: 'green',
    borderRadius: 10,
  },
});
If everything works as intended, we should see the result below:  React Native Redash provides other mathematical functions that are important to smooth animations. For example, we can use
 bin() to convert a Boolean to a number and toDeg() to convert a radian to a degree.
It also contains functions like useTiming() to handle transitions and useVector() for creating vectors. In this next code sample, we will explore how to use the useTiming() method to transition a useState value:
// /components/examples-with-rngh-rnredash-reanimated/ButtonTranslate.jsx

import { Button, StyleSheet, Text, View } from 'react-native';
import React, { useState } from 'react';
import { useTiming } from 'react-native-redash';
import Animated, { useAnimatedStyle } from 'react-native-reanimated';

const ButtonTranslate = () => {
  const [open, setOpen] = useState(false);
  const transition = useTiming(open, { duration: 4000 });

  const animatedStyle = useAnimatedStyle(() => ({
    opacity: transition.value,
  }));

  const handleOpen = () => {
    setOpen((prev) => !prev);
  };

  return (
    <View>
      <Animated.View style={[styles.square, animatedStyle]} />
      <Button title='Toggle' onPress={handleOpen} />
    </View>
  );
};
export default ButtonTranslate;

const styles = StyleSheet.create({
  square: {
    width: 200,
    height: 200,
    backgroundColor: 'blue',
    alignSelf: 'center',
  },
});
By default, you can’t animate the change of a state in React. However, we can make it happen with the help of the useTiming helper function from React Native Redash.
In the code above, we have an open state, whose value we can change using the handleOpen function. We also have a transition variable — which implements the useTiming function — and an animatedStyle variable that sets the transition variable as the opacity value.
Then, in the return section, we render an Animated.View component and a Button that triggers a transition upon being pressed. This transition slowly hides or shows the Animated.View over the span of 4000 milliseconds, or four seconds, as shown in the image below: 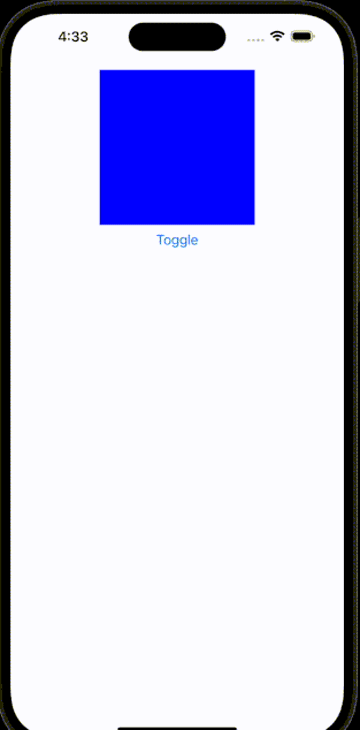
React Native Gesture Handler vs. React Native Redash: Differences
As stated earlier, React Native Redash primarily provides helper functions that make it easier to create smooth animations and transitions as well as handle gestures. In contrast, React Native Gesture Handler strictly handles gestures and touches on objects by interacting with a platform’s native code.
Since these libraries have different purposes, there’s no way to really compare them head-to-head. Nevertheless, below is a summary of the differences between React Native Gesture Handler and React Native Redash to help clarify their distinct functionalities:
| React Native Gesture Handler | React Native Redash | |
|---|---|---|
| Purpose | Used to handle gestures | A helper library for React Native Gesture Handler and React Native Reanimated |
| Animation handling | Does not handle animations, but can provide events to control animations | Can be used to control and alter animations and transitions |
| Features | Provides components that have animations and transitions already implemented — e.g., `Swipeable` and `DrawerLayout` | Provides utility functions to handle mathematical operations such as toRad |
| UI state handling | Does not implement UI state handlers with `useSharedValue` from React Native Reanimated | Implements UI state handlers — e.g., the `useTiming` function |
React Native Reanimated vs. React Native Gesture Handler: Differences
The Reanimated library is specifically designed to handle animations. In contrast, the React Native Gesture Handler library was designed to replace the native Gesture Responder System in React Native, providing more control and better performance for components that handle gestures.
Although the Reanimated library was built to handle animations, it also comes with some other helper methods that render animations more smoothly. The table below provides some insights about the differences between the two libraries:
| React Native Reanimated | React Native Gesture Handler | |
|---|---|---|
| Core functionality | Provides a low level implementation of the Animated library from React Native | Provides a low level implementation of Gesture Handler System from React Native |
| Primary use case | Can be used to handle animations | Can be used to handle gestures and actions on objects |
| Provides helper functions to enhance animations | ✅ | ❌ |
| Triggering mechanism | Its events can be triggered automatically; doesn’t rely on user actions | It relies on gestures by the user |
| Requirement to function | An Animated component — e.g., `Animated.View`. Also relies on the `useSharedValue` Hook for animations to properly work | The `GestureDetector` context. Does not rely on `useSharedValue` |
How React Native Reanimated interacts with the Animated API
In the first version of the React Native Reanimated library, its APIs were built to mimic the Animated library from React Native. The most recent version instead uses worklets to handle animations that actually run on the UI thread, thus ensuring high-performance animations.
However, the Reanimated library still has APIs that are strikingly similar to those in the Animated library. Some of these APIs include:
| Animated | React Native Reanimated |
|---|---|
| `Animated.Parallel` | `Parallel` |
| `Animated.Value()` | `useSharedValue()` |
| `Animated.decay()` | `withDecay()` |
| `Animated.spring()` | `withSpring()` |
| `Animated.timing()` | `withTiming()` |
| `Animated.sequence()` | `withSequence()` |
React Native Reanimated is also compatible with the Animated API. This means that the Reanimated library and the Animated library can be used in the same project without any part of the code breaking or failing to work.
The Reanimated library also provides a very good support for the React Native Gesture Handler in order to handle gestures such as fling, long press, and more. However, the Animated library can work very well with the Gesture Handler System provided by React Native.
How React Native Gesture Handler interacts with the Gesture Responder System
The native gesture handler that comes with React Native uses the Gesture Responder System to handle interactions and gestures, while the React Native Gesture Handler package does not. Instead, it uses the UIGestureRecognizer for iOS and a custom-built orchestrator for Android.
Although the two libraries have different implementation mechanisms, they can be used together in a project. Let’s see how.
To use the native gesture handler, we can use some of the native components and handlers provided by React Native, such as Touchable, TouchableHighlight, and PanResponder. However, to use non-native gestures like fling or rotation, we will need to use the Responder Lifecycle.
The Responder Lifecycle provides two methods we can pass to a component to manually implement gestures without native support. These two methods are onStartShouldSetResponder and onMoveShouldSetResponder.
Each of these methods is a function that we expect to return a boolean. When they return a true value, it means that the object has become a responder. We can also use the onResponderGrant and onResponderReject method to check if the object has become a responder. Once the object becomes a responder, we can access the event of the responder using the appropriate method, such as onResponderMove or onResponderRelease. With this event, we can set up our own gesture handler.
This is not the case with the React Native Gesture Handler library, as it provides a GestureHandlerRootView and GestureDetector that allow us to handle gestures.
We can demonstrate how to set up gesture handling with the native Gesture Responder System in the code below by making a View respond to a press and a move gesture:
import { StyleSheet, Text, View } from 'react-native';
import React from 'react';

const GRSSample = () => {
  return (
    <View>
      <View
        style={styles.square}
        onStartShouldSetResponder={(event) => true}
        onMoveShouldSetResponde={(event) => true}
        onResponderGrant={(event) => {
          console.log({ responderGrantEvent: event });
        }}
        onResponderReject={(event) => {
          console.log({ responderRejectEvent: event });
        }}
        onResponderMove={(event) => {
          console.log({ responderMoveEvent: event });
        }}
        onResponderRelease={(event) => {
          console.log({ responderReleaseEvent: event });
        }}
        onResponderTerminationRequest={(event) => {
          console.log({ responderReleaseEvent: event });
        }}
        onResponderTerminate={(event) => {
          console.log({ responderTerminateEvent: event });
        }}
      />
    </View>
  );
};
export default GRSSample;

const styles = StyleSheet.create({
  square: {
    width: 200,
    height: 200,
    backgroundColor: 'blue',
    alignSelf: 'center',
  },
});
Note that each of the methods in the sample above produces a native event that contains the following properties: changedTouches , identifier, locationX, locationY, pageX, pageY, target, timestamp, and touches.
Which library should you use for animation?
The library that implements animations is the React Native Reanimated library. Meanwhile, React Native Gesture Handler provides gesture handling capabilities and React Native Redash provides helper functions to handle the animations.
As a result, the library to use for animation is React Native Reanimated. However, if you want to make your animations smoother and more interactive, you can incorporate gesture handling and helper functions using React Native Redash and React Native Gesture Handler.
Conclusion
In this article, we compared the functionality of React Native Redash and React Native Gesture Handler. We also explored the difference between React Native Reanimated and React Native Gesture Handler.
To better understand the purpose and use of each library, we touched on how the Reanimated library interacts with the Animated API and how React Native Gesture Handler interacts with the native gesture handler in React Native. Finally, we discussed which library to use for animations.
You can check GitHub for the full source code for the examples that we implemented in this tutorial.
Thanks for reading! I hope you found this article useful for better understanding the differences between React Native Redash and React Native Gesture Handler. Be sure to leave a comment if you have any questions. Happy coding!
LogRocket: Instantly recreate issues in your React Native apps.

LogRocket is a React Native monitoring solution that helps you reproduce issues instantly, prioritize bugs, and understand performance in your React Native apps.
LogRocket also helps you increase conversion rates and product usage by showing you exactly how users are interacting with your app. LogRocket's product analytics features surface the reasons why users don't complete a particular flow or don't adopt a new feature.
Start proactively monitoring your React Native apps — try LogRocket for free.


