
Written by Samuel Ogunleye✏️
Learning multiple frameworks in the frontend technology world is not only entertaining, it can also be a smart career move and good practice for future projects. In case you encounter the new framework again, you’ll be ready to go.
Refine is another wonderful framework that was just released to lessen developer tension in areas like routing, authentication, and state management.
In this article, we'll look at how Refine, a React-based framework, may aid developers using its built-in features by creating a simple web application that demonstrates user authentication and routing.
What is Refine?
Refine is a React-based framework for developing data-heavy apps quickly. It makes use of the Ant Design system, a business-oriented user interface toolkit.
Refine comes with a lot of prebuilt functionality to help you get started quickly without losing customizability. Routing, networking, authentication, state management, and internationalization are examples of such functionality.
Refine’s superpower is complete control over the user interface. It's great for applications that need to process large volumes of data, like admin panels and dashboards, and it provides database support for REST and GraphQL, including Strapi and NestJS CRUD.
Prerequisites
To understand this tutorial, you will need:
- React v16 or newer
- Working knowledge of React
- Working knowledge of Node.js
- A text editor
Using Refine Hooks
Before we dive into building our example app, let’s go over one of Refine’s best features: Hooks. Refine's Hooks have made integration with web applications much easier for developers. Best of all, Refine’s Hooks include a few extra features in addition to the native React Hooks that they are based on.
The data hooks, which include useCreate, useUpdate, useDelete, useCustom, and useApiUrl, are some of the additional functionalities offered by Refine. They are similar to Hooks you can find in React Query - check out the documentation to learn more about Refine's data Hooks.
We'll focus primarily on authorization hooks in this article, because we'll be implementing them later when we build our sample app.
Refine's Authorization Hooks
These Hooks aid in web application authentication. They grant us superpowers such as the ability to authenticate users to log in, log out, or validate if an existing user meets certain criteria before accessing protected routes. It employs the following functions:
First, useLogin invokes an authProvider login method, which authenticates the application if the login method succeeds, and displays an error notification if it fails. It returns the user to the base application after successful authentication:
import { useLogin, Form } from "@pankod/refine";

export const LoginPage = () => {
    const { mutate: login } = useLogin()

    const onSubmit = (values) => {
        login(values);
    };

    return (
        <Form onFinish={onSubmit}>
            // rest of the login form
        </Form>
    )
}
Next, useLogout calls the authProvider's logout method underneath the hood. If the authProvider's logout method succeeds, it authenticates the app; if it fails, the authentication state remains unchanged.
Take a look at a short snippet below to see this Hook in action:
import { useLogout, Button } from "@pankod/refine";

export const LogoutButton = () => {
    const { mutate: logout } = useLogout();

    return (
        <Button onClick={() => logout()}>
            Logout
        </Button>
    )
}
useCheckError invokes the authProvider's checkError function. useCheckError runs the authProvider's logout method if checkError returns a denied promise, and the app is unauthenticated:
import { useCheckError } from "@pankod/refine";

const { mutate: checkError } = useCheckError();

fetch("https://api.fake-rest.refine.dev/users)
    .then(() => console.log("Success"))
    .catch((error) => checkError(error));
Finally, useAuthenticated invokes the authProvider's checkAuth method, which checks for any particular and protected actions.
Table Hooks
By using the useTable() Hook, you can access properties that are compatible with Ant Design's Table component. This Hook offers several functionalities, such as sorting, filtering, and pagination:
import React from "react";
import { List, Table, useTable } from "@pankod/refine";

export const Sample = () => {
  const { tableProps } = useTable();

  return (
    <div>
      <List>
        <Table {...tableProps} rowKey="id">
          <Table.Column dataIndex="id" title="ID"     />
           </Table>
      </List>
    </div>
  );
};

export default Sample;
Getting started with Refine
In this tutorial, we will be building a simple application that lists users. To begin, we will generate a default template for Refine.
There are two ways to do this; the first technique is to use superplate, and the second is to use Create React App. We'll use the Create React App approach based on this tutorial because we're all React fans 😊.
In your terminal, create a new React app and run the command below:
yarn create react-app refine-react-framework
This will generate a starter template and create a refine-react-framework folder. This is what your package.json file should look like:

But we're not done yet; after building the default React template, we'll need to run the command below to install the Refine package:
yarn add @pankod/refine @pankod/refine-react-router
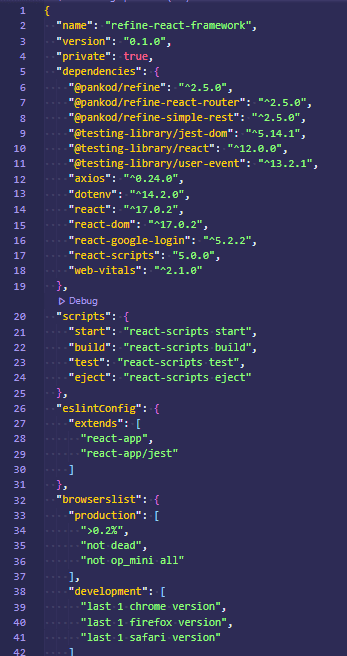
This will install the Refine module into the React application that we created above. This is what your package.json file should look like now:

The Refine module has been successfully installed, as seen on lines six and seven. Now, let’s run the application using the command below:
yarn start
This is what your output should look like:
Let’s do some cleanup inside the project that was created above, because there are some unnecessary files that we won’t be using.
Open the src folder and delete setupTests.js, reportWebVitals.js, logo.svg, App.css, and toApp.test.js from the project. This is just to reduce the project file size because we won’t be using them.
Open App.js and replace the code with this:
const App = () => {
  return (
    <div>
      Hello World
    </div>
  );
}

export default App;
The code above simply removes the previous content from the template so that we can work in a clean environment.
Another thing to note is that our application is broken because we deleted some files that are linked inside index.js. Let's fix that by updating the file with the code below:
import React from "react";
import ReactDOM from "react-dom";
import "./index.css";
import App from "./App";

ReactDOM.render(
 <React.StrictMode>
   <App />
 </React.StrictMode>,

 document.getElementById("root")
);
Finally, go into your index.css file and clear it out so it does not contain any code.
You'll notice that we didn't include any third-party UI libraries in our app. Why? This is because Refine comes with a built-in UI library system called Ant Design.
Other UI library systems (such as Chakra UI, Bootstrap, and Material UI) are also supported by Refine. In this article, we'll use the Ant Design system, which is the default.
Building a simple web application with Refine
Now let’s get our hands dirty to see how Refine works in a simple user listing application. This application will retrieve some random data from an endpoint and provide it to the user in a tabular layout with pagination functionality.
We'll be using some imaginary REST API data provided by JSON Server, a tool that generates fake REST APIs. Before using the API, you should read the documentation at https://api.fake-rest.refine.dev/.
Let's make some changes to the project we started in the previous section. Create a pages folder, component folder, and queries folder inside the src folder. These folders will aid in the separation of concerns, resulting in good code organization.
Create a subfolder called users inside the components folder, and a file called User.jsx inside that. Then, copy and paste in the code below:
import React from "react";
import { List, Table, useTable } from "@pankod/refine";

export const Users = () => {
  const { tableProps } = useTable({
    initialSorter: [
      {
        field: "title",
        order: "asc",
      },
    ],
  });

  return (
    <div>
      <List>
        <Table {...tableProps} rowKey="id">
          <Table.Column dataIndex="id" title="ID" sorter />
          <Table.Column dataIndex="firstName" title="First Name" sorter />
          <Table.Column dataIndex="lastName" title="Last name" sorter />
          <Table.Column dataIndex="email" title="Email" sorter />
          <Table.Column dataIndex="birthday" title="Birthday" sorter />
        </Table>
      </List>
    </div>
  );
};

export default Users;
This is where the real trick takes place! In this scenario, some components were imported coupled with a useTable Hook.
Remember that all of the Ant Design components are used here, and they create a collection of unique tables that will be used to populate particular data during the project. Let’s take a closer look at the code above.
Hooks are a big part of Refine, and useTable() is an important one, as we learned earlier. Here, the useTable() Hook retrieves data from an API and wraps it in the component's various helper Hooks. Data interaction tasks such as sorting, filtering, and pagination will be available on the fly with this single line of code.
The initialSorter parameter allows you to choose which field will start with which sorting state ("asc" or "desc"). It determines whether the data is shown in ascending or descending order. It works by the sorter property of the table.
List is a Refine component. It serves as a wrapper for other elements.
Table.Column is used to display rows of data and to collect structured data. It's also capable of sorting, searching, paginating, and filtering.
rowKey is a one-of-a-kind identifier key for efficient iteration.
The dataIndex property serves as a unique identifier for each table row and column. It maps the field to a matching key from the API response.
Let's fire up our terminal and look at the output in your preferred browser; it should look somewhat like this:

Retrieving data for the app
Now let's use the fake REST API to get some useful info. Navigate to the queries folder and create a file called GetData.jsx within it. Copy and paste the code below into your editor:
import { Refine } from "@pankod/refine";
import routerProvider from "@pankod/refine-react-router";
import dataProvider from "@pankod/refine-simple-rest";

import { Users } from "components/users/Users";

export const GetData = () => {
  const API_URL = "https://api.fake-rest.refine.dev";

  return (
    <Refine
      routerProvider={routerProvider}
      dataProvider={dataProvider(API_URL)}
      resources={[{ name: "users", list: Users }]}
      Layout={({ children }) => (
        <div style={{ display: "flex", flexDirection: "column" }}>
          {children}
        </div>
      )}
    />
  );
};
export default GetData;
The routerProvider, dataProvider, resources, and Layout are the most important things to look for here. These are all properties that have been passed to the Refine component. The dummy data will be generated in API_URL.
Some router features, such as resource pages, navigation, and so on, are created as a result of routerProvider. It gives you the option of using whichever router library you desire.
The interface between a customized app and an API is called a data provider, as seen above as dataProvider. It acts as a Refine integrator, making it simple for devs to utilize a wide range of APIs and data services. It uses established methods to send HTTP requests and receive data in return.
The resources Refine property represents API endpoints. It connects the name prop to a specific endpoint and automatically generates a URL that will be attached to the endpoint; in this case, the appended URL is "/users."
Layout is a custom component that allows you to design a new template and styling without having to use the default template. It takes a child argument to make future components that are supplied inside it easier to handle.
A named import was used to bring in a User component from the User component that was created earlier with the Table.Column technique. It's then added to the resource property, which creates a URL path for routing automatically.
Now, let’s make some modifications to our User.jsx file by adding some additional tags to improve the physical layout of the application.
Copy and paste the following code below:
import React from "react";
import {
  Button,
  Icons,
  List,
  Table,
  useTable,
  Typography,
} from "@pankod/refine";

export const Users = () => {
  const { Title } = Typography;
  const { tableProps } = useTable({
    initialSorter: [
      {
        field: "title",
        order: "asc",
      },
    ],
  });

  return (
    <div>
      <Title
        style={{
          textAlign: "center",
          fontSize: "2rem",
          fontWeight: 600,
          padding: "1rem",
          color: "#67be23",
        }}
      >
        Simple User Listing Application
      </Title>
      <List>
        <Table {...tableProps} rowKey="id">
          <Table.Column dataIndex="id" title="ID" sorter />
          <Table.Column dataIndex="firstName" title="First Name" sorter />
          <Table.Column dataIndex="lastName" title="Last name" sorter />
          <Table.Column dataIndex="email" title="Email" sorter />
          <Table.Column dataIndex="birthday" title="Birthday" sorter />
        </Table>
      </List>
    </div>
  );
};

export default Users;
In the code above, components from "@pankod/refine" were imported, and they will be utilized to generate users for the table.
To improve the user experience, a few tags have been introduced, and the tags have been enhanced with inline styling.
Let's restart our terminal and examine the new output from our browser:
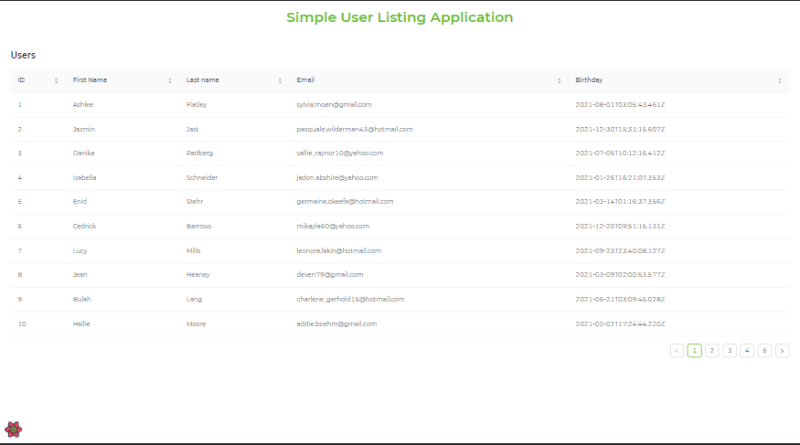
Yay! Even the pagination works nicely with the table we used to generate our data, which contains a list of users.
Note that when utilizing the useTable hook, pagination is included by default.
Creating a dynamic login page
We were able to create a simple application that displays a list of random people along with some more information. We can add some spice to our application by creating a dynamic login page that prevents users from accessing the list of users created until they have been authenticated.
In this scenario, we'll use third-party libraries such as Google Authenticator, Axios, and dotenv. Users will be able to authenticate themselves using Google, send requests to REST endpoints using Axios, and preserve secret API keys using dotenv.
Copy and paste the following command into your terminal:
yarn add react-google-login axios dotenv
This will install the Google Authenticator dependencies, as well as Axios for initiating requests and dotenv for keeping secret keys safe. Your package.json file should end up looking something like this:
Let's get started with Google Authenticator's features!
Go to the pages folder and create a new file called Login.jsx inside it. That is where the login process will take place. Copy and paste the code below into your browser:
import { Button, Icons, useLogin, Typography } from "@pankod/refine";
import { useGoogleLogin } from "react-google-login";
const { GoogleOutlined } = Icons;
const clientId = `${process.env.REACT_APP_CLIENT_ID}`;

export const Login = () => {
  const { Title } = Typography;
  const { mutate: login, isLoading } = useLogin();

  const { signIn } = useGoogleLogin({
    onSuccess: (response) => login(response),
    clientId,
    isSignedIn: true,
    cookiePolicy: "single_host_origin",
  });

  return (
    <div>
      <div
        style={{
          background: "#fafafa",
          height: "100vh",
          display: "flex",
          flexDirection: "column",
        }}
      >
        <div>
          <Title
            style={{
              textAlign: "center",
              fontSize: "2rem",
              fontWeight: 600,
              padding: "2rem",
              color: "#67be23",
            }}
          >
            Simple User Listing Application
          </Title>
        </div>
        <div style={{  margin: "auto" }}>
          <Title
            style={{
              textAlign: "center",
              fontSize: "1rem",
              fontWeight: 300,
              padding: "3rem 0 0 0",
              color: "#67be23",
            }}
          >
            Sign in with Google
          </Title>
          <Button
            type="primary"
            size="large"
            block
            icon={<GoogleOutlined />}
            loading={isLoading}
            onClick={() => signIn()}
          >
            Sign in
          </Button>
        </div>
      </div>
    </div>
  );
};
Let's look at the code above in more detail to see what's going on.
We needed to import several components and hooks for our login page, so we did.
Button, Icon, and Typography are among the components, while useLogin and useGoogleLogin are among the Hooks.
Button performs the same function as a standard HTML button tag, allowing an action to be performed when the button is clicked. It includes the Icon component, the loading state, and an onClick method, which are all supplied as props.
Typography supports text features, allowing additional header text to be added to the Title component.
useGoogleLogin gives you access to a signIn parameter. This parameter is then supplied to the Button component, which triggers an action when a user clicks on it.
useGoogleLogin calls the onSuccess function, which is called anytime a login request is made. It checks if the properties associated with onSuccess are right whenever it runs, and then authenticates the user. ClientId, isSignedIn, and cookiePolicy are among the properties.
Copy the client ID key and put it into the .env file that will be created in your application's root folder. Process.env is used to synchronize the client ID key with the application to use it.
Now, Let's create a services folder that will handle all user actions before we begin the application. Create an authProvider.js file within the folder and add the following code:
import axios from "axios";

export const authProvider = {
    login({ tokenId, profileObj, tokenObj }) {
      axios.defaults.headers.common = {
        Authorization: `Bearer ${tokenId}`,
      };

      localStorage.setItem(
        "user",
        JSON.stringify({ ...profileObj, avatar: profileObj.imageUrl }),
      );
      localStorage.setItem("expiresAt", tokenObj.expires_at.toString());

      return Promise.resolve();
    },
    logout() {
      localStorage.removeItem("user");
      localStorage.removeItem("expiresAt");
      return Promise.resolve();
    },
    checkError() {
      return Promise.resolve();
    },
    checkAuth() {
      const expiresAt = localStorage.getItem("expiresAt");

      if (expiresAt) {
        return new Date().getTime() / 1000 < +expiresAt
          ? Promise.resolve()
          : Promise.reject();
      }
      return Promise.reject();
    },
    getUserIdentity() {
      const user = localStorage.getItem("user");
      if (user) {
        return Promise.resolve(JSON.parse(user));
      }
    },
  };
In this case, the authProvider was developed to handle the authentication operations. It accepts some methods that are executed when an action is performed.
The login method accepts some inputs (tokenId, profileObj, tokenObj) that were obtained from Google and will be utilized in the future of the application. The responses are temporarily saved to localStorage and then called upon when needed.
The logout method essentially deletes anything that has been set or saved to localStorage.
The validation is handled via the checkAuth method. It checks to see if the user session is still active and hasn't been used up; if not, it bounces the user back to the home page.
After a successful login, the getUserIdentity function aids in getting the saved data. Data that was previously saved for the future will be accessed and used here.
Let's now update the GetData.jsx file that was previously created. Copy and paste the code below:
import { Refine } from "@pankod/refine";
import routerProvider from "@pankod/refine-react-router";
import dataProvider from "@pankod/refine-simple-rest";
import {authProvider} from "services/authProvider"
import axios from "axios";

import { Users } from "components/users/Users";
import { Login } from "pages/Login";

export const GetData = () => {
  const API_URL = "https://api.fake-rest.refine.dev";

  return (
    <Refine
      authProvider={authProvider}
      routerProvider={routerProvider}
      dataProvider={dataProvider(API_URL, axios)}
      resources={[{ name: "users", list: Users }]}
      LoginPage={Login}
      reactQueryDevtoolConfig={{
        initialIsOpen: false,
        position: "none",
      }}
      Layout={({ children }) => (
        <div style={{ display: "flex", flexDirection: "column" }}>
          {children}
        </div>
      )}
    />
  );
};

export default GetData;
The previously created authProvider was imported and passed as a property to the Refine component.
Since it is acting as a custom Login.jsx component, the LoginPage property was also provided in the Refine component.
Axios was passed as a parameter with the API_URL because it is essential for sending a request.
Let's look at the results in the browser. The output should look like this:
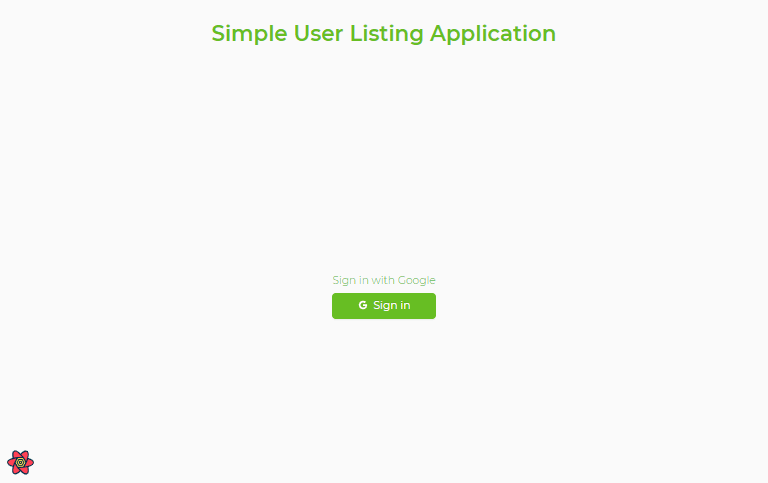
When a user selects the Sign in button, the system authenticates the user and redirects them to the user page that we created earlier.
Creating a sign-out button
So far, we've created the user listing page and the login page. Let's wrap up our application by adding a sign-out button and generating some dynamic data from localStorage.
Copy the code below and paste it inside the Users.jsx file:
import React from "react";
import {
  Button,
  Icons,
  List,
  Table,
  useTable,
  useLogout,
  Typography,
} from "@pankod/refine";
import { useGoogleLogout } from "react-google-login";
import { useGetIdentity } from "@pankod/refine";

export const Users = () => {
  const { data: identity } = useGetIdentity()
  const { Title } = Typography;
  const { tableProps } = useTable({
    initialSorter: [
      {
        field: "title",
        order: "asc",
      },
    ],
  });

  const { mutate: logout, isLoading } = useLogout();
  const { GoogleOutlined } = Icons;
  const clientId = `${process.env.REACT_APP_CLIENT_ID}`;

  const { signOut } = useGoogleLogout({
    onLogoutSuccess: (response) => logout(response),
    clientId,
    isSignedIn: false,
    cookiePolicy: "single_host_origin",
  });

  return (
    <div>
      <Title
        style={{
          textAlign: "center",
          fontSize: "2rem",
          fontWeight: 600,
          padding: "1rem",
          color: "#67be23",
        }}
      >
        Simple User Listing Application
      </Title>
      <div
        style={{
          display: "flex",
          justifyContent: "space-between",
          padding: "0 1.5rem",
        }}
      >
        <Title
          style={{
            fontSize: "1.2rem",
          }}
        >
          <img
            style={{ borderRadius: "50%", marginRight: "1rem", height: "60px" }}
            src={identity?.imageUrl}
            alt=""
          />
          Welcome <span style={{ color: "#67be23" }}> {identity?.name}!</span>
        </Title>
        <Button
          type="primary"
          size="large"
          htmlType="submit"
          icon={<GoogleOutlined />}
          loading={isLoading}
          onClick={() => signOut()}
        >
          Sign out
        </Button>
      </div>
      <List>
        <Table {...tableProps} rowKey="id">
          <Table.Column dataIndex="id" title="ID" sorter />
          <Table.Column dataIndex="firstName" title="First Name" sorter />
          <Table.Column dataIndex="lastName" title="Last name" sorter />
          <Table.Column dataIndex="email" title="Email" sorter />
          <Table.Column dataIndex="birthday" title="Birthday" sorter />
        </Table>
      </List>
    </div>
  );
};

export default Users;
We used the useGoogleLogout() and useGetIdentity() Hooks in this case.
In the authProvider file, the useGetIdentity() Hook was declared. It offers you access to the identity parameter, which will be utilized to obtain some localStorage data.
The useGoogleLogout() Hook is similar to the useGoogleLogin() Hook because it does the opposite function by allowing you to use the signOut parameter. When a user clicks on the button, this parameter is passed to the Button component, which performs an action.
The onLogoutSuccess method is executed whenever a logout request is made by useGoogleLogin().
identity.name reads the user's name from localStorage.
The image URL is obtained from the localStorage via identity.imageUrl.

Yippee! Our application is now officially complete. I believe we have learned a variety of things about Refine and have grasped certain Refine workarounds, such as the usage of authorization hooks.
Conclusion
By the end of this article, you should have a good understanding of how Refine works, why it’s significant in web applications, and how to put up a basic Refine web application.
This is a simple project with a variety of features. You can look at the code on GitHub or see the live view for more practice.
I hope you find this tutorial as useful as I do.
Happy coding!
Full visibility into production React apps
Debugging React applications can be difficult, especially when users experience issues that are hard to reproduce. If you’re interested in monitoring and tracking Redux state, automatically surfacing JavaScript errors, and tracking slow network requests and component load time, try LogRocket.

LogRocket is like a DVR for web and mobile apps, recording literally everything that happens on your React app. Instead of guessing why problems happen, you can aggregate and report on what state your application was in when an issue occurred. LogRocket also monitors your app's performance, reporting with metrics like client CPU load, client memory usage, and more.
The LogRocket Redux middleware package adds an extra layer of visibility into your user sessions. LogRocket logs all actions and state from your Redux stores.
Modernize how you debug your React apps — start monitoring for free.


