One of my goals for 2023 is to be more active on Twitter. I am on Twitter most days, but is often just consuming content rather than creating it.
I soon found out that my creativity comes in bursts. I might come up with 10 interesting things to say one day and then have nothing for a few days.
Rather than send out 10 tweets all out once, I would rather save them up and send them out over the course of a week.
There are many tools that let you do this, some of them are free, some of them paid. The free ones generally have a limit to the amount that you can queue up at anyone time.
I thought about building my own tweet scheduler, but that would likely have taken a couple of weeks of development work.
Instead, I decided to embrace no-code, at least low-code and build up my own tweet scheduler with Notion and n8n.
What is n8n?
You may not have heard of n8n, I hadn’t until a few weeks ago. N8N (affiliate link) is like IFTTT, and Zapier, but it can be self-hosted and is a lot more powerful than either of them.
N8N also offers cloud plans if you want to avoid hosting it yourself, although I will cover how to host it for free in a future post. There is also a desktop app however that means your automations will only run when your computer is on, which isn’t ideal.
N8N is more complicated to use compared to IFTTT and Zapier, so I wouldn’t recommend it for non-technical users. However, if you are already a software developer like myself, then you shouldn’t have any issues setting things up.
The reason n8n is a bit harder to use is because the developer accounts for each platform need to be set up yourself. This is often as simple as requesting an API key, but in some cases (like Twitter) it is a bit more involved.
What are we going to build?
To be able to automate sending tweets, I needed to create some form of queue.
Notion’s Kanban boards are perfect for this. This is the general flow I wanted to accomplish:
- Add an idea for a tweet to the Kanban board
- Refine it and move it to the Ready column
- Automation picks up the tweet from Ready and sends it to Twitter
- Automation moves the Tweet to Published and adds a URL for the tweet.
The automation needs to run a few times a day, and I wanted to send out tweets when my Twitter followers are most active.
I use a great tool called Black Magic which shows me the most engaging hours of the day:
I am based in the UK 🇬🇧, so my most engaging hours will likely be a bit different to yours. I eventually settled on 3 times a day:
- 08:00 - 09:00
- 15:00 - 16:00
- 18:00 - 19:00
I might adjust these in future if this pattern changes over time. I still use Twitter organically as well, but generally, I am retweeting or replying to other people's tweets.
Step-by-Step Instructions
I will guide you through how I built this. There will be a few areas that could do with more work, which I will highlight as I go through. If you find any improvements for this, then let me know in the comments.
1. Set up Twitter Developer Account
The first thing you will need is a Twitter developer account to be able to send tweets.
This where tools like IFTTT are easier, as they already have their application set up with Twitter.
The reason this is the first step is that it takes around 3 days to get your account approved. There is no point building out the rest of your automation until you have this.
I would rather not reinvent the wheel, so I suggest you read through n8n documentation to set up Twitter.
I didn’t have much luck using the Twitter node that comes with n8n, I ended up doing an API request, but you still require the same details.
For this tutorial, you will need to set up OAuth 1 credentials and as mentioned in the docs you will need the API Key and Consumer Secret.
2. Set up n8n
There are a few ways you can run n8n. You can either pay for their cloud hosting, run the desktop app, or self-host it either in the cloud or on your local network.
I have mine running for free using Railway. I will show you how to do that in a future post.
For now, I am going to assume you have n8n set up with at least one of these methods.
3. Set up Notion Kanban board
To schedule tweets, we will use a Notion Kanban board as a queue.
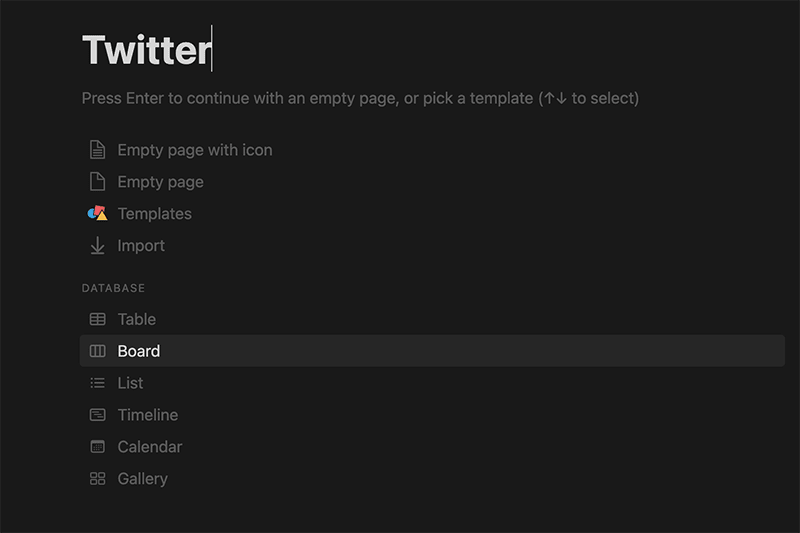
In Notion, create a new page, give it a name and select Board under Database.
On the right-hand side, select New database.
You should now have a board that looks something like this.
You can leave the board like this, but I prefer to rename the column to Idea, Ready, Published.
To rename them, you need to click the 3 dots next to New. Then go to Properties and click the arrow at the right of Status. You then have the option to rename each of the statuses.
You may need to go to Layout and select Group by Status again for it to update the columns on your board.
I have a few properties set up on each Card:
- PublishedAt (date time)
- Published (checkbox)
- Length (number)
- URL (url)
4. Connect Notion to n8n
To be able to connect to Notion’s API, we must create an API Key.
We can do this in Notion by going to the integrations page and selecting New Integration.
Once created you will receive an “Internal Integration Token” which is just a fancy name for an API Key.
Copy this and go to the Credentials page in n8n. Select Add Credential and then pick Notion API (not Notion OAuth2 API) from the list.
Then paste in your API Key.
5. Give n8n access to your Twitter Kanban board
This is the step that I always forget and get stuck for 15 minutes wondering why it isn’t working.
You need to give your new integration access to your Kanban board.
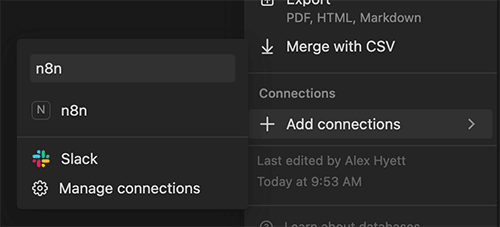
To do this, you need to click on the 3 dots in the top-right corner of Notion (not the ones next to the New button).
It is best to just search for your integration in the list. I called mine n8n:
This then provides access to n8n to see and makes changes to your Notion board.
6. Set up your n8n workflow
This is what we are going to build.
This is what each step is doing:
- Schedule Trigger - This is the schedule that I want this workflow to run on.
- Get Ready Tweet - This gets the oldest tweet from the Ready column on my Kanban
- Get Page - The content of the tweet is in the body of the page on Notion, so I need to grab the page using the ID from the previous step.
- Format Tweet - You can write Javascript code in n8n to do more complicated tasks. This takes the JSON from the Notion page and formats it into a Tweet.
- IF Too Long - There is a small chance that I get carried away and write something too long for Twitter. This checks that the length is under 280 characters.
- POST to Twitter - This sends out the Tweet using the Twitter API. As mentioned, I had issues with the official integration in n8n so chose to use the API instead.
- Set To Published - This updates the card in Notion and sets it to Published as well as adding the URL to the tweet and when it was published.
- Set To Idea - If the text is over 280 characters or under 5, I set it back to Idea.
Let’s have a look at each of these steps in detail, so you can set up this workflow yourself.
Schedule Trigger
I mentioned earlier that I have decided to publish my tweets 3 times a day.
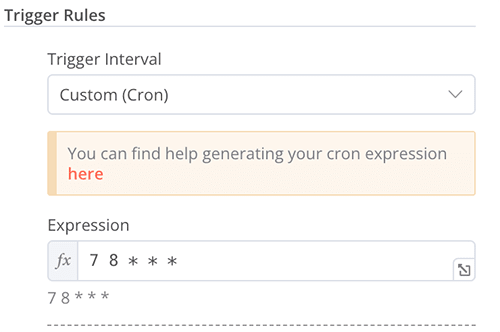
To do this, we need to set up a schedule trigger in n8n.
Currently, I just have my tweets going out at 3 fixed times each day. At some point, I might update this to pick a random minute between those hours.
For example, using an expression such as (Math.random() * 60) << 0 will give you a random number between 0 and 59, but I am uncertain if n8n scheduling can cope with that.
The easiest way to do this is to set up a cron expression such as 7 8 * * * which will trigger every day at 8:07 am.
If you need help coming up with the Cron expression, you can use crontab.guru to come up with them.
Get Ready Tweets
The next step is to get the oldest tweet from the Ready column in Notion. We can use the “Notion (Beta)” node to do this.
You need to select the following options once you have picked your credentials:
- Resource: Database Page
- Operation: Get Many
- Database: From List (pick your Twitter Kanban board)
- Return All: False
- Limit: 1
- Filter: JSON
You can use this JSON to filter by only those in the Ready column:
{
  "and": [
    {
      "property": "Status",
      "status": {
        "equals": "Ready"
      }
    }
  ]
}
Lastly, we are going to sort the results so that we get the oldest tweet first.
Under Options, you need to pick Sort by Timestamp and pick the Created Time property and Direction Ascending.
If you have something in your Ready column and Execute this node, you should get back a list of the properties.
Get Page
We now need to get the contents of the page in Notion. You could put everything in the title of the card, but I prefer a bit more structure to my tweets.
The n8n integration doesn’t support getting page data, so I had to resort to doing an API request to get the data.
You have to use the “HTTP Request” node, and we are going to make a GET call to the Notion API.
These are the details you need:
- Method: GET
-
URL:
https://api.notion.com/v1/blocks/{{ $json["id"] }}/children. This will use the ID from the previous step to find the page - Authentication: Predefined Credential Type
- Credential Type: Notion API
- Credential For Notion API: The credential you created earlier
- Send Query Parameters: false
- Send Headers: true
-
Specific Headers: Using Fields Below
-
Name:
Notion-Version -
Value:
2022-06-28
-
Name:
Running this will give you back the page from Notion as a JSON object.
Format Tweet
We now need to turn the JSON object from the previous step into a formatted Tweet.
This is where you might want to add some more functionality. Currently, this handles sending plain text tweets with new lines.
It doesn’t cope with:
- Bullet points
- Numbered lists
- Breaking Tweets down into Threads
To format the JSON into a tweet, we are going to use the “Code” node and write some Javascript.
This is where tools like n8n come into their element, as you can do so much more with them compared to IFTTT and Zapier.
For Mode, we will pick “Run Once for All Items”. We only have 1 item, so it doesn’t matter too much, but you may need to edit the code if you pick the other option.
Here is the code for this step:
let results = $('Get Page').first().json.results;

let tweet = ''

for (let i = 0; i < results.length; i++) {
  let result = results[i];

  if (result.type === "paragraph") {
    if (result.paragraph.rich_text.length === 1) {
       tweet = tweet + result.paragraph.rich_text[0].plain_text + '\n';
    } else {
       if (i <= results.length - 2) {
         tweet = tweet + '\n'
       }
    }
  }
}

return {
  tweet: tweet
}
You can see here it is expecting the paragraph type and ignores all others. You might want to experiment and see what else you can get Notion to output.
This should, when run, give you a simple JSON output with the contents of your tweet:
[
    {
        "tweet": "Insert interesting tweet here"
    }
]
IF Too Long
Unless you are checking before writing your tweets in Notion, you might end up going over the 280-character limit.
We can check the length of the tweet in n8n and only let it continue if it meets some length restrictions.
I have set a minimum of 5 characters and a maximum of 280. I want to make sure in case of API changes that I am actually getting back something reasonable after formatting my tweets.
So, we are going to set up an IF node with a Boolean expression with these values:
-
Value 1:
{{ $json["tweet"].length <= 280 && $json["tweet"].length >= 5 }} -
Value 2:
{{ true }}
If your tweet is between 5 and 280 characters it will go to the true branch, if not it will go to the false branch.
Set To Idea
If the tweet is too long or too short, we need to send the tweet back to the Idea column in Notion.
I am setting here the length of the tweet, so I know why it has been sent back to Idea.
We can use the “Notion (Beta)” node again for this. This time with the following options:
- Resource: Database Page
- Operation: Update
-
Database Page: By ID
{{ $node["Get Ready Tweet"].json["id"] }} -
Properties:
- Key Name or ID: Status
- Status Name or ID: Idea
- Key Name or ID: Length
-
Number:
{{ $node["Format Tweet"].json["tweet"].length }}
POST to Twitter
Assuming your Tweet is the correct length, then we can now send it to Twitter.
As I mentioned earlier, I had issues using the n8n integration for Twitter, so resorted to using an HTTP request. They may have fixed this by the time you read this though.
If you are using the API, then you need to create an HTTP Request node with the following options:
- Method: POST
-
URL:
https://api.twitter.com/2/tweets - Authentication: Generic Credential Type
- Generic Auth Type: OAuth1 API
- Credential for OAuth1 API: Set up a new OAuth1 credential with the API Key and Consumer Secret you set up on the Twitter developer portal.
- Send Query Parameters: false
- Send Headers: false
- Send Body: true
- Body Content Type: JSON
-
Specify Body: Using Fields Below
- Name: text
-
Value:
{{ $json["tweet"] }}
This will then send your tweet to Twitter and come back with an API response with the ID of the tweet.
Set to Published
We now need to update the card in Notion so that it moves it to Published, so it won’t come up again next time the workflow runs.
We are also going to add some useful details to the card, so we can see the URL of the tweet and when it was sent out.
If you are paranoid, you might want to set up an additional Status that moves the tweet from Ready to Processing before it is sent out, just in case something fails. You wouldn’t want the same tweet being sent over and over again.
To set the tweet to published, we can do the same thing we did to set it back to Idea. You will need the “Notion (Beta)” node with the following settings:
- Resource: Database Page
- Operation: Update
-
Database Page: By ID
{{ $node["Get Ready Tweet"].json["id"] }} -
Properties:
- Key Name or ID: Status
- Status Name or ID: Published
- Key Name or ID: Published
- Checked: true
- Key Name or ID: URL
-
URL:
https://twitter.com/<your twitter handle>/status/{{ $json["data"]["id"] }} - Key Name or ID: PublishedAt
- Include Time: true
-
Date:
{{new Date().toISOString()}}
Don't forget to update your Twitter handle above so the URL is correct.
Active Your Workflow
The last thing you need to do is set it to active by changing the switch at the top right of your workflow from Inactive to Active.
You now have your very own Twitter scheduler powered by Notion and n8n.


