Overview
In this tutorial, I'll show you how to use the Vonage Voice API to create a subtle way to excuse yourself from a situation you'd rather not be in. You can trigger a ghost call by sending an SMS to a virtual number!
This project's code is on GitHub.
Prerequisites
Before starting to build the project, ensure you have:
- A Vonage developer account.
- Node.js and npm installed on your machine.
- Ngrok for creating a secure tunnel to your localhost.
- A text editor and basic JavaScript knowledge.
Use Ngrok to Expose Your Local Server
Ngrok exposes your local webhooks on the public internet and allows you to receive external calls on them:
- Start ngrok with
ngrok http 3000. - Note the HTTPS forwarding address (e.g.,
https://xyz.ngrok.com).
Setting Up the Vonage Application
After signing up for a Vonage account:
- Create a New Application: Go to 'Your Applications' in the dashboard and toggle the Voice and Messages capabilities.
-
Generate Credentials: Create a public/private key pair for API authentication; this will download a
private.keyto be added to our project folder. - Link a Virtual Number: Acquire and link a virtual number to your application.
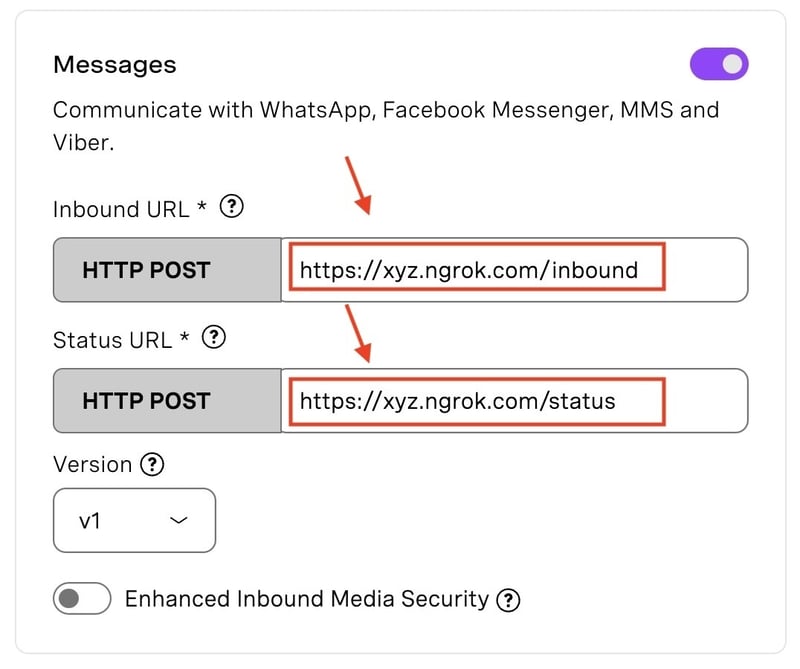
- Configure Webhooks: Set your server's public URL from ngrok as the endpoint for inbound messages and events. it should look like: https://xyz.ngrok.com/inbound for inbound and https://xyz.ngrok.com/event for events.
![Messages Inbound and Status URLs. It shows that the Inbound URL and the Status URL should be filled with the ngrok url followed by /inbound and /status respectively]
Server-Side Implementation
Initial Project Setup
- Create a New Project Directory: Open your terminal and navigate where you want to create your new project. Then, use the following command to create and change to a new directory for your project:
mkdir vonage-ghost-call && cd vonage-ghost-call
-
Initialize a Node.js Project:
In your new project directory, initialize a Node.js project. This will create a
package.jsonfile that manages your project's dependencies and scripts. Use thenpm initcommand to specify details or press Enter to accept defaults. The-yflag automatically fills in the defaults without asking for the details.
npm init -y
- Install the Dependencies: Now, it's time to install the dependencies required for the project:
-
express: A web framework for Node.js. -
dotenv: Used to load environment variables from a.envfile. -
@vonage/server-sdk: The Vonage Server SDK for Node.js. -
@vonage/voice: The Vonage Voice API SDK.
To install all these in one go, run the following command, which will automatically add these packages to your package.json file and add them to your project's node_modules directory.
npm install express dotenv @vonage/server-sdk @vonage/voice
Create the Environment Variables File
Create a .env file in your project and add the following environment found in the code snippet below.
- The
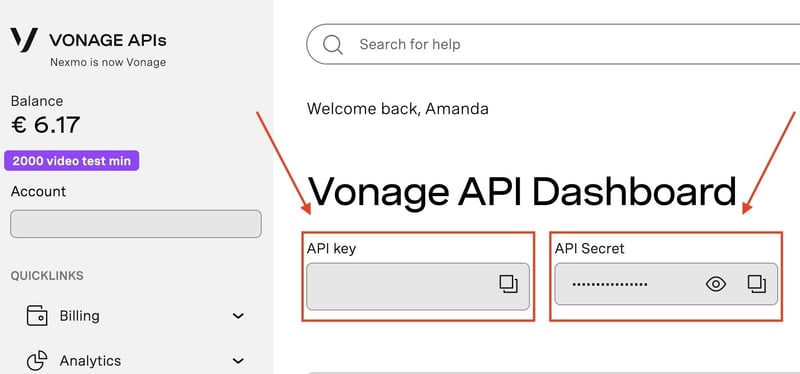
VONAGE_KEYandVONAGE_SECRETcan be found on the Vonage Dashboard.
![Vonage Dashboard. It shows where the API Key and API Secrets are. Right under the text 'API key and API Secret']
- The
VONAGE_APPLICATION_IDcan be found in the application you have created, which can be found in the Vonage Applications. - The
FROM_IMPORTANT_FRIENDis the phone number for the phone call. - The
ANSWER_URLdetermines how to handle a call and who to connect the call to. It does that by executing an NCCO that utilizes numerous capabilities of the Voice API; an example value could behttps://raw.githubusercontent.com/nexmo-community/ncco-examples/gh-pages/text-to-speech.json. - The
PRIVATE_KEY_PATHis the path of theprivate.keyfile we downloaded earlier when we generated the public/private key pair for API authentication.
VONAGE_KEY=
VONAGE_SECRET=
VONAGE_APPLICATION_ID=
PRIVATE_KEY_PATH=
ANSWER_URL=
FROM_IMPORTANT_FRIEND=
Implement the Server Side Code
In your index.js file, start the project by importing the required modules. You'll set up Express to handle incoming HTTP requests and configure the Vonage client with credentials stored in your environment variables:
// Import dependencies
require('dotenv').config();
const express = require('express');
const { Vonage } = require('@vonage/server-sdk');
const app = express();

// Middleware for parsing incoming requests
app.use(express.json());
app.use(express.urlencoded({ extended: false }));

// Initialize Vonage API client with environment variables
const vonage = new Vonage({
  apiKey: process.env.VONAGE_KEY,
  apiSecret: process.env.VONAGE_SECRET,
  applicationId: process.env.VONAGE_APPLICATION_ID,
  privateKey: process.env.PRIVATE_KEY_PATH
});
Handle Inbound SMS Messages
The server is listening for new SMS messages to come in. When the server gets a new SMS message, it makes an outbound phone call to the phone number that sent the SMS message. This is contained in the server code's /inbound part.
// Route to handle inbound SMS
app.post('/inbound', (req, res) => {
  const { from } = req.body;
  const requesterNumber = from;

  // Function to trigger an outbound call
  triggerOutboundCall(requesterNumber);

  res.status(200).end();
});

// Server listens to a specified port
const PORT = process.env.PORT || 3000;
app.listen(PORT, () => console.log(`App listening on port ${PORT}`));
Outbound Call Without NCCO
If you need to make an outbound call with a pre-recorded message, you can make the call without specifying an NCCO. The Voice API lets you directly initiate an outbound call and play an audio file to the recipient without configuring advanced call control logic.
function triggerOutboundCall(requesterNumber) {
  const ANSWER_URL = process.env.ANSWER_URL; // URL to NCCO JSON

  vonage.voice.createOutboundCall({
    to: [{ type: type: 'phone', number: requesterNumber }],
    from: { type: 'phone', number: process.env.FROM_IMPORTANT_FRIEND },
    answer_url: [ANSWER_URL]
  }, handleResponse);
}

function handleResponse(err, resp) {
  if (err) console.error(err);
  else console.log(resp);
}
In this setup, ANSWER_URL points to a JSON file that dictates the call flow. For example:
[
  {
    "action": "talk",
    "voiceName": "Amy",
    "text": "There's an urgent need for you elsewhere. Please excuse yourself."
  }
]
Outbound Call With NCCO
For a more tailored call experience, NCCO provides greater flexibility. This is especially useful for dynamic call flows.
async function makeCallWithNCCO(requesterNumber) {
  const ncco = [
    {
      "action": "talk",
      "voiceName": "Amy",
      "text": "Hey, sorry to bother you, but I need your help; an urgent unforeseen circumstance has happened."
    }
  ];

  try {
    const resp = await vonage.calls.create({
      to: [{ type: 'phone', requesterNumber }],
      from: { type: 'phone', number: process.env.FROM_IMPORTANT_FRIEND },
      ncco
    });
    console.log(resp);
  } catch (err) {
    console.error(err);
  }
}
This function makeCallWithNCCO dynamically creates the call flow based on the NCCO specifications.
In this example, the ncco variable holds an array of actions to control the call. The talk action reads a message when the call is answered.
Steps to Run the Application
- Ensure
.envhas all credentials. - Start the server by running the
node index.jscommand. - Send an SMS message to your virtual number to trigger the ghost call!
- The app will place a call with your chosen method - get ready to have a reason to leave that situation you didn’t want to be in!
Conclusion
Today, you've learned how to avoid personal convenience. By sending an SMS message, you can trigger a call that provides a plausible reason to step out of that situation you don’t want to be in using JavaScript, Node.js, and the Vonage Voice API.
This project's code is on GitHub.
Join the discussion and share your insights with us in the Vonage Developer Community on Slack or follow us on X, previously known as Twitter!


