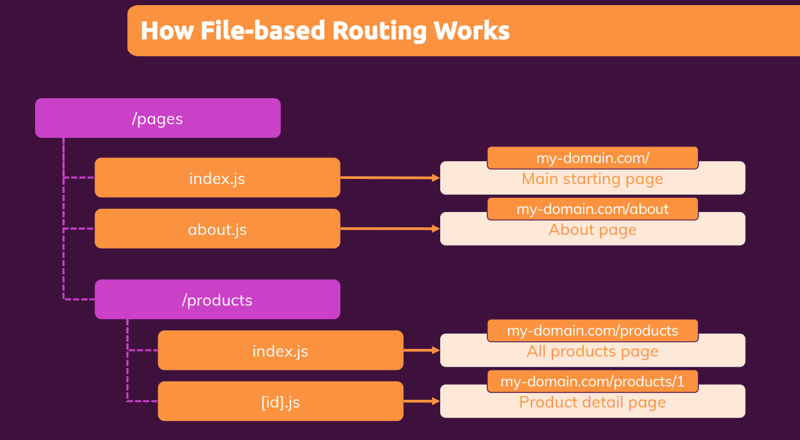
In this article, we'll dive into the routing system & Basics of Next.js and how you can use it to create powerful and efficient routes for your applications.
Getting Started
npx create-next-app
or
yarn create-next-app
Understanding the Basics of Routing in Next.js
At its core, routing in Next.js is the process of mapping URLs to specific components in your application. When a user visits a specific URL, the corresponding component is rendered to the user's browser.
Next.js uses the <Link> component to handle navigation between pages in your application. The <Link> component works similarly to an anchor tag, allowing you to navigate between pages with a simple click.
Additionally, Next.js provides a powerful dynamic routing system where you can define routes based on URL parameters. This allows you to create more complex and dynamic pages with ease, such as a user profile page that is dynamically generated based on the user's id.
Setting Up Routing in Next.js
To start routing in Next.js, you must create a new page in your application. In Next.js, pages are defined as React components in the page directory.
For example, if you want to create a page for a blog post, you would create a new file in the pages directory called post.js.
function Post(){
    return(
        <h1>Blog Post</h1>
    )
}

export default Post;
This page will be mapped to the /post*.*
Next, you can use the <Link> component to navigate to your new page. For example, if you have a homepage component, you could add a link to your blog post like this:
<Link href="/post">
  <a>Read my blog post</a>
</Link>
When the user clicks on the link, they will be taken to the /post URL, where the post.js component will be rendered.
Dynamic Routing in Next.js
As mentioned earlier, Next.js provides a powerful dynamic routing system, allowing you to define routes based on URL parameters. This allows you to create dynamic pages, such as a user profile page, based on the user's id.
To create a dynamic route, you can use the [id].js syntax in the pages directory. For example, if you want to create a dynamic user profile page, you could create a new file in the pages directory called [id].js.
Next, you can retrieve the id parameter in your component using the useRouter hook. For example:
import { useRouter } from 'next/router';

function UserProfile() {
  const router = useRouter();
  const { id } = router.query;

  return (
    <div>
      <h1>User Profile</h1>
      <p>User ID: {id}</p>
    </div>
  );
}

export default UserProfile;
With this setup, you can now navigate to the dynamic user profile page by visiting a URL like /user/1, and the UserProfile component will be rendered with the id set to 1.
Important Point to Remember
📌 While using the Dynamic Route use the Human-Readable-text instead of the id as it is more SEO Friendly & Easy to Understand.


