
A table is one of the most common data structures used to present information in an organized manner and is even an integral part of any document. Consider any field, whether finance, medical, or legal each uses tables in its own way when generating reports, bill receipts, contracts, and more. These tables can be flat, showing plain text, or customized to display information decoratively.
Grapecity Documents for PDF API lets you create tables, style table cells, customize table data or add cells with custom content to a table. The TableRenderer class of GcPdf API enables you to render table layouts on PDF without knowing the size of table columns, merged cells, or the layout of rotated text. All complex details of table resizing are automatically adjusted by the layout engine as described here. To understand the details of table creation, cell styling, text customizations, and more, refer to the documentation. This will even help you understand the scenario being implemented in this post.
In this blog, we will create a table defining the status of the tasks currently being worked on for different projects by designated teams. The custom content here is the combination of the task and its status being showcased in the same cell, where the status is showcased in a colored rectangle with a specific color associated with a particular status. The screenshot below depicts the scenario we just described and will be implemented in the steps ahead:

The steps below will guide you on how to create a table with custom content:
Step 1: Configure Application
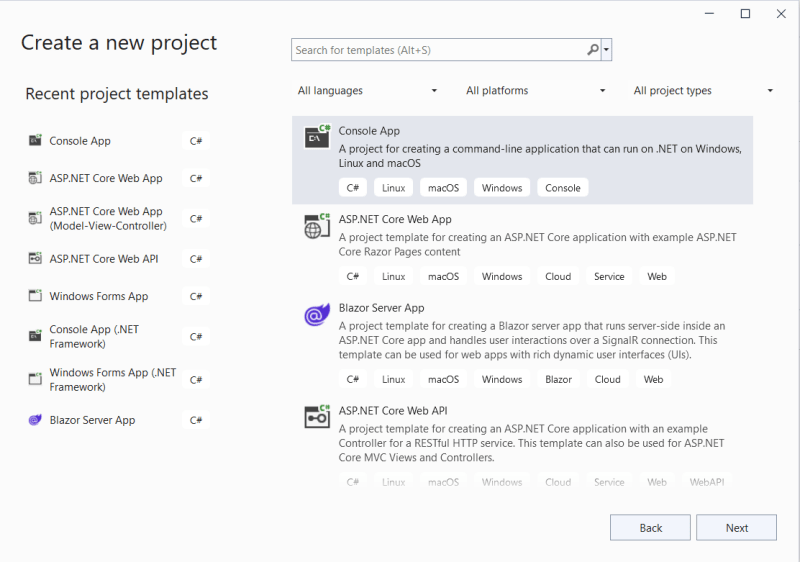
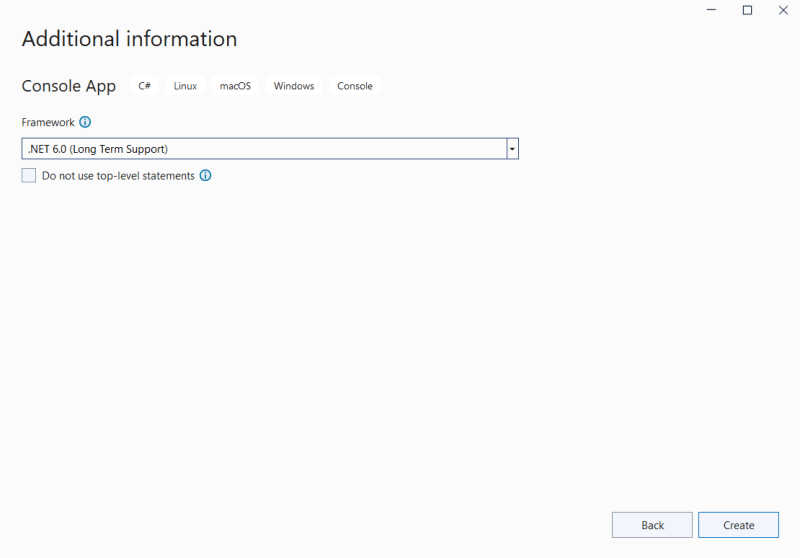
1. Create a new Console application using Visual Studio 2022, ensuring .NET 6 has been chosen as the target framework.
2. Install Grapecity.Documents.Pdf NuGet package using the NuGet Package Manager accessed from the Tools menu item.

Step 2: Create a Table
In this step, we will learn how to set up a basic table with row headers and column headers before adding the actual data with custom content. Follow the steps and add the mentioned code snippets to Program.cs file replacing the existing code in the file.
1. We will begin by creating a PDF document by initializing an instance of GcPdfDocument class and adding a new blank page to the document. The code snippet below depicts the same:
    // Initialize GcPdfDocument
    var doc = new GcPdfDocument();

    //Set page width and height
    float pageW = 1250;
    float pageH = 600;

    // Add a page to the PDF document
    var page = doc.Pages.Add(new SizeF(pageW, pageH));

    // Initialize GcPdfGraphics
    var g = page.Graphics;
2. To create a table, initialize LayoutHost, LayoutView, and LayoutRect class instances to define table size and position. The layout engine automatically calculates the position of the table and cells.
    // Initialize LayoutHost
    var host = new LayoutHost();

    // Create LayoutView
    var view = host.CreateView(pageW, pageH);

    // Create LayoutRect. Add anchor points
    var rt = view.CreateRect();
    rt.AnchorTopLeft(null, 36, 36);
3. Create an instance of the TableRenderer class and set the table parameters such as row count, column count, etc. The code below even sets the row height and column width of the first row and first column explicitly, as they will be acting as the header columns for the table:
    // Create an instance of TableRenderer
    var ta = new TableRenderer(g,
        rt, FixedTableSides.TopLeft,
        rowCount: 6, columnCount: 6,
        gridLineColor: Color.FromArgb(112,112,112),
        gridLineWidth: 1);

    // Set height and width of the the rows and columns
    ta.RowRects[0].SetHeight(74);
    ta.ColumnRects[0].SetWidth(144);
Next, we define cell styles creating an instance of CellStyle class, to be used by different cells being added to the table:
    // Set the cell style
    var cs = new CellStyle
    {
        TextAlignment = TextAlignment.Center,
        ParagraphAlignment = ParagraphAlignment.Center,

        // Set text format
        TextFormat = new TextFormat
        {
            FontName = "Roboto",
            FontSize = 16,
            FontSizeInGraphicUnits = true,
            FontBold = true
        }
    };

    // Add even row header cell style
    var evenCellStyle = new CellStyle(cs)
    {
        FillColor = Color.FromArgb(250, 250, 250)
    };

    //Define cell style for column header cells
    var csColumnHeader = new CellStyle(cs)
    {
        FillColor = Color.FromArgb(243, 244, 246),
    };

    // Add a background style for displaying the header text "Project"
    // with a custom drawn element (diagonal line)
    var csCornerTopRight = new CellStyle(cs)
    {
        Background = true,
        FillColor = Color.FromArgb(243, 244, 246),
        LineWidth = 1f,
        Borders = FrameBorders.MainDiagonal,
        TextAlignment = TextAlignment.Trailing,
        ParagraphAlignment = ParagraphAlignment.Near,
        PaddingRight = 8,
        PaddingTop = 4,

        // Set text format
        TextFormat = new TextFormat
        {
            FontName = "Roboto",
            FontSize = 18,
            FontSizeInGraphicUnits = true,
            FontBold = true
        }
    };

    // Add a regular style for displaying the header text "PM" at the bottom
    // left corner of the same cell.
    var csCornerBottomLeft = new CellStyle(cs)
    {
        TextAlignment = TextAlignment.Leading,
        ParagraphAlignment = ParagraphAlignment.Far,
        PaddingLeft = 15,
        PaddingBottom = 5,

        // Set text format
        TextFormat = new TextFormat
        {
            FontName = "Roboto",
            FontSize = 18,
            FontSizeInGraphicUnits = true,
            FontBold = true
        }
    };
4. The corner cell of a table generally remains vacant, but in this case, we will use it to showcase the concept of having regular, background, and foreground table cells in the same grid cell. We will do so by adding a background cell and a regular cell to the same grid cell. Both these cells will be used to add two different texts with two different cell styles in the same cell:
    // Add a background cell at the top left corner
    ta.AddCell(csCornerTopRight, 0, 0, "Project");

    // Add a regular cell at the top left corner
    ta.AddCell(csCornerBottomLeft, 0, 0, "PM");
5. Next, we add row header cells consisting of Employee names handling different tasks for each project and column header cells listing the different projects currently being worked upon:
    // Add column header cells
    ta.AddCell(cs, 0, 1, "Inventory Management");
    ta.AddCell(cs, 0, 2, "Spell Checker");
    ta.AddCell(cs, 0, 3, "Audit Engine");
    ta.AddCell(cs, 0, 4, "Retail Process");
    ta.AddCell(cs, 0, 5, "Evaluation Report");

    // Add row header cells
    ta.AddCell(cs, 1, 0, "Jim Kon");
    ta.AddCell(evenCellStyle, 2, 0, "Ted Baker");
    ta.AddCell(cs, 3, 0, "John Meyers");
    ta.AddCell(evenCellStyle, 4, 0, "James Brown");
    ta.AddCell(cs, 5, 0, "Michael Kin");
Step 3: Create Custom Content
We will create the custom content and add it to the cells to complete the table.
1. We will begin by defining a class named Task, which contains the attributes used to define the list of tasks along with their current status to be showcased in the table:
    class Task
    {
        public string Title;
        public string Status;

        public Task(string title, string status)
        {
            Title = title;
            Status = status;
        }

        public void Draw(GcGraphics g, float w, float h)
        {
            RectangleF rc;
            var pen = new Pen(Color.Black, 1);
            TextFormat tf = new TextFormat()
            {
                FontName = "Roboto",
                FontSize = 12,
                FontBold = false
            };

            switch (Status)
            {
                case "Yet To Start":
                    rc = new RectangleF(w / 2 - 35, h - 40, 70, 20);
                    g.FillRectangle(rc, Color.FromArgb(253, 232, 255));
                    g.DrawRoundRect(rc, 3, Color.FromArgb(136, 0, 214));
                    g.DrawString(Status.ToString(), tf, rc, TextAlignment.Center, ParagraphAlignment.Center);
                    break;
                case "In Progress":
                    rc = new RectangleF(w / 2 - 35, h - 40, 70, 20);
                    g.FillRectangle(rc, Color.FromArgb(255,252,232));
                    g.DrawRoundRect(rc, 3, Color.FromArgb(214, 186, 0));
                    g.DrawString(Status.ToString(), tf, rc, TextAlignment.Center, ParagraphAlignment.Center);
                    break;
                case "On Hold":
                    rc = new RectangleF(w / 2 - 35, h - 40, 70, 20);
                    g.FillRectangle(rc, Color.FromArgb(255,232,232));
                    g.DrawRoundRect(rc, 3, Color.FromArgb(214, 0, 0));
                    g.DrawString(Status.ToString(), tf, rc, TextAlignment.Center, ParagraphAlignment.Center);
                    break;
                case "Completed":
                    rc = new RectangleF(w / 2 - 35, h - 40, 70, 20);
                    g.FillRectangle(rc, Color.FromArgb(232,255,234));
                    g.DrawRoundRect(rc, 3, Color.FromArgb(0, 214, 36));
                    g.DrawString(Status.ToString(), tf, rc, TextAlignment.Center, ParagraphAlignment.Center);
                    break;
                case "Cancelled":
                    rc = new RectangleF(w / 2 - 35, h - 40, 70, 20);
                    g.FillRectangle(rc, Color.FromArgb(236, 236, 236));
                    g.DrawRoundRect(rc, 3, Color.FromArgb(180, 180, 180));
                    tf.ForeColor = Color.FromArgb(119, 119, 119);
                    g.DrawString(Status.ToString(), tf, rc, TextAlignment.Center, ParagraphAlignment.Center);
                    break;
            }
        }
    }
2. Next, we will define a cell style that assigns a delegate to the CustomDraw property of CellStyle class, which is executed from the Render method of TableRenderer class to generate table cells with custom content.
    // Add default cell style
    ta.DefaultCellStyle = new CellStyle
    {
        PaddingTop = 15,
        PaddingLeftRight = 20,
        PaddingBottom = 55,
        FixedWidth = false,
        TextAlignment = TextAlignment.Center,
        TextFormat = new TextFormat
        {
            FontName = "Roboto",
            FontSize = 16,
            FontBold = false
        },

        // Set text layout
        CreateTextLayout = (g, cs, data) =>
        {
            var tl = g.CreateTextLayout();
            tl.Append(((Task)data).Title, cs.TextFormat);
            return tl;
        },

        // Draw the custom content into the cells
        CustomDraw = (g, tc) =>
        {
            ((Task)tc.Data).Draw(g, tc.Width, tc.Height);
        }
    };

    // Cell Style to set back color for even rows
    var evenRowStyle = new CellStyle(ta.DefaultCellStyle)
    {
        FillColor = Color.FromArgb(250, 250, 250)
    };
Step 4: Add cells with custom content to the table
1. Invoke the AddCell method of TableRenderer class and pass an instance of the Task class to generate custom content to be added to the cell:
    // Add data cells with custom content
    ta.AddCell(1, 1, new Task("Requirement Gathering", "In Progress"));
    ta.AddCell(1, 2, new Task("Competitive Analysis", "Yet To Start"));
    ta.AddCell(1, 3, new Task("Implementation", "On Hold"));
    ta.AddCell(1, 4, new Task("Testing", "Completed"));
    ta.AddCell(1, 5, new Task("Marketing", "Cancelled"));

    ta.AddCell(evenRowStyle, 2, 1, new Task("Testing", "Yet To Start"));
    ta.AddCell(evenRowStyle, 2, 2, new Task("Requirement Gathering", "On Hold"));
    ta.AddCell(evenRowStyle, 2, 3, new Task("Marketing", "Completed"));
    ta.AddCell(evenRowStyle, 2, 4, new Task("Requirement Gathering", "Cancelled"));
    ta.AddCell(evenRowStyle, 2, 5, new Task("Implementation", "Yet To Start"));

    ta.AddCell(3, 1, new Task("Competitive Analysis", "In Progress"));
    ta.AddCell(3, 2, new Task("Implementation", "Completed"));
    ta.AddCell(3, 3, new Task("Testing", "Yet To Start"));
    ta.AddCell(3, 4, new Task("Implementation", "Cancelled"));
    ta.AddCell(3, 5, new Task("Testing", "On Hold"));

    ta.AddCell(evenRowStyle, 4, 1, new Task("Marketing", "In Progress"));
    ta.AddCell(evenRowStyle, 4, 2, new Task("Marketing", "Completed"));
    ta.AddCell(evenRowStyle, 4, 3, new Task("Requirement Gathering", "On Hold"));
    ta.AddCell(evenRowStyle, 4, 4, new Task("Marketing", "Yet To Start"));
    ta.AddCell(evenRowStyle, 4, 5, new Task("Competitive Analysis", "Cancelled"));

    ta.AddCell(5, 1, new Task("Implementation", "On Hold"));
    ta.AddCell(5, 2, new Task("Testing", "Yet To Start"));
    ta.AddCell(5, 3, new Task("Competitive Analysis", "In Progress"));
    ta.AddCell(5, 4, new Task("Competitive Analysis", "Cancelled"));
    ta.AddCell(5, 5, new Task("Requirement Gathering", "Completed"));
2. Invoke the Render method of TableRenderer class to generate the table. As mentioned above, this method will call the delegate assigned to the CustomDraw property of CellStyle class to add the custom content to the cell. In this case, the Draw method of the Task class is the delegate assigned to the CustomDraw property:
    // Draw the table.
    ta.Render();
3. Invoke the Save method of GcPdfDocument class to save the PDF document with the table:
    // Save the PDF document.
    doc.Save("custom-content.pdf");
Run the application, and a PDF document is generated with a table with custom content, as depicted in the screenshot at the top. You can download the sample implementing the mentioned use case.
For more information, you may refer to the demos and documentation.


