If you followed the DataStax app development workshop series, you have already learned how to build a To-Do web application using JS, Node.js, and DataStax Astra DB, a serverless, pay-as-you-go database based on Apache Cassandra®.
To take your To-Do app a step further, this workshop shows you how to convert your app into a React Native mobile and web application. We’ll use the same database setup as the previous workshop, and introduce you to Expo as the fastest way to build a React Native app.
To start, here’s a reminder of what the previous version of the To-Do web application looks like:
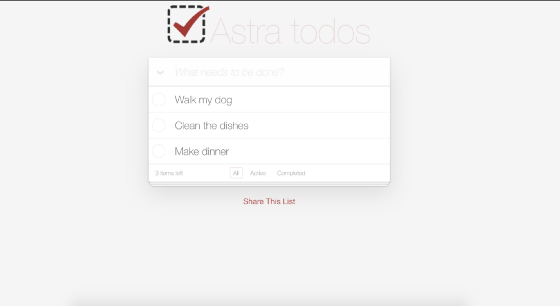
Figure 1: The interface of the To-Do app.
By the end of this workshop, you’ll have a mobile-native To-Do application that can run on Android, iOS, and Web. Look at Figures 2 and 3 below for a glimpse of what you’ll end up with on mobile and desktop.
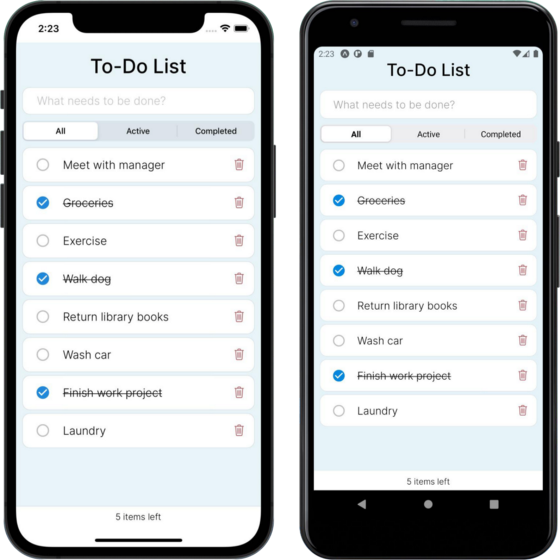
Figure 2: To-Do app on iOS (left) and Android (right).
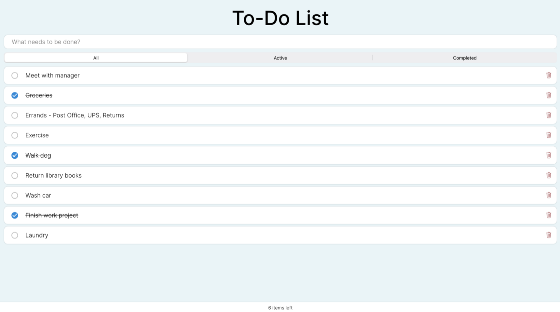
Figure 3: To-Do web application in Chrome.
Here are the technologies you’ll be using in this workshop:
- React & React Native to develop the user interface
- Expo to help us build web and mobile apps from the same JS codebase
- Node.js as our runtime environment
- Astra DB as our free, serverless database
- astrajs/collections, which is a library called to interact with a document-oriented database
- Netlify to deploy the app across a global content delivery network (CDN)
To start, let’s take a quick dip into the popular open-source platform: React Native.
Why use the React Native Framework?
Before the advent of frameworks like React Native and Flutter, if you wanted to build a responsive, native application for mobile and web, you needed to build the same application, in three different languages, on three different platforms. For example, you’d use Swift for iOS in Xcode, and Java or Kotlin for Android in Android Studio. This meant you had to be fluent in multiple platforms and languages, and build the same application from scratch several times.
Since you already built the To-Do app as a React-based web application using JavaScript, we’ll use React Native and Expo to convert the application to native. (If we used Flutter, we would have to convert the entire infrastructure to Dart.)
In this workshop, we’ll use Expo to build the To-Do React Native App. In short, Expo is a set of open-source tools and services built around React Native that help you develop, build, deploy, and quickly iterate on iOS, Android, and web apps.
By using Expo, you can create web apps and native Android and iOS applications from a single codebase, all using React and React Native components. You could always develop using a bare workflow in Expo or React Native, but the convenience of developing using your phone as the emulator shifts the tide in favor of Expo. This is because you can actually view your new To-Do mobile app without needing to download heavy applications (like Xcode and Android Studio) or set up emulators.
In addition, Expo has Snack: a playground in your browser, on which you can view code snippets in a browser-based emulator and even run complete Expo projects within a browser. No download is required.
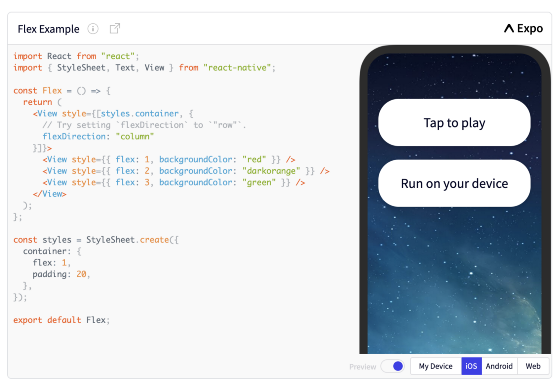
Figure 4: Example of an in-browser Expo project.
Getting started with Expo
Developing Locally
If you’re developing a native application from scratch, you should be developing locally, using a physical Android or iPhone, Xcode for the iPhone simulator, Android Studio for the Android emulator, and a Web Browser so you can view your project on all platforms as you are developing.
Alternatively, for speed and simplicity, you can simply use the Expo mobile app on your phone. All three platforms support hot refresh so you can see the changes live as you make updates in your IDE.
To develop locally, you need the Expo CLI, Watchman, Git, Node.js, an IDE of your choice (i.e. VisualStudio), and ideally, Xcode and Android Studio. You can walk through the Expo installation process and create an empty Expo project.
When you’re ready to test your project, start your project in debugging mode with the command: expo start. This will bring up a QR code you can scan with your phone camera to bring up the app. It’ll also give you shortcut commands to run the Android, iOS, and web applications.
The simulators can be a little tricky, so they work best when you have the Android emulator running before doing expo start --android, whereas the iOS simulator works best when the emulator quits before doing expo start --ios. Similarly, you can just pay attention to the browser tab with your IP and the port, like https://192.198.68.35/8888, and ignore the others that are launched by Netlify and Expo.
expo start
expo start --ios
expo start --android
To get all three platforms to connect to the Expo and Netlify servers simultaneously, you’ll need to hard code in your Port (8888) and IP address. This configuration is detailed in the netlify.toml file and the .env file you’ll create during this workshop. Here’s what the end set up for the .env file looks like when run locally (You will need to replace your Tokens, region, and IP with your own.):
ASTRA_DB_ADMIN_TOKEN="AstraCS:ZWpKiCKCtGkwuLadZSlclznj:a14a51e87a51b58ac7ec8fef92d5ef68abef09aa24349ec8a5d86e6c2ef479310"
ASTRA_DB_APPLICATION_TOKEN="AstraCS:ZWpKiCKCtGkwuLadZSlclznj:a14a51e87a51b58ac7ec8fef92d5ef68abef09aa24349ec8a5d86e6c2ef479310"
ASTRA_DB_ID="1795de90-1d19-43e9-bcfe-8f33aec8d9cf"
ASTRA_DB_REGION="us-west1"
ASTRA_DB_KEYSPACE="todos"
HOST="192.168.86.60"
PORT="8888"
IS_PROD="false"
GITPOD="false"
Setting Up
In this workshop, you’ll run the app on the cloud-based IDE called GitPod, which means that you need the Expo Go client app installed on your mobile device to view the app. You’ll also need to have a specific setup in your .env file, which you’ll generate during the workshop. The end product will look similar to below.
ASTRA_DB_ADMIN_TOKEN="AstraCS:ZWpKiCKCtGkwuLadZSlclznj:a14a51e87a51b58ac7ec8fef92d5ef68abef09aa24349ec8a5d86e6c2ef47910"
ASTRA_DB_APPLICATION_TOKEN="AstraCS:ZWpKiCKCtGkwuLadZSlclznj:a14a51e87a51b58ac7ec8fef92d5ef68abef09aa24349ec8a5d86e6c2ef47910"
ASTRA_DB_ID="1795de90-1d19-43e9-bcfe-8f33aec8d9cf"
ASTRA_DB_REGION="us-west1"
ASTRA_DB_KEYSPACE="todos"
HOST="https://amaranth-jay-0efw1dab.ws-us15.gitpod.io/"
PORT="8888"
IS_PROD="false"
GITPOD="true"
Additionally, you’ll need to start the app using expo start --tunnel, in which Expo CLI starts a tunnel using ngrok. This allows devices outside of your LAN to access the above servers without you needing to change your firewall settings. To run your app, enter the following commands, where each line is in a separate terminal window:
netlify dev
expo start --tunnel
Networking with Expo, Netlify, and GitPod
One of the biggest challenges when developing locally is configuring the emulators to all run at the same time. We found that if iOS and Web are running, the Android emulator doesn’t connect, and vice versa. As you can imagine, this made simultaneous development challenging.
It all came down to configuring networking. The iOS (using localhost) and Android emulators (using its own loopback interface) had different IP addresses, and both Expo and Netlify were serving different ports. Expo looks for the lowest unused port starting at 19000, while Netlify defaults to port 8888. To handle this (in the netlify.toml), we specified the port to which Netlify will listen (port 8888), and added a PORT environment variable in our .env file.
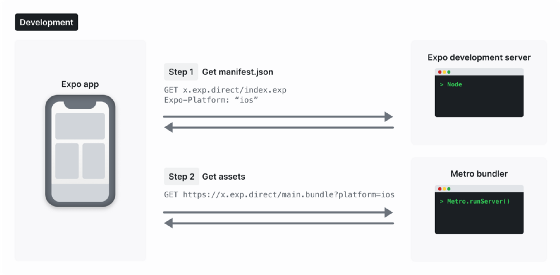
Figure 4: Diagram showing how the Expo app works.
When you start an app with Expo CLI using expo start, you’re running the Expo Development Server and Metro bundler. The Dev Server is the endpoint that you hit first when you type the URL into the Expo app. Its purpose is to serve the Expo Manifest and provide a communication layer between Expo CLI and the Expo app on your phone or emulator.
The Metro Bundler is the first to serve your app JavaScript compiled into a single file, and to translate any JavaScript code that you wrote that isn’t compatible with your phone’s JavaScript engine, as well as serve the assets.
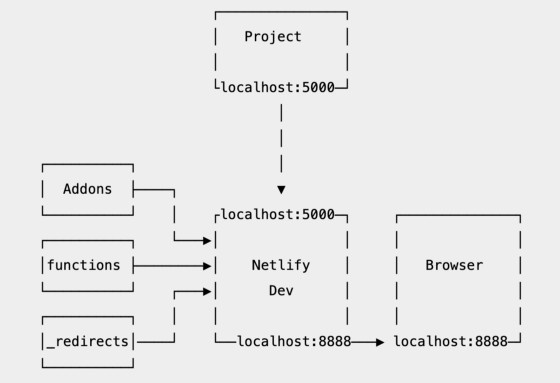
Figure 5: Diagram showing how Netlify works.
The command we use to run Netlify, netlify dev runs Netlify’s production routing engine in a local dev server to make all redirects, proxy rules, function routes, or add-on routes available locally. It then injects the correct environment variables from your site environment and installs add-ons or your netlify.toml file into your build and function environment.
To get all platform simulators firing simultaneously, you can set the path to your local private IP (or GitPod URL for cloud development) and specify the port as well, so all three platforms work at the same time.
Differences between React and React Native
Now let’s take a closer look at React Native and how it differs from React. Both frameworks are open-sourced by Facebook, and used in applications like Instagram, Discord, AirBnB, Pinterest, UberEats, Skype, and SalesForce.
In short:
- React is a framework for building applications using JavaScript
- React Native is a platform that allows you to build native, cross-platform mobile apps
- React.js is a JavaScript library you use for constructing a high performing UI layer
React.js is central to React Native, and is built upon React’s principles and syntax, so converting from one to the other is relatively intuitive. The browser code in React is rendered through Virtual DOM, while React Native uses Native APIs to render components on mobile. React uses HTML and CSS, whereas React Native uses its own components and libraries. You can also use hot reload in React Native so you can see your application’s current state while building.
Here are some examples of code differences between the two frameworks with examples.
HTML Tags vs. React Native Components
React Native uses native UI components instead of HTML. Here are some examples of translations.
<div> vs <View>
<input> vs <TextInput>
<li> vs <FlatList>
Many of these React Native components have more event handlers that require specific calling syntax, which you can read about in React Native’s Core Component and API documentation.
CSS vs. StyleSheets
Certain attributes have the same title, except React Native uses camel case instead of hyphens. Some CSS attributes don’t have a corresponding equivalent in React Native, so it’s best to go through the React Native documentation in detail.
In React, you can create one file that has all the styling for each class, but in React Native, you include it in a StyleSheet component at the end of the file (if you’re not creating a styling theme for the entire app).
CSS in React
<div className="complete"> </div>

    complete: {
         text-decoration: line-through;
         font-size: 18;
         font-family: Inter_300Light;
}
StyleSheet in ReactNative
<View style={styles.complete}> </View>

const styles = StyleSheet.create({
    complete: {
         textDecorationLine: 'line-through',
         fontSize: 18,
         fontFamily: 'Inter_300Light',
         flexWrap: 'wrap'
    }
});
Import Statements
You will now have to specify the import of each component from react-native.
import { SafeAreaView, StyleSheet, View, TextInput, Button } from 'react-native';
Layouts, Navigation, Animation, and more
All are done differently in React Native. The FlexBox algorithm is a responsive way to arrange components, while Navigation requires the react-native-navigation library. You can read more about the Animated API and many other available APIs here.
How to convert your React To-Do app into a React Native app
Port over the following folders and files
src (Main code changes occur here), functions (keep the same), netlify.toml (Configure for Expo), package.json (run npm install after copying this over), .env
Move the App.js file from within the src directory to the root directory
It’s the root component for your app so Expo wants it in the root directory.
src/utils/api.js
Configure fetch path to accommodate environment variables
Before:
const response = await fetch(`/.netlify/functions/getRestTodos`);
After:
// GENERATE
    const generateEndpoint = () => {
    const ipAddress = process.env.HOST;
    const port = process.env.PORT;

// Netlify deploy
    if (process.env.IS_PROD === "true") {
         return ``;
    }
// Running on GitPod
    else if (process.env.GITPOD === "true") {
         return ipAddress;
    }
// Local configuration
    else {
         return `http://${ipAddress}:${port}`;
    }
netlify.toml: Update the build command and the publish folder to work with Expo.
Before:
[build]
command = "npm run build"
functions = "functions"
publish = "build"
After:
[build]
command = "expo build:web"
functions = "functions"
publish = "web-build"
targetPort = 8888
.env: Add these lines to the original .env you had
HOST="192.168.86.95" // Add your local IP here or GitPod url
PORT="8888"
IS_PROD="false"
GITPOD="false" // Change to true if on GitPod
State Changes for Delete and Complete in Todo.js
Props are used to pass data, whereas the state is for managing data. Here we’re updating the state of the Checkbox and the state of the To-Do item and then conducting the API call to update it in Astra DB. This makes the interaction snappier and more native.
const [isChecked, setIsChecked] = React.useState(todo.completed);

const [isVisible, setIsVisible] = React.useState(true);

const handleCheck = () => {
    setIsChecked(!isChecked);
    completeRestTodo(todo.id, todo.text, todo.completed);
}

const handleVisible = () => {
    setIsVisible(!isVisible);
    deleteRestTodo(todo.id);
}
Additional Steps
- Swap HTML tags for React Native UI components and find the appropriate properties for those components to enable functionality.
- Translate CSS into StyleSheets for each component.
- Install additional libraries to support Expo and React Native (Take a look at
package.json).
Packages and Libraries
Look at .gitpod.yml, which sets up the cloud workspace before you start the app, and package.json to see all the required packages and libraries.
Gitpod.yml
tasks:
- name: todonativemobileapp
before: |
cd /workspace/todonativemobileapp
nvm install node
npm install
npm install -g expo-cli (Command line interface for Expo)
npm install -g netlify-cli (Command line interface for Netlify)
npm install astra-setup (To create the .env file during the workshop)
npm install whatwg-fetch
npm install -g @expo/ngrok (For tunnels on GitPod)
npm install @expo/ngrok@4.1.0
npm install react-native-gesture-handler (For swipe to delete/complete gesture)
npm install @react-native-segmented-control/segmented-control (For filter based on completeness)
npm install @expo-google-fonts/inter — legacy-peer-deps (For custom fonts)
npm install babel-plugin-inline-dotenv — legacy-peer-deps (For using inline environment variables)
Adding new Native features
You can also add native features that aren’t in the original web application. These include:
- Segmented Control: Instead of a filter at the bottom of the list, you’ll learn how to create a segmented control component that allows you to filter tasks based on their status of All, Active, and Completed.
- Swipe to delete and complete: Aside from clicking the trash icon for delete and the check box for complete/incomplete, you can also swipe from the right to expose a drawer and swipe to the left to delete. From the left side, you can reveal a drawer that swaps based on the state of the task (Complete or Incomplete). Swiping across will change its state and the item will close itself.
Enhancing the user interface
Expo recommends certain UI libraries for sleek, native-looking enhancements for your application, depending on the components and functionality you need. Each library has a different set of functionality and appearance, so choose accordingly.
Other additions to the native app include:
-
flexWrap: Property needed to prevent horizontal and vertical overflow from a long To-Do item:
flexWrap: 'wrap'. - Removing border when TextInput is selected on the web: Perfect example of a platform-specific bug. On the web, the selected input box is highlighted in blue so you can import Platform to specify platform-related properties.
- Custom Fonts: Adding custom fonts from Google Fonts allows for the same font across platforms.
- StatusBar: This is possible for Android but not iOS. You can change the color behind the StatusBar, but only on Android.
Tips for success
- Platform-specific bugs: Sometimes native behavior is different between platforms. For example, the word you’re currently typing will appear underlined on Android. As a result, you need to keep all emulators open while developing so you can catch platform-specific bugs as they happen.
-
Peer dependency errors: If you’re getting faulty peer dependency errors, first look at your package.json to see if you can resolve these manually. Otherwise, try re-running the npm command with the legacy peer dependency flag. These seem to happen because NPM 7 is pickier about peer dependencies than NPM 6. The legacy peer dependencies flag reverts to NPM 6 standards for peer dependencies.
npm install @expo-google-fonts/inter — legacy-peer-deps - Finding additional features: Expo and React Native may not include all the components and extended functionality you need. Don’t hesitate to look for libraries in the React Native Directory for the features you want.
- Search for solutions: Google, StackOverflow, blogs, and forums are the best teachers. If you’re stumped on something, it’s very probable that another developer has faced the same issue. Search for a solution using keywords and code snippets, and you should be able to find a workaround. If all else fails, find the forum for the library you’re using and post a question there.
- Create a Progressive Web App (PWA): Expo is automatically set up to build a PWA should you want to have one. You can follow the steps here to make one in under five minutes!
Explore more tutorials on our DataStax Developers YouTube channel and subscribe to our event alert to get notified about new developer workshops. For exclusive posts on all things data: Cassandra, streaming, Kubernetes, and more; follow DataStax on Medium.
Resources
- Building a To-Do list app with Javascript and NodeJS
- GitHub: Run your first frontend application — To-Do list
- Full DataStax app development series on YouTube
- Astra DB — Serverless cloud database built on Apache Cassandra
- Core Components and APIs · React Native
- How Expo Works
- DataStax Academy
- DataStax Workshops


