Cloud functions are powerful tools for developing applications and reducing server costs. Appwrite Functions, a cloud function service offered by the backend-as-a-service platform Appwrite, offers the flexibility and efficiency for implementing serverless solutions effortlessly.
Appwrite functions must be deployed, but manual deployment can lead to insufficient version control, wasted time, inconsistent app environments, and exposure of secret environment variables, all of which can cause errors and security issues. Automating your deployments with GitHub can help avoid these problems.
In this tutorial, you'll learn the benefits of automating Appwrite function deployments and explore the step-by-step process of automating your Appwrite function deployments using GitHub without manually configuring environment variables.
Prerequisites
Before you dive into the automation process, you'll need to ensure you have the following prerequisites covered:
- Basic knowledge of Node.js: You should have a foundational understanding of Node.js, which is commonly used for developing serverless functions.
- An Appwrite cloud account: To use Appwrite functions, you need to have an active Appwrite cloud account. If you don't have one, sign up on the Appwrite website to get started.
- A basic knowledge of Git and a GitHub account: You'll need a GitHub account to set up your repository. If you don't have one, sign up at GitHub.
The full project is in this repository.
Setting up Appwrite and GitHub repository
Get started by creating a GitHub repository using these instructions.
Next, you’ll need to create a project within the Appwrite Cloud console. If you just signed up, you’ll be immediately prompted to create a project.
If not, click on the Create a new Project, as indicated below:
Once you've finished this step, you'll be able to see the dashboard for your project.
Creating your Appwrite Function on Appwrite
Next, you’ll need to create your function on the Appwrite console. To continue, click the Functions menu on the navigation bar.
Afterward, click the Create function button indicated below.
Next, select the starter template you’d like to use. For this case, click Node.js.
Enter the name of your function and select Node.js - 18.0 as the runtime. Then, click Next.
In the next step, Appwrite gives you the option to use an existing API key or generate a new one. To continue with this tutorial, select the Generate API key on completion checkbox, then click Next.
Next, you can choose to use an existing repository or have Appwrite clone the template to a new one. Select Create a new repository, then click Next.
Once you've completed that step, you’ll need to connect your GitHub account to your Appwrite console. Click on the GitHub option as indicated below.
If you haven’t connected your GitHub account to Appwrite, you’ll be redirected to GitHub to do so.
Make sure to select the repository you initially created.
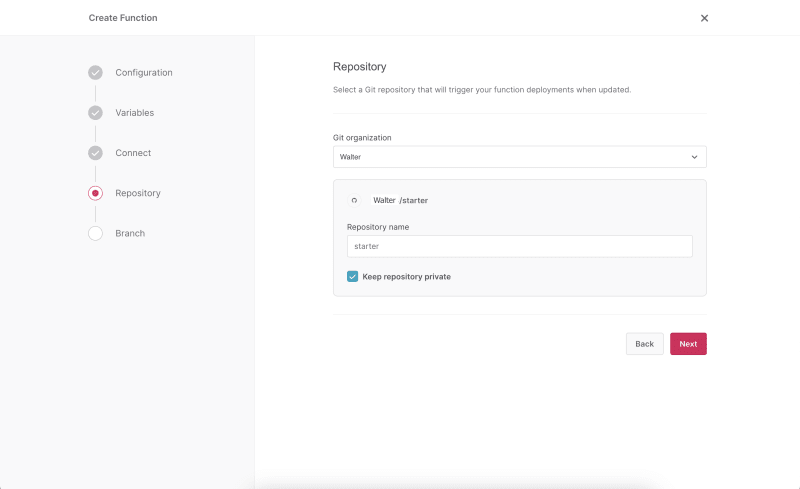
Once that’s done, enter the name of the new repository and click Next. This step specifies the name of the new repository Appwrite will create on your GitHub account.
Next, select your desired Git branch and enter the root directory of your function.
At this point, the function has been successfully created and deployed on your Appwrite cloud account. Subsequent deployments will be triggered when you push changes to the GitHub repository Appwrite created for you.
Adding your Appwrite Function code
Now that you've created the Appwrite Function, it's time to update the template in the GitHub repository generated by Appwrite on your GitHub account.
The GitHub repository created by Appwrite is usually a private repository. Therefore, it’s preferred that you use SSH to clone this repository. Check here to configure SSH on your GitHub account.
To continue, go to your GitHub repository created by Appwrite, and then follow these steps to clone your repository locally.
Once the repository is successfully cloned, open the projects folder with your code editor.
The main.js file is the entry point for the function, which means that this is where you should place your function code.
Open the main.js file and replace its contents with the following code.
import axios from "axios";
import cheerio from "cheerio";
async function getSEOInfo(url) {
  try {
    const response = await axios.get(url);
    const html = response.data;
    const $ = cheerio.load(html);
    const title = $("title").text();
    const headers = {};
    for (let i = 1; i <= 6; i++) {
      headers[`h${i}`] = $(`h${i}`).length;
    }
    const metaDescription = $("meta[name=description]").attr("content") || "";
    const metaKeywords = $("meta[name=keywords]").attr("content") || "";
    const images = $("img").length;
    const canonicalURL = $("link[rel=canonical]").attr("href") || "";
    const internalLinks = $('a[href^="/"]').length;
    const externalLinks = $('a[href^="http"]').length;
    return {
      title,
      headers,
      metaDescription,
      metaKeywords,
      images,
      canonicalURL,
      internalLinks,
      externalLinks,
    };
  } catch (error) {
    console.error("Error: ", error);
    return null;
  }
}
export default async ({ req, res, log, error }) => {
  if (req.method !== "GET") {
    return error("Request method not supported");
  }
  const info = await getSEOInfo(req.query.url);
  if (!info) return error("failed to get SEO information");
  log(info);
  return res.json(info);
};
The code above uses axios to fetch the content of a given URL and cheerio to extract the SEO information.
After that, run the following command to install the project’s package dependencies:
yarn add axios cheerio
Triggering and testing the deployment
Once you're finished developing your function locally, you can deploy it by committing your changes to Git and pushing them to the GitHub repository.
You’ll notice that a new deployment has been added to the list of deployments.
To test your deployment, click Execute now.
Next, add the parameters required by your function. In this case, you’re adding a query parameter url as indicated below.
Afterwards, click Execute.
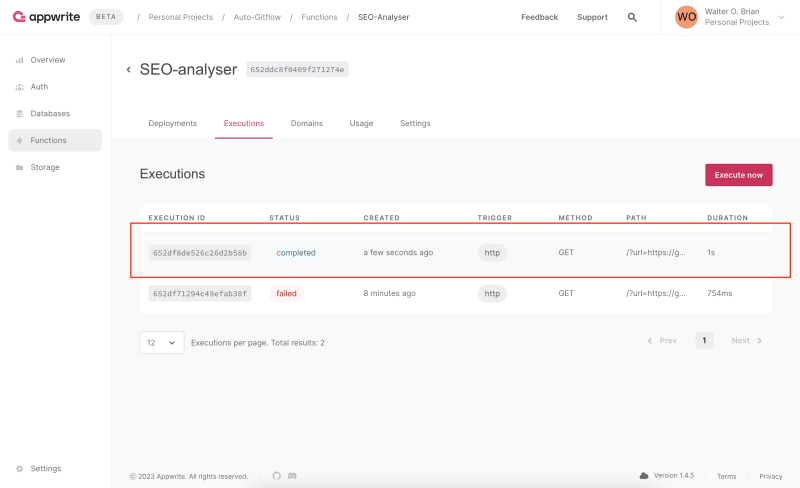
Click on the execution to view more information about it.
Conclusion
Automating your Appwrite function deployments using this method is a great way to streamline your development and deployment workflows, free up valuable time, and improve efficiency while eliminating the need to add your Appwrite environment variables to GitHub.


