Authentication is an essential part of every web application. It helps ensure that only authorized people access sensitive data and resources. As cloud computing gains traction, authentication systems have become increasingly challenging to manage. Appwrite Cloud, a cloud-based authentication solution, helps fix this problem. It offers comprehensive authentication services, simplifies authentication procedures, and ensures robust user security. Appwrite Cloud guarantees a top-notch user experience while protecting data from malicious parties.
This article will examine the benefits of using Appwrite Cloud for authentication.
What is Appwrite Cloud?
Appwrite Cloud is a powerful backend-as-a-service (BaaS) platform offering various authentication services. It makes the backend management and development for web and mobile applications simpler. It gives developers the benefit of outsourcing infrastructure maintenance and backend development responsibilities. They can avoid server configuration, deployment, maintenance, and other time-consuming tasks. Thus, developers can focus on building engaging front-end features and enhancing user experiences. Learn more about Appwrite Cloud.
Key features and functionalities of Appwrite Cloud's authentication services
The Appwrite Cloud offers a variety of essential features and functionalities for authentication. Some of these features and functionalities include:
- Security: Security is paramount for user authentication and protecting sensitive data. Appwrite Cloud places a high priority on the protection of user data. It uses advanced security measures to safeguard user accounts and essential data. These security features include password salting and hashing, two-factor authentication, and data encryption. Security measures are regularly updated and scrutinized to prevent new threats and vulnerabilities. It protects user data by passing several security tests that follow industry guidelines.
- User Registration: User Registration is vital for applications that need authentication and personalization. Appwrite Cloud's Authentication service makes registration seamless for its customers. Users can easily create new accounts by entering their email addresses and passwords. Appwrite Cloud then stores these emails and passwords, ensuring the user's privacy.
- Customization: Another great feature of Appwrite Cloud is its customization option. It allows developers to create customizable user profiles to suit their preferences. Users can add personal information, profile images, and other data to their profiles. This feature helps create a more personalized and engaging experience for its users.
- Access Control: Access control is essential for application security and data protection. Appwrite Cloud allows users to manage user permissions and role-based access control (RBAC). It will enable you to create custom roles that align with your application's needs. Also, you can grant or restrict access to specific users for each role. As a result, the ideal user will have access to the necessary resources and features. It improves application security, simplifies user management procedures, and more.
Benefits of using Appwrite Cloud for authentication
Using Appwrite Cloud for authentication has the following advantages:
- Cost-Effective: Developing an authentication system from scratch can be time and resource-consuming. It requires familiarity with security protocols, encryption methods, user management, and more. Appwrite Cloud provides developers with a ready-to-use authentication service. It offers pre-built authentication features like user registration, password management, and more. Thus it removes the need to create and manage an authentication system from scratch.
- Increased Security: One of the vital components of Appwrite Cloud is data security. Built-in security features like two-factor authentication ensure the safety of users' data. It contributes to ensuring the privacy and accuracy of user data. With Appwrite Cloud, you can trust that your data is always safe.
- Scalability: Appwrite Cloud excels at scalability, a vital feature of any authentication system. It has advanced features like auto-scaling, load balancing, and more, making it easy to scale up or down. It can handle high user loads, allowing you to scale your application as your user base grows. Thus, you do not need to worry about your application crashing under heavy traffic. It ensures that your authentication services remain available and responsive at all times. Appwrite Cloud will meet your authentication needs regardless of your application size
- Easy to use: Integrating Appwrite Cloud authentication service into your application is easy. Appwrite Cloud provides developers with easy-to-use pre-built APIs and SDKs. These APIs and SDKs are available for a variety of programming languages. It allows developers to integrate authentication into their applications easily. Appwrite Cloud makes adding authentication to your application super easy and efficient
How to get started with Appwrite Cloud for authentication
The steps for setting up Appwrite Cloud for authentication are as follows:
Step 1: Sign up for an Appwrite Cloud account
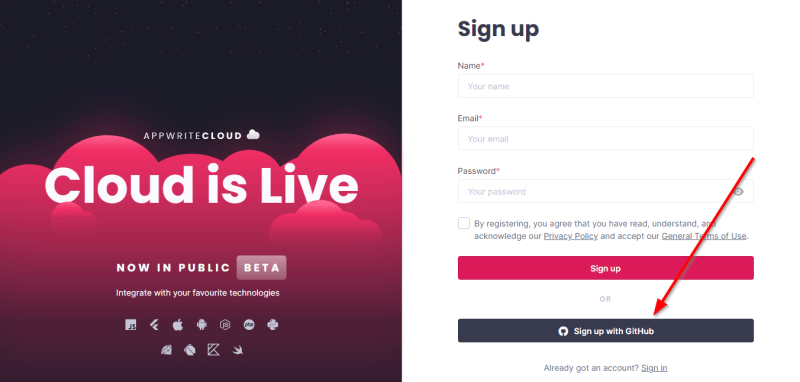
To register for a new account, go to the Appwrite Cloud website. Click the sign-up button and fill in your details, name, email address and password. Ensure that you choose a unique password that you can easily remember. Check the box to agree to the terms and conditions, then click the sign-up button to create your account. To create a new account, click here.
You can manually enter your data or sign up using your GitHub account when creating your account.
Step 2: Create a new project
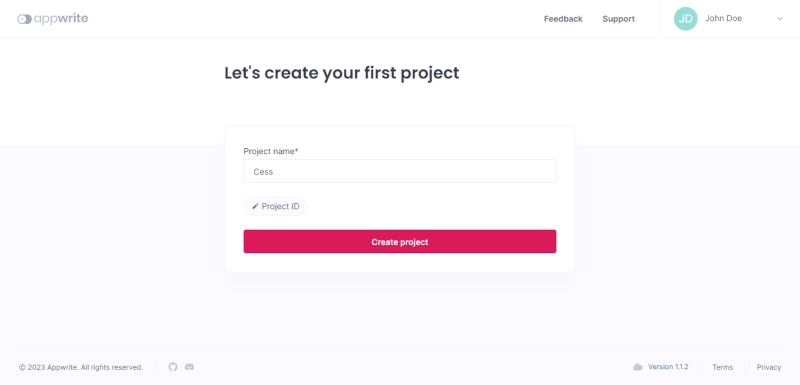
After logging into your Appwrite Cloud account, start a new project. Upon signing in, first-time users will get a project page that says, "Let's create your first project". Next, you'll have to write the name of your project. Make sure the name of your project describes what it's for or its intended purpose.
Click the "Create project" button after double-checking that your project's name is correct. It will lead you to the project dashboard, where you can manage your application anytime. The project serves as a container for your application and the resources it needs.
Step 3: Configure authentication settings
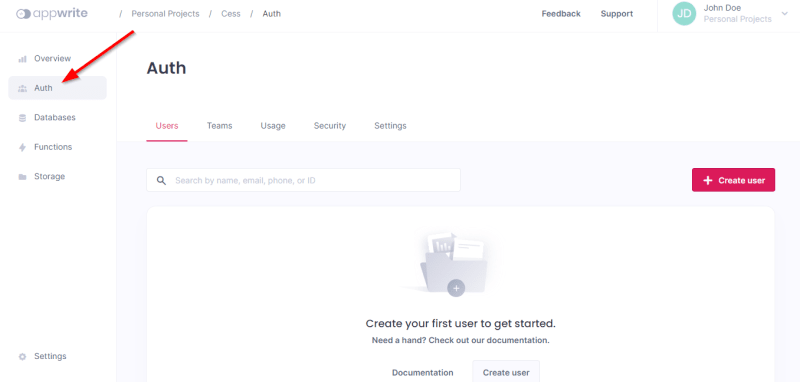
Click the "Auth" icon on the sidebar to navigate to the authentication section of your project. It is where you will manage and change authentication-related configurations.
Click on the "Create User" button to create your first user to get started. Save and apply your configuration after making the necessary authentication changes. When users use your application, these modifications will be available to them.
Step 4: Integrate authentication into your application
Once you have set up authentication settings, integrate Appwrite Cloud with your application. This entails smoothly integrating authentication features using the given APIs and SDKs. These features include user registration, two-factor authentication, and more. To learn more about incorporating authentication into your application, click here.
Step 5: Test and deploy your application
Once you've set up authentication, test your application to ensure everything works. It entails verifying authentication features like user registration for a seamless user experience. Suppose you run across any problems when testing; debug them to determine the source. Use the APIs provided by Appwrite to access error messages and other diagnostic data. It will help you fix any issue you encounter when debugging. After testing, deploy your application to a server to make it available to users.
Note also that monitoring your application after deployment is vital to ensure reliability.
Conclusion
With Appwrite Cloud, you get a secure and reliable authentication solution. Its built-in features, like two-factor authentication, ensure your data is always safe. It's a breeze to get going, won't break the bank, and you can tailor it to fit your specific requirements. By leveraging Appwrite Cloud, you can enhance your applications' security and user experience.
Resources
You will find the following resources helpful:


