This article was originally posted on Hackmamba.
In the past two decades, massive changes have occurred in software development. From waterfall to agile methodology, silos to DevOps philosophy, on-premise to cloud computing, and so on, these changes allow engineering teams to develop high-quality software at the fastest pace ever.
"Fastest pace ever?" some developers will question. With all the improvements, they recall the days in which they had to wait before testing their changes due to messy shared environments and their struggles with internal tooling. At best, this is frustrating; at worst, it is a severe drain on developer productivity.
This article introduces Garden, explains how it works, and walk you through how to set up Garden for development on an AWS EKS cluster using an example project.
What is Garden.io?
Garden is an all-in-one platform that simplifies and speeds up software development by combining rapid development, testing, and DevOps automation. Garden allows you to create realistic cloud-native environments for every stage of your software development lifecycle (SDLC) without worrying about the difference between each environment (dev, CI and prod).
With Garden, you can:
- program your workflows across all stages of your SDLC,
- develop faster in production-like environments at each stage, accompanied by live reloading,
- write end-to-end tests faster, and
- reduce lead time thanks to smart caching, which dramatically speeds up every step of the process.
How does Garden work?
You might ask, “how does Garden achieve all this?” The high-level answer is that Garden deploys a Stack Graph.
The Stack Graph is an opinionated graph structure that allows you to describe your whole stack in a consistent and structured way without having to write massive scripts or monolithic configuration files.
The Stack Graph is based on the idea that all DevOps workflows can be fully described in terms of the following four actions:
- build it
- deploy it
- test it
- run (for running ad-hoc tasks)
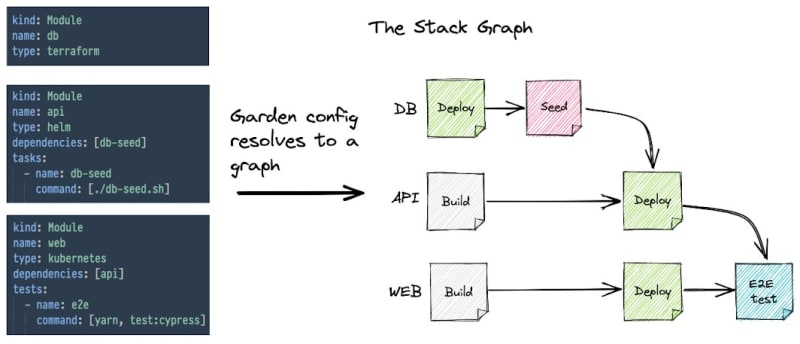
With Stack Graph, you define each component of your stack independently with respect to the four actions above using straightforward, understandable YAML declarations—without altering any of your current code. Garden compiles every declaration you make, even those spread over different repositories, into a complete graph of your stack.
Image source — Garden on GitHub
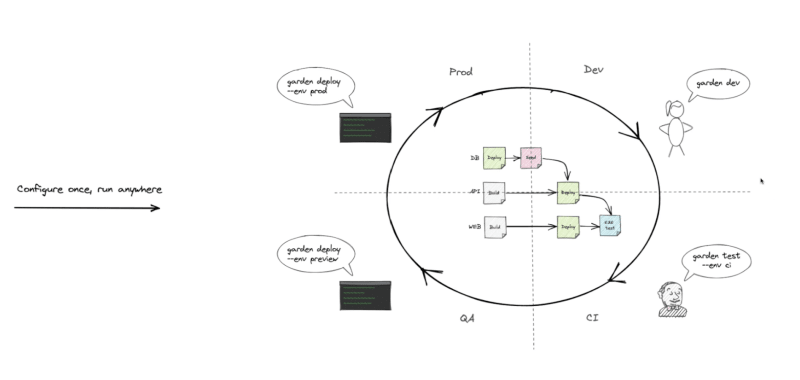
The Stack Graph makes your workflows portable and reproducible across your entire SLDC. Garden can execute the Stack Graph in environments as in the image below.
Image source — Garden on Youtube.
Moreover, you can easily add components to your stack without introducing more complexity to your workflows.
Image source — Garden on Youtube.
To learn more about how Garden works, check out its documentation.
Prerequisites
To follow along with this article’s demo, you must have the following:
- The Garden CLI installed on your machine — see how to install it here.
- Basic-to-intermediate understanding of AWS and EKS (Amazon Elastic Kubernetes Service).
- A running AWS EKS cluster. If you don't have one, you can create a demo cluster using this YAML configuration.
- The
kubectlcommand-line tool configured to communicate with the cluster.
Configuring a project for use with Garden
This article will use a simple example project created by Garden. To clone the project and enter its directory, run the following commands:
$ git clone https://github.com/garden-io/garden.git
$ cd garden/examples/demo-project-start
The demo-project-start project contains two directories, with one container service each; backend and frontend. To configure this project for use with Garden, you must first define a boilerplate Garden project and then a Garden module for each service.
To create the boilerplate Garden project, use the following helper command:
$ garden create project --skip-comments
The above command will create a basic boilerplate project configuration — project.garden.yml — in the current directory, as seen below. This is the project's configuration root. The --skip-comments flag removes all the comments that reveal all the available options for the configuration. You can omit it to see all of the options.
kind: Project
name: demo-project-start
environments:
  - name: default
providers:
  - name: local-kubernetes
Every Garden command is run against one of the environments defined in the project.garden.yml configuration. The above configuration has one environment (default) and a single provider. A provider is a resource upon which you will build an environment. The two most commonly used providers in Garden are the local Kubernetes provider and the remote Kubernetes provider.
To learn more about environments and providers, see the Garden Projects documentation.
Later in the article, you will edit this boilerplate config to define a dev environment, connect to your AWS EKS cluster, etc.
Next, create module configs (garden.yml) for each container service, starting with backend.
$ cd backend
$ garden create module --skip-comments
$ cd ..
You'll get a suggestion to make it a container module. Choose that, and give it the default name as well. Then do the same for the frontend module:
$ cd frontend
$ garden create module --skip-comments
$ cd ..
This is now enough configuration to build the project. But before you can deploy it, you need to configure services in each module configuration and then connect to a remote EKS cluster.
Configuring services in each module
Starting with the backend container service, open the garden.yml file and add the following:
services:
  - name: backend
    ports:
      - name: http
        containerPort: 8080
        servicePort: 80
    ingresses:
      - path: /hello-backend
        port: http
The above is enough information for Garden to deploy and expose the backend service. The full module config should look like that of the image below.
Now, for the frontend service, add the following to its garden.yml file:
services:
  - name: frontend
    ports:
      - name: http
        containerPort: 8080
    ingresses:
      - path: /hello-frontend
        port: http
      - path: /call-backend
        port: http
    dependencies:
      - backend
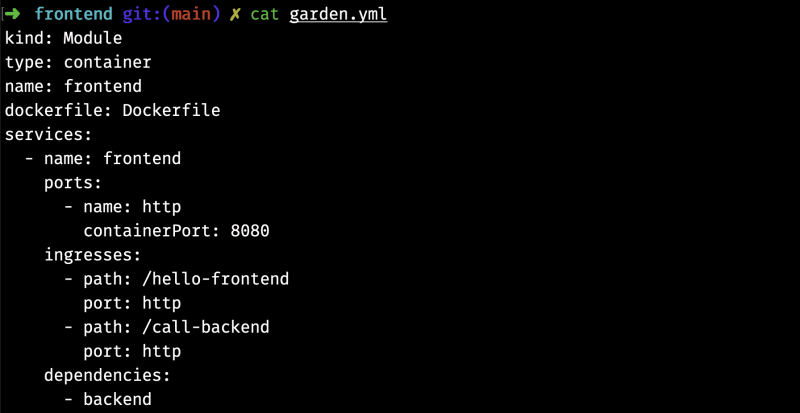
The above does the same as the backend service, adding a runtime dependency on the backend service. The full module config should look like that of the image below.
Connecting to the EKS Cluster and ECR container registry
Garden has great features, the most powerful of which is the ability to build images in your development cluster, thus avoiding the need for local clusters. To enable in-cluster building, you will need to:
- configure the remote Kubernetes plugin
- and then configure access to the remote deployment registry for built images. While testing, you can skip this step and utilize the in-cluster registry already provided; however, remember that you might run into scaling problems.
Configuring the remote Kubernetes plugin
To configure the remote Kubernetes plugin, update the project-level configuration file, project.garden.yml, with the following:
- The context for your EKS cluster. You can get the context of your EKS cluster with the following kubectl command:
$ kubectl config current-context
- The hostname for your services.
- The build mode. This article uses kaniko build mode, which works well for most scenarios.
- The image deployment registry.
- The name(s) and namespace(s) of the ImagePullSecret(s) used by your cluster. This article uses just one ImagePullSecret to authenticate your AWS ECR.
- A TLS secret (optional).
Before updating the project.garden.yml, create the ImagePullSecret. To do so, first, create a config.json file, and add the following JSON configuration.
{
  "credHelpers": {
    "<aws_account_id>.dkr.ecr.<region>.amazonaws.com": "ecr-login"
  }
}
The <aws_account_id> and <region> are placeholders that you need to replace for your registry.
Next, create the ImagePullSecret in your cluster (you can replace the default namespace; make sure it's correctly referenced in the project.garden.yml):
$ kubectl --namespace default create secret generic ecr-config \
    --from-file=.dockerconfigjson=./config.json \
    --type=kubernetes.io/dockerconfigjson
Then, update your project.garden.yml to be as below:
kind: Project
name: demo-project-start
environments:
- name: dev
  providers:
  - name: kubernetes
    context: <your_eks_cluster_context>
    defaultHostname: test.com //for demo purposes
    buildMode: kaniko
    deploymentRegistry:
      hostname: <aws_account_id>.dkr.ecr.<region>.amazonaws.com
      namespace: test
    imagePullSecrets:
      - name: ecr-config
        namespace: default
defaultEnvironment: dev
In the above YAML configuration, it is important to note that when you specify <aws_account_id>.dkr.ecr.<region>.amazonaws.com and namespace: test for the deploymentRegistry field, and you have a container module named backend in your project, it will be tagged and pushed to <aws_account_id>.dkr.ecr.<region>.amazonaws.com/test/backend:v:<module-version> after building. That image ID will then be used in Kubernetes manifests when running containers.
Configuring access to ECR container registry
Before you configure access to ECR, create two repositories for the backend and frontend containers respectively as in the image below.
To configure access to ECR, grant your service account the right permission to push to ECR by adding the policy below to each repository.
{
    "Version": "2012-10-17",
    "Statement": [
        {
            "Sid": "AllowPushPull",
            "Effect": "Allow",
            "Principal": {
                "AWS": [
                    "arn:aws:iam::<account-id>:role/<k8s_worker_iam_role>"                ]
            },
            "Action": [
                "ecr:BatchGetImage",
                "ecr:BatchCheckLayerAvailability",
                "ecr:CompleteLayerUpload",
                "ecr:GetDownloadUrlForLayer",
                "ecr:InitiateLayerUpload",
                "ecr:PutImage",
                "ecr:UploadLayerPart"
            ]
        }
    ]
}
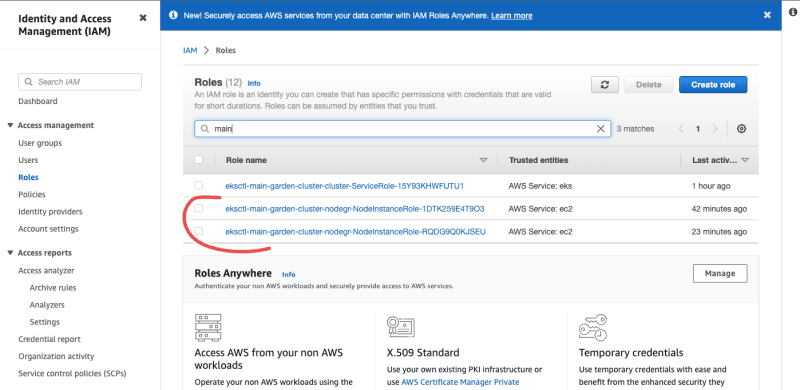
In the above policy, arn:aws:iam::<account-id>:role/<k8s_worker_iam_role> will be the ARN of your cluster worker nodes. In the Roles section of your IAM dashboard, search for your cluster name, as seen in the image below. Edit the policy such that it contains your cluster’s ARN, then copy it.
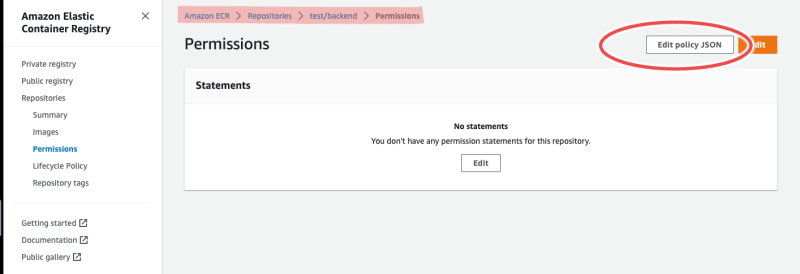
To add the above policy, navigate to the Permissions section of each repository as in the image below, click Edit policy JSON, and paste the policy, then save.
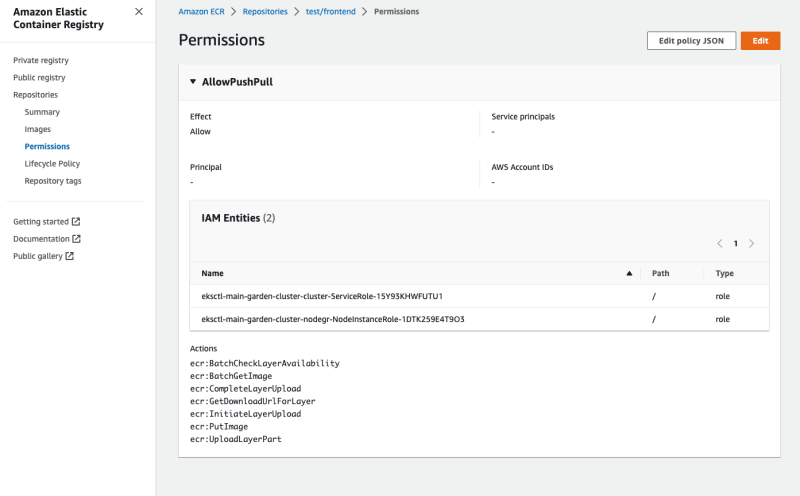
After saving, the policy should look like this:
With all that done, you can now deploy and test your project.
Deploying and testing the Garden project
In the directory, you have the project.garden.yml. Now, run the following command:
$ garden deploy
You should see your services display similarly to the image below.
You can verify that the images were built on ECR and the pods are running using the following command:
$ kubectl get pods -n demo-project-start-default
To set up tests, similar to how you configured the services earlier, open the frontend/garden.yml config and add the following:
tests:
  - name: unit
    args: [npm, test]
  - name: integ
    args: [npm, run, integ]
    dependencies:
      - frontend
The above config defines two simple test suites. One runs the unit tests of the frontend service. The other runs a basic integration test that relies on the frontend service being up and running.
To run the test, run the following command:
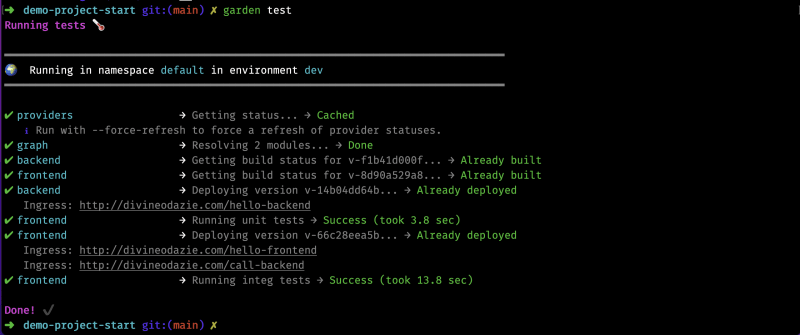
$ garden test
You should see the tests pass, similar to that shown in the image below.
With all that done, you can move on from this simple example to configuring your own project with these steps, regardless of its complexity.
Conclusion
In this article, you learned about Garden, how it works, and how to configure an existing project to use it for development on an AWS EKS cluster. There is so much more to learn about Garden; to do so, check out the following resources:
