The evolution of “build once, run anywhere” containers and Kubernetes—a cloud-agnostic, declarative-driven orchestration API—have made a scalable, self-service platform layer a reality. Even though it is not a one size fits all solution, a majority of business and technical challenges are being addressed. Kubernetes as the common denominator gives scalability, resiliency, and agility to internet-scale applications on various clouds in a predictable, consistent manner. But what good is application layer scalability if the data is still confined to a single vertically scalable server that can’t exceed a predefined limit?
YugabyteDB addresses these challenges. It is an open source, distributed SQL database built for cloud native architecture. YugabyteDB can handle global, internet-scale applications with low query latency and extreme resilience against failures. It also offers the same level of internet-scale similar to Kubernetes but for data on bare metal, virtual machines, and containers deployed on various clouds.
In this blog post, we’ll explore a multi-region deployment of YugabyteDB on Google Kubernetes Engine (GKE) using Google Cloud Platform’s (GCP) native multi-cluster discovery service (MCS). In a Kubernetes cluster, the “Service” object manifest facilitates service discovery and consumption only within the cluster. We need to rely on an off-platform, bespoke solution with Istio-like capabilities to discover services across clusters. But we can build and discover services that span across clusters natively with MCS. Below is an illustration of our multi-region deployment in action.
Assumptions
We will find commands with appropriate placeholders and substitutions throughout this blog based on the following assignments.
Step 1: Ensure Cloud Readiness
We need to enable a couple of GCP service APIs to use this feature. Let’s allow the following APIs.
Enable Kubernetes Engine API.
Enable GKE hub API.
Enable Cloud DNS API.
Enable Traffic Director API.
Enable Cloud Resource Manager API.
In addition to these APIs, enable standard services such as Compute Engine and IAM.
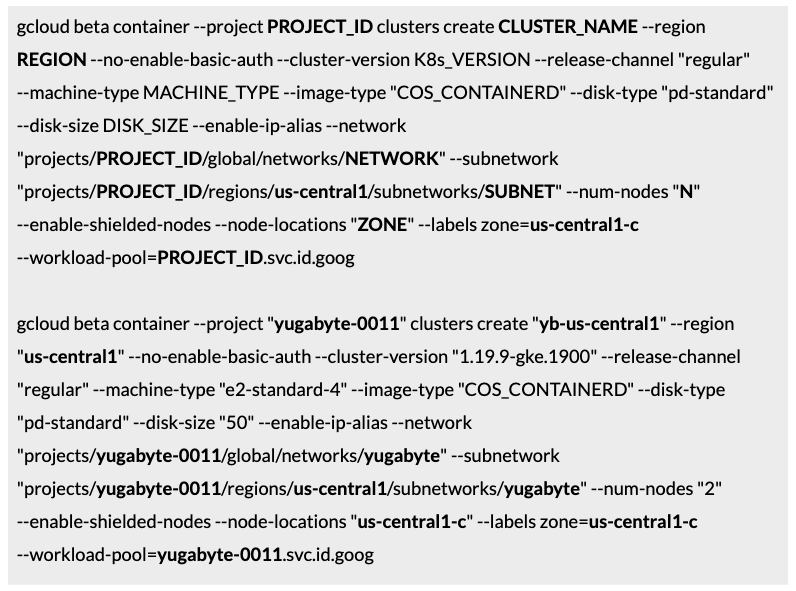
Step 2: Create three GKE Clusters (VPC native)
Create the first cluster in the US region with workload identity enabled.
Create the second cluster in the Europe region with workload identity enabled.
Create the third cluster in the Asia region with workload identity enabled.
Validate the output of the multi-region cluster creation.
Step 3: Enable MCS Discovery
Enable the MCS discovery API and Services:
As workload identity has already been enabled for the clusters, we need to map the Kubernetes service account to impersonate GCP’s service account. This will allow applications running in the cluster to consume GCP services. IAM binding requires the following mapping.
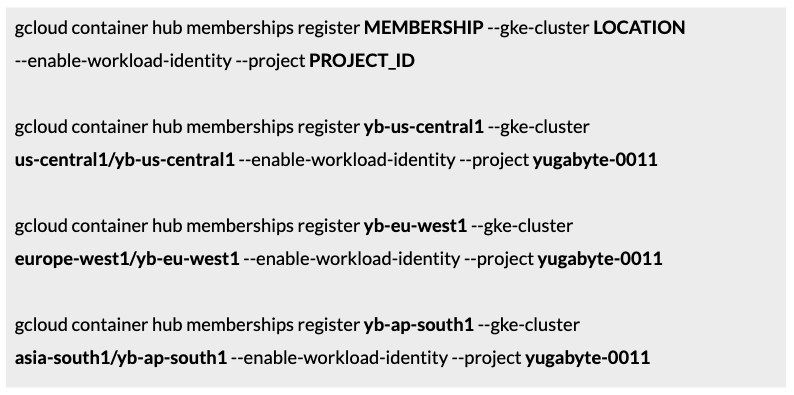
Step 4: Establish Hub Membership
Upon successful registration, the Hub membership service will provision gke-connect and gke-mcs services to the cluster. These are CRDs and controllers to talk to GCP APIs in order to provision the appropriate cloud resources such as network endpoints, mapping rules, and others (as necessary). This service creates a private managed hosted zone and a traffic director mapping rule on successful membership enrollment. The managed zone “clusterset.local” is similar to “cluster.local” but advertises the services across clusters to auto-discover and consume.
To get started, register all three clusters:
After successful membership enrollment, the following objects will be created.
Managed private zone => “clusterset.local”
From there, the traffic director initializes with the following mapping rule.
Once the traffic director initializes, verify the membership status.
This will also set up the appropriate firewall rules. When the service gets provisioned, the right network endpoints with the mapping rules would be automatically created, as illustrated below.
Step 5: Initialize YugabyteDB
As we have been exploring MCS, it’s clear our upstream Helm package won’t work out of the box. Let’s use the upstream chart to generate the template files locally and then make the relevant changes in the local copy. The template variable file for all three regions is available in the gist repo.
Download all three region-specific variable files and an additional service-export.yaml from the remote repo to the local machine and name them as “ap-south1.yaml”, “eu-west1.yaml”, “us-central1.yaml”, and “service-export.yaml”.
As the upstream chart is not updated for cross-cluster service discovery, the broadcast address of the master and tserver service instances would refer to the cluster local “svc.cluster.local” DNS entry. This needs to be updated explicitly with the new managed zone private domain that the hub created during cluster membership enrollment to let the instances communicate between clusters.
To get started, generate Helm templates for all three regions:
Once we generate the template files, we have to update the broadcast address. More specifically, search for this text “–server_broadcast_addresses” in both the master and tserver StatefulSet manifest definition and update both the entries.
The pattern is [INSTANCE_NAME].[MEMBERSHIP].[SERVICE_NAME].[NAMESPACE].svc.clusterset.local. This change is explained in the next section.
Finally, get the container credentials of all three clusters. Once we get the kubeconfig, the local context would be similar to:
Step 6: Deploy YugabyteDB
Connect to all three cluster contexts one by one and execute the generated template file using kubectl CLI.
Now, let’s explore the service-export.yaml file:
“ServiceExport” CRD is added by the MCS service. This will export services outside of the cluster to be discovered and consumed by other services. The controller programmed to react to events from this resource would interact with GCP services to create ‘A’ name records in the internal private managed zone for both yb-tservers and yb-masters headless services. If we verify the “clusterset.local” domain in the console, we would see the following records:
For the exported headless services, there will be two “A” name records:

This is similar to how the in-cluster “svc.cluster.local” DNS works. The DNS creation and propagation would take some time (around 4-5 mins) for the first time. YugabyteDB wouldn’t be able to establish the quorum until the DNS records are made available. Once those entries get propagated, the cluster would be up and running.
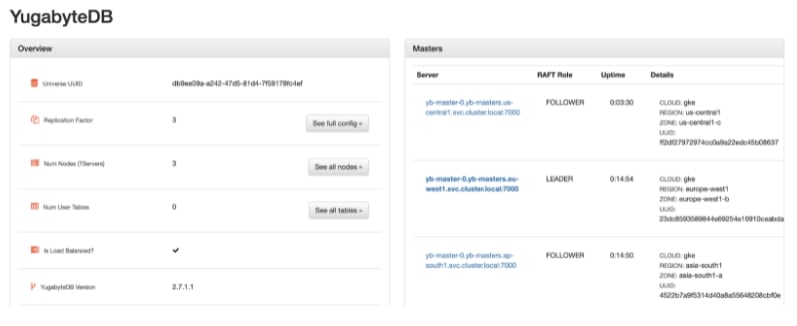
When we verify the Kubernetes cluster state for the master and tserver objects, we will find all of them in a healthy state. This is represented below using the Octant dashboard.
We can simulate the region failure by bringing down the StatefulSet replica to zero. Upon failure, the RAFT consensus group reacts and adjusts accordingly to bring the state to normalcy as we still have two surviving instances.
Once we scale up the replica count, the node joins back with the cluster group, and all three regions are again back to a healthy state.
Good usage pattern
Because of the distributed nature of data and the associated secondary indexes in a multi-region deployment, it is beneficial to pin a region as the preferred region to host the tablet leaders. This keeps the network latencies to a minimum and is confined to a region for cross-node RPC calls such as multi-row transactions, secondary index lookups, and other similar operations. As you can see, this is one of the best usage patterns to improve network latencies in a multi-region deployment.
Step 7: Cleanup
Delete YugabyteDB:
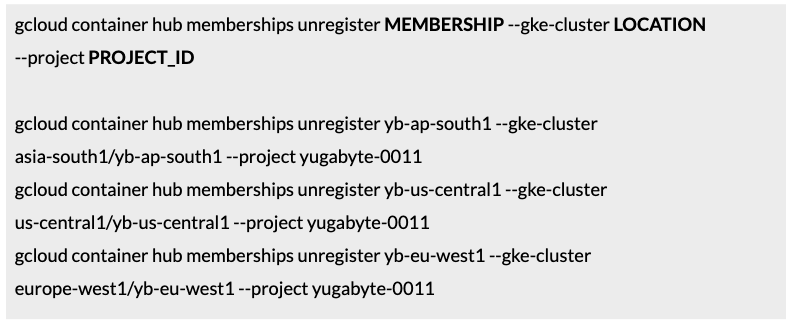
Unregister the Hub Membership:
Disable the MCS APIs:
And finally, delete the GKE clusters.
Conclusion
This blog post used GCP’s multi-cluster service discovery to deploy a highly available, fault-tolerant, and geo-distributed YugabyteDB cluster. As shown in the illustration below, a single YugabyteDB cluster distributed across three different regions addresses many use cases, such as region local delivery, geo-partitioning, higher availability, and resiliency.
Give this tutorial a try—and don’t hesitate to let us know what you think in the YugabyteDB Community Slack channel.
The post Tutorial: How to Deploy Multi-Region YugabyteDB on GKE Using Multi-Cluster Services appeared first on The Distributed SQL Blog.


