Your web-application may have thousands of daily visits and you can’t know where they would be clicking or how they would be interacting with your homepage or any other web page for that instance. The question is, can you test your web application for such scenarios? Yes, you can. But how do you test for such scenarios? I mean you can’t just go ahead and click everywhere on your website. The answer to that my friend is monkey testing.! Yeah, you heard that right. It is called Monkey testing and is a type of testing where you interact with your web-application on a random basis. The idea here is to perform automated website testing by passing random values to the automation testing scripts to generate random interactions without any particular pattern.
Now, can you automate monkey testing with Selenium, an open-source test automation framework?
Yes, you can do that too. And that is precisely the focus of this article. In this article, I am going to help you become familiar with monkey testing using Selenium with WebdriverIO.
Hey! Did you know? input-file-accept is an extension that allows a filter to be defined for what types of files a user may pick with from an element.
What Is Monkey Testing?
In Monkey testing, we try to break the system by giving a random input to the system. The input could be anything from an end-user’s perspective, it could be a click, scroll, or a dummy text string.
Monkey testing is broadly classified into 3 types:
Dumb Monkey testing or Ignorant Monkey testing
Smart Monkey testing
Brilliant Monkey testing
Dumb or Ignorant Monkey
This is when you perform testing without any understanding of the software. You are unaware of the expected outcomes, unaware of the inbound and outbound workflows, even unaware of the valid inputs for the test script. Being a dumb monkey is like walking in the dark and you might have a tough time realizing whether you have come across a bug or not. However, when you would stumble across a bug then chances are that it may be a critical one and also a rare one to come across.
Smart Monkey
This is when you and your team are well aware of the web application under test. You realize where the hyperlinks should lead you, and other expected outcomes too. Being a smart monkey means that you are aware of the invalid outcomes and are trying to break the web application to face them.
Brilliant Monkey
This is when you are an expert of the web application and you know the entire requirements of the testing. Being a brilliant monkey means that you are a virtuoso of the domain for which you need to perform testing.
For example: If you are performing cross browser testing, then you are aware of the browser testing matrix, and are defining your Selenium desired capabilities with respect to the matrix.
You are acknowledged about the latest code changes and modules being modified, or added in the production.
You are ready to perform testing with a list of unsupported web elements for different browsers and browser versions, running on operating systems for mobile and desktop.
You can take this certification as proof of expertise in the field of test automation with JavaScript to empower yourself and boost your career.
Here’s a short glimpse of the Selenium JavaScript 101 certification from LambdaTest:
Why Monkey Testing?
You might be wondering about the relevance of monkey testing. Is it even necessary? Well, let us take an example of a heatmap from a website.
Heatmap indicates where the visitors interacted with your website and in what volume. The area with red heat indicates the majority of user interaction while the area of blue heat indicates a minority of user interactions.
This is a random website and you look at the area that was clicked by the users. Many times it happens that an unwanted link is often unobserved until clicked upon. And if your customer finds that link before you do then I don’t consider that it is going to be healthy for your organization.
Which is why you need to automate monkey testing. With that said, let us quickly review the pros and cons of monkey testing.
Advantages of Monkey Testing
Users can find unexpected bugs.
Not required special skills.
Check the reliability and stability of System.
Perform out of the box scenario.
Can handle dynamic links generation.
It helps to break the entire system.
Disadvantages of Monkey Testing
Bug reproduction is very difficult.
No fixed result.
Random input data.
Longer execution time.
Now, that we are well-versed with the concept of monkey testing. It is time to jump into action and automate monkey testing with WebdriverIO and Selenium.
What Is WebDriverIO?
WebdriverIO is a next-generation WebDriver test framework on Node.js. It’s an open-source testing framework that helps you to automate the website under test as well as a mobile app. The advantage of WebdriverIO is much faster and it uses JavaScript to write automation. WebdriverIO supports selenium and appium library to automate browsers and mobile-based application. Additionally, WebdriverIO also supports integration with many cloud tools for automation.
If you are not familiar with WebdriverIO, you can have a look at our tutorial.
Why Monkey Testing with WebDriverIO?
Monkey testing is a time-honored way to test the limits of your applications by entering random, even unexpected inputs, in hope that one of those inputs is gonna break something and bring out some non-obvious flaw. WebdriverIO on the other hand, is one of the most used JavaScript frameworks for web automation testing that gets nearly 420,000 downloads every week at NPM, has around 5300 Stars on it’s GitHub repo, and has 170 contributors to its name. What these two things have in common you ask? Simply put, you can leverage the awesomeness of WebdriverIO along with the selenium framework to automate monkey testing of your website or web applications.
Monkey Testing Example With Real Time Scenario
Say, you have a website and have added a couple of entries in your header. Now, you wish to test whether the hyperlinks are clickable or not. You do not plan to validate where the hyperlinks are taking you to so you are unaware of the landing pages that they might go to. You are only to break the website header. This represents you as an ignorant or dumb monkey, no pun intended.!!
Scenario For Monkey Testing with WebdriverIO:
Open LambdaTest Homepage.
Collect header menu links.
Click on randomly on each menu link.
Demo WebDriverIO JavaScript
To achieve this scenario I will present you a Selenium automation testing script for WebdriverIO. The automation script will open in the Chrome browser and will store all header menu links in one javascript array. Once I got all the links elements in the array, I stored the length of that array. With that length, I am looping and using javascript math.random() method to get random numbers between 0 to a length of elements and performing click operation.
const assert = require("assert");
    describe("Open Web browser in the chrome", () => {
        it("Page should open", () => {
            browser.url("https://www.lambdatest.com/");
            const title = browser.getTitle();
            assert.strictEqual(
                title,
                "Cross Browser Testing Tools | Free Automated Website Testing | LambdaTest"
            );
        });
    });

    describe("Perform Random click", () => {
        it("Random click on Header Menu should perform based on random index ", () => {
            const headerMenuLinks = $$(".//div[@id='navbarSupportedContent']/ul/li");
            const linksCount = headerMenuLinks.length;

            for (i = 0; i < linksCount - 1; i++) {
                let randomIndex = Math.floor(Math.random() * linksCount);
                headerMenuLinks[randomIndex].click();
                browser.back();
                browser.pause(3000);
            }
        });
    });
Code Walkthrough for Monkey Testing with WebdriverIO
Firstly, we have imported the assert library to leverage assertions in our automation testing script.
const assert = require("assert");
describe() allows us to keep all our tests under one function. In our case, we have defined two describe method. One is “Open Web browser in the chrome” and another one is “Perform Random click”.
describe("Open Web browser in the chrome", () => {
    // Some code
    });

    describe("Perform Random click", () => {
    // Some code
    });
Each describe() can have multiple it() which is your test case. You can write N number of test cases under describe function.
it("Page should open", () => {
         // some code
        });
The below line of code opens the given URL in the Google Chrome browser. Here browser is equal to webdriver variable with that you can get all webdriver related methods.
browser.url("[https://www.lambdatest.com/](https://www.lambdatest.com/)");
The below line of code helps you to open website page title.
const title = browser.getTitle();
Below code assert the page title with the expected page title.
assert.strictEqual(title,"Cross Browser Testing Tools | Free Automated Website Testing | LambdaTest");
Below line of code finds the header links web elements and stores in the javascript array. Here, $$() is as equal to findElements() method on java
const headerMenuLinks = $$(".//div[[@id](http://twitter.com/id)='navbarSupportedContent']/ul/li");
Below line of code gets the length of the array and stores the value into the variable
const linksCount = headerMenuLinks.length;
Below line of code loops until link count and generate random numbers then click on header links randomly.
 for (i = 0; i < linksCount - 1; i++) {
                let randomIndex = Math.floor(Math.random() * linksCount);
                headerMenuLinks[randomIndex].click();
                browser.back();
                browser.pause(3000);
      }
That’s great!!! You have understood the sample problem and its advantages. Now, how to execute it?
Do you know? The input-inputmode attribute, when specified, indicates what kind of input mechanism would be most helpful for users entering content into the form control. Possible values are: “keyboard”, “speech”, and “none”.
Executing Test Execution on Local Machine
In case, if you have changed your test case folder name then follow this. Before running this test, you need to:
Open wdio.conf.js file.
Find the specs: property and change the path according to your test case folder.
Save the file.
Now, you are good to execute the Selenium automation testing script for monkey testing with WebdriverIO. Just type this command in the terminal/ cmd and press enter.
./node_modules/.bin/wdio run wdio.conf.js
Mac Operating System
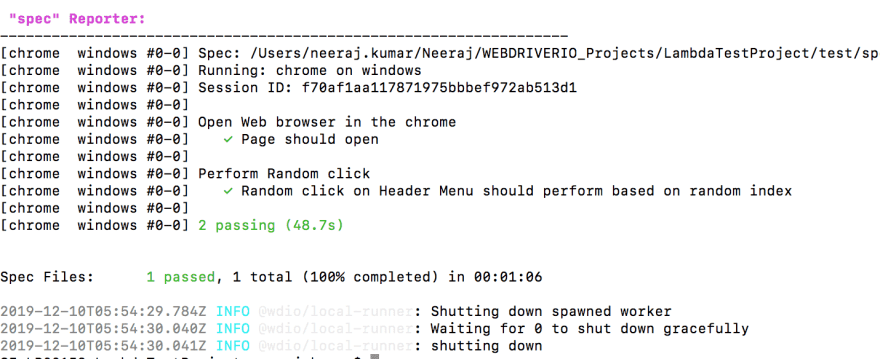
The execution result console looks like the below screenshot.
You can see one specs file is passed and in that specs file, we have written two test cases that are also passed.
Windows Operating system
The above whole setup is performed on the mac operating system. If you want to run the whole step up for the windows system then follow the below steps:
Open Specify Test Files what is wdio.conf.js under the project root folder.
Find the “capabilities” section.
Add “platformName: ‘Windows 10’”.
After that you can go ahead and execute the Selenium automation testing script for monkey testing with WebdriverIO.
Kudos! You have successfully executed Monkey testing with WebdriverIO.
What if my test suite is larger?
Your testing requirements may be larger. You may have to execute automated browser testing over a variety of browser + browser versions + OS combinations. Doing so can take a considerable amount of time unless you plan to leverage parallel testing with Selenium Grid.
Keep in mind though, doing so with an in-house infrastructure is going to pinch you. Why?
Well, you say you come up with a browser testing matrix and filtered out your top 50 browsers + OS combinations. Now, to test them you would have to set up your Selenium Grid for these 50 combinations. Now, every month a new browser version from a different vendor would be out, new devices would be rolled into the market. Expanding your Selenium Grid will not only demand for expensive hardware resources but also for more time. Ultimately, you will be putting more time and effort in maintaining the inhouse Selenium Grid rather than automation testing with Selenium.
What can you do? Start Selenium automation testing with LambdaTest.
This is why it is recommended to go for a cloud-based Selenium Grid such as LambdaTest. With LambdaTest, you can execute Selenium automation testing on 3000+ real browsers running on real operating systems for both desktop and mobile. Our Selenium Grid is compatible with every test automation framework and programming language compatible with Selenium. We also help you fasttrack your browser testing experience by providing third party integrations with CI/CD tools, project management tools, instant messaging tools, codeless automation tools, and more.
Automate Monkey Testing With WebdriverIO On An Online Selenium Grid
Before running your test on LamdaTest, you need to install dev dependencies. You can install them by entering the following command
npm install [@wdio/selenium-standalone-servi](http://twitter.com/wdio/selenium-standalone-servi)ce --save-dev
Now, Suppose you want to run the same script which you have written for the local machine, on LamdaTest you just need to change the Specify Test File that is wdio.conf.js.
The below configuration runs on Chrome version 79.0 on windows 10 operating system.
Note: Add actual user name and accessKey from the LamdaTest website.
Most important is the service parameter. You need to set it as selenium-standalone otherwise the script will not run on LamdaTest.
path: "/wd/hub",
    capabilities: [
            {
                maxInstances: 5,
                name: "Random Click Suite", // name of the test,
                user: "{add here LamdaTest User Name}",
                accessKey: "{Add here access token}",
                build: "Monkey Test",
                platformName: "Windows 10",
                browserName: "Chrome",
                browserVersion: "79.0",
                video: true,
                console: true,
                visual: false
            }
        ],
        coloredLogs: true,
        hostname: "hub.lambdatest.com",
        port: 80,
        services: ["selenium-standalone"],
        baseUrl: "",
Once you run ./node_modules/.bin/wdio wdio.conf.js, Go to the LamdaTest web application and check your automation dashboard. You can see your script running.
Console execution result:
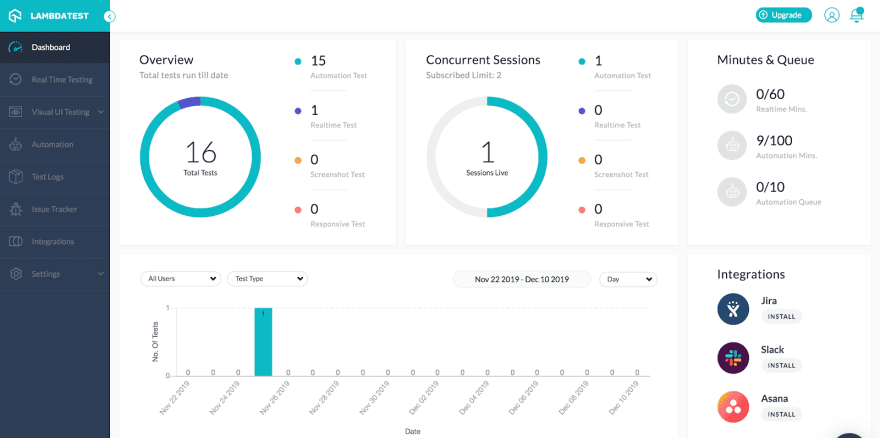
LamdaTest Dashboard
Dashboard: In the Dashboard view you can check summary where an overview of your total tests run and concurrent session details and others more information.
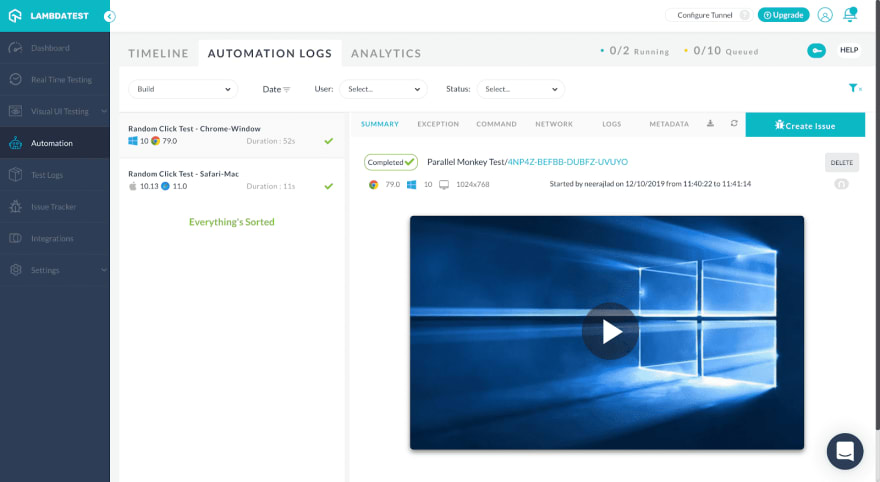
Automation Logs: In the Automation Logs you can see each execution in detail including
browser version, Operating system version, execution date and time, videos, screenshots and steps of execution.
TimeLine: In the timeline screen, you can see your automation script build version. You can give build version names in your capabilities.
Logs: You can view the Selenium log as well as the console log.
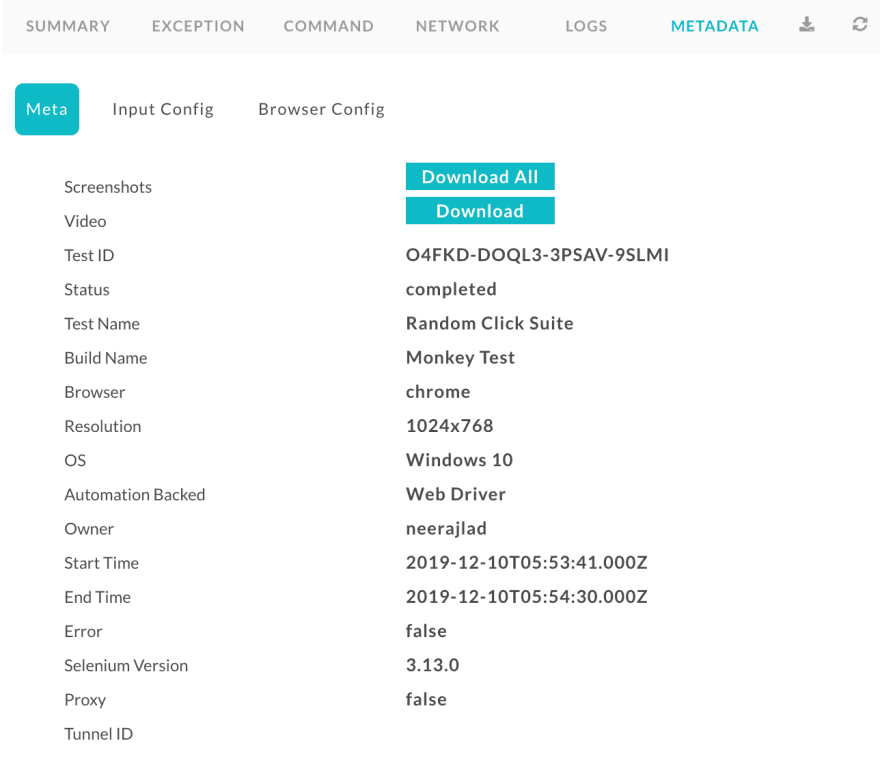
Metadata: Metadata view gives you the supplied meta details and input configuration and browser configuration you passed.
Command: In the command view, you can see each step element status.
Parallel Testing With WebdriverIO On LamdaTest
So far, we have learned serial browser automation. We talked about leveraging parallel testing with Selenium Grid when we executed our Selenium automation testing script for monkey testing with WebdriverIO on local setup.
When your project test script grows and it takes a lot more time to execute and produce results. You need to find a solution to get faster ways to generate results. Also, many different types of browsers are coming into markets and we have to deal with that. In such a situation, the parallel execution will help us to find the correct solution. Now, we will learn parallel testing with Selenium using WebdriverIO over an online Selenium Grid.
In the WebdriverIO there is a property called maxInstances which helps you to run parallel browsers. Change your current wdio.conf.js with multiple browsers’ capabilities and run the same script.
The following capabilities will run the Safari browser on the Mac Operating system and Chrome browser on the Windows Operating system.
You can add multiple instances based on the target operating system CPU capacity. It is advisable to create maxInstances as required in order to get stable results.
capabilities: [
            {
                maxInstances: 5,
                name: "Random Click Test - Safari-Mac", // name of the test,
                user: "{Add LamdaTest User Name}",
                accessKey: "{Add LamdaTest accessKey}",
                build: "Parallel Monkey Test",
                platformName: "macOS High Sierra", // macOS High Sierra & Windows 10
                browserName: "Safari",
                browserVersion: "11.0",
                video: true,
                console: true,
                visual: false
            },
            {
                name: "Random Click Test - Chrome-Window", // name of the test,
                user: "{Add LamdaTest User Name}",
                accessKey: "{Add LamdaTest accessKey}",
                build: "Parallel Monkey Test",
                platformName: "Windows 10", // macOS High Sierra & Windows 10
                browserName: "Chrome",
                browserVersion: "79.0",
                video: true,
                console: true,
                visual: false
            }
        ],
Let’s view the LamdaTest and see the execution details. You can see there are two tests running on and details are shown in the below Concurrent Sessions.
Do you know what input-number does? The number field type allows you to quickly provide an editable number field.
Stay Tuned For More Selenium Automation Testing Tutorials
Monkey testing should be incorporated in your test cycles as they can help you find peculiar UI bugs. There are 3 types of Monkeys i.e. Dumb, Smart, and Brilliant. You can decide how to allocate the automated monkey testing among your team depending on their experience with automation testing using Selenium. We performed monkey testing with WebdriverIO because it is one of the most popular JavaScript testing framework.
Automation testing with Selenium is pivotal to ensure faster product delivery by accelerating your test cycles. You can test your website or web-application across different browsers, browser versions running on various operating systems. Once you figure out the most important browsers + OS combinations through a browser testing matrix, you then create a test script and mention different combinations using the Desired Capabilities class in Selenium. That way, you can free up more bandwidth for yourself by automating the repetitive test cases for cross browser testing.
Leverage cloud-based Selenium Grid such as LambdaTest. That way, you can forget the trouble of maintaining inhouse Selenium infrastructure and focus on one thing alone, automation testing with Selenium!!
I hope you enjoy the tutorial. 🙂 Make sure you hit the bell icon so you are alerted in the next one.;)


