“Testing leads to failure, and failure leads to understanding.”
Burt Rutan
It goes without saying that the very essence of testing lies in locating issues so that they can be worked upon. This results in a better-quality & well-performing web application (or website) that is important in building a positive customer experience. However, as the automation test builds grow with time, maintaining and organizing the tests in a more readable format becomes even more challenging. When writing Mocha scripts for JavaScript automation testing, I came across a handy Mocha report generator utility called Mochawesome.
What does Mochawesome do?
Mochawesome is a custom Mocha reporter that allows you to create standalone HTML/CSS test reports based on the execution of your Mocha test scripts. Mochawesome brings the intuitiveness that is sorely missing in default Mocha reports. This eventually helps in managing the Selenium test automation builds in a better way.
In this article, I will showcase how to make the most of Mochawesome to generate visually appealing yet detailed test reports from your Mocha scripts.
But, before we jump into Mocha reporter, let’s first understand what the Mocha test framework is all about in the Selenium test automation world.
What Is Mocha?
Mocha is the modern-day JavaScript test framework that executes on Node.js. It is used for writing unit tests and End-to-End (E2E) automated tests for API, Web UI, performance tests, and more. Popular frameworks like Cypress, Selenium WebDriver, WebDriverIO all have supported Mocha as their core style of writing tests.
Mocha for Selenium automation testing, thus, has wide acceptance in the Javascript community because of its simple and rich features, using which you can write simply as well as complex test cases.
To get detailed information on Mocha, please refer to the Mocha Tutorial by LambdaTest.
Default Mocha Report Generator
Spec is the default reporter in Mocha. The Spec Mocha reporter generates the report as a hierarchical view. The Spec reports are nested based on test cases.
To generate reports via the default Mocha Report Generator (i.e., Spec), you don’t need to pass any particular command. The Mocha tests are executed with the help of a –spec modifier. This modifier generates a report while executing the tests.
For example, consider a simple Mocha script as search_basic.js:
const assert = require('assert')
describe('Mocha Works?', () => {
    it('Mocha Run test', () => {
        assert.ok(true, 'Failed test')
    });
    it('Should return -1 if value not present', ()=>{
        assert.strictEqual([1,2,3].indexOf(5), 'Failed to find')
    });
})
To execute the above tests and generate the report using Spec, run the following command on the terminal:
npx mocha --spec search_basic.js
Upon execution, the default Mocha report generator (i.e., Spec) will generate a report resembling the actual test case hierarchy. It provides the essential details about the test results.
Here are the other Mocha report generator tools:
DOT Matrix
Nyan
List
Progress
Perform browser automation testing on the most powerful cloud infrastructure. Leverage LambdaTest automation testing for faster, reliable and scalable experience on cloud.
Limitations Of Default Mocha Reporter
While these Mocha reporters generate reports on the terminal window in their different styles, they lack sufficient details of the tests. This is particularly important when running many tests, or the tests are complex in nature.
Reports are expected to visualize the test details, failures, screenshots, time for execution, logging details, and more. Hence, the Spec Mocha report generator might not be the one to meet your ‘detailed’ reporting needs.
Luckily, other Mocha report generators generate the reports in popular formats like HTML/CSS, XML, and JSON. These reports have visual appeal and provide the much-needed intuitiveness in the reports. Mochawesome is one such Mocha reporter, which is extensively used with JavaScript automation testing with Selenium.
Mochawesome — The Mocha Report Generator You Need
Mochawesome is one such Mocha Reporter that generates standalone HTML/CSS reports to visualize your JavaScript Mocha tests simply and efficiently. Mochawesome runs on Node.js (<=10) and is supported on all the leading test frameworks that support the Mocha style of writing tests.
Advantages Of Using Mochawesome Report Generator
Here are the significant advantages of Mochawesome in comparison to the other Mocha reporting tools:
Mochawesome report is designed in a mobile-friendly and straightforward way. It uses chartJS for the visualization of test reports.
It has supports display of different types of hooks — before(), beforeEach(), after(),afterAll() and so on.
Failure at a particular line of code is directly visible in the report itself due to the inline code review feature in Mochawesome.
It has support for stack trace logs and failure messages.
You can add extra context information to tests like console logs, environment details, custom messages to tests as an attachment. This gives the additional hand of information about the test cases in the report.
Since the reports are generated with standalone HTML/CSS, they can be shared offline with .HTML extension.
How To Generate Reports With Mochawesome Report Generator
To generate reports using the Mochawesome report generator, we first need to add them to our existing project. Follow the below steps to add Mochawesome to the project:
npm install mochawesome mochawesome-report-generator --save-dev
- [Used to add Mochawesome only to the current directory]
npm install -g mochawesome mochawesome-report-generator
- [Used to add Mochawesome globally]
Once Mochawesome is added, you can create Mocha reports using Mochawesome using the following command:
npx mocha --spec search_basic.js --reporter mochawesome
The command for Mochawesome differs from the command used with the default Mocha report generator on two terms:
reporter is used to specify that we want to use the reporter option to generate Mocha reports.
mochawesome is used to specify that we will be using the Mochawesome report generator instead of the default Mocha reporter.
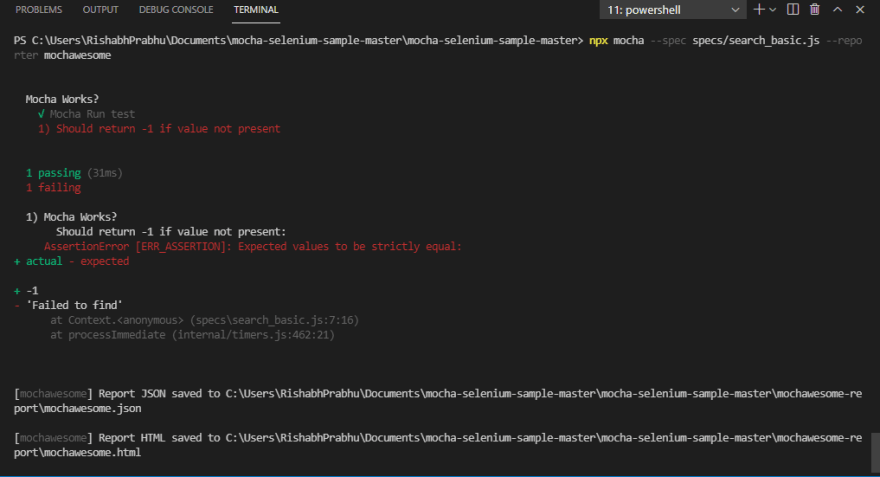
Here is how you can run the command on the search_basic.js file:
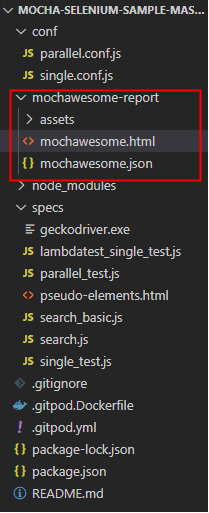
As soon as you run the above command, the single test file search_basic.js gets executed. Upon execution, the report will be generated using the Mochawesome report generator in the folder mochawesome-report, which is created at the root level of the current project. This folder will contain the Mochawesome in two formats — HTML and JSON.
Mocha HTML Report By Mochawesome
Let us have a closer look at the contents of the reports generated with the help of the Mochawesome report generator.
First, let’s open the HTML report generated in the mochawesome.html file.
The HTML report generated by Mochawesome shows the test execution time, passed/failed tests, and other relevant project information. If you click on the individual tests, you can even see whether the actual tests passed/failed along with the detailed error reports.
Mocha JSON Report By Mochawesome
Let’s have a closer look at the contents of the JSON report generated in the mochawesome.json file.
{
  "stats": {
    "suites": 1,
    "tests": 2,
    "passes": 1,
    "pending": 0,
    "failures": 1,
    "start": "2021-05-24T00:57:43.809Z",
    "end": "2021-05-24T00:57:43.840Z",
    "duration": 31,
    "testsRegistered": 2,
    "passPercent": 50,
    "pendingPercent": 0,
    "other": 0,
    "hasOther": false,
    "skipped": 0,
    "hasSkipped": false
  },
  "results": [
    {
      "uuid": "49dac235-26c3-4787-aa2a-3bb9f4b95c99",
      "title": "",
      "fullFile": "",
      "file": "",
      "beforeHooks": [],
      "afterHooks": [],
      "tests": [],
      "suites": [
        {
          "uuid": "2ee44ad6-1759-4923-b1c1-8a621be13ef8",
          "title": "Mocha Works?",
          "fullFile": "C:\\Users\\RishabhPrabhu\\Documents\\mocha-selenium-sample-master\\mocha-selenium-sample-master\\specs\\search_basic.js",
          "file": "\\specs\\search_basic.js",
          "beforeHooks": [],
          "afterHooks": [],
          "tests": [
            {
              "title": "Mocha Run test",
              "fullTitle": "Mocha Works? Mocha Run test",
              "timedOut": false,
              "duration": 1,
              "state": "passed",
              "speed": "fast",
              "pass": true,
              "fail": false,
              "pending": false,
              "context": null,
              "code": "assert.ok(true, 'Failed test')",
              "err": {},
              "uuid": "6a817446-6b84-46ea-aa32-43f100fce9b2",
              "parentUUID": "2ee44ad6-1759-4923-b1c1-8a621be13ef8",
              "isHook": false,
              "skipped": false
            },
            {
              "title": "Should return -1 if value not present",
              "fullTitle": "Mocha Works? Should return -1 if value not present",
              "timedOut": false,
              "duration": 3,
              "state": "failed",
              "speed": null,
              "pass": false,
              "fail": true,
              "pending": false,
              "context": null,
              "code": "assert.strictEqual([1,2,3].indexOf(5), 'Failed to find')",
              "err": {
                "message": "AssertionError: Expected values to be strictly equal:\n+ actual - expected\n\n+ -1\n- 'Failed to find'",
                "estack": "AssertionError [ERR_ASSERTION]: Expected values to be strictly equal:\n+ actual - expected\n\n+ -1\n- 'Failed to find'\n    at Context.<anonymous> (specs\\search_basic.js:7:16)\n    at processImmediate (internal/timers.js:462:21)",
                "diff": null
              },
              "uuid": "fbc9b77c-2b64-4d25-9f32-2c3b29e957c5",
              "parentUUID": "2ee44ad6-1759-4923-b1c1-8a621be13ef8",
              "isHook": false,
              "skipped": false
            }
          ],
          "suites": [],
          "passes": [
            "6a817446-6b84-46ea-aa32-43f100fce9b2"
          ],
          "failures": [
            "fbc9b77c-2b64-4d25-9f32-2c3b29e957c5"
          ],
          "pending": [],
          "skipped": [],
          "duration": 4,
          "root": false,
          "rootEmpty": false,
          "_timeout": 2000
        }
      ],
      "passes": [],
      "failures": [],
      "pending": [],
      "skipped": [],
      "duration": 0,
      "root": true,
      "rootEmpty": true,
      "_timeout": 2000
    }
  ],
  "meta": {
    "mocha": {
      "version": "6.2.3"
    },
    "mochawesome": {
      "options": {
        "quiet": false,
        "reportFilename": "mochawesome",
        "saveHtml": true,
        "saveJson": true,
        "consoleReporter": "spec",
        "useInlineDiffs": false,
        "code": true
      },
      "version": "6.2.2"
    },
    "marge": {
      "options": null,
      "version": "5.2.0"
    }
  }
}
The Mochawesome JSON report is very much extensive and contains every bit of information related to the tests. These JSON files can be very useful to transfer data via APIs, making them ideal for other applications.
Need a great solution for Safari for windows browser testing on Windows? Forget about emulators or simulators — use real online browsers. Try LambdaTest for free!
Mochawesome Report For Parallel Tests
Check out our blog to figure out why parallel testing is important in Selenium automation testing. With Mochawesome, you can also create Mocha reports for tests run in parallel.
To do so, just add –parallel modifier in the execution command:
npx mocha --spec specs/search_basic.js --reporter mochawesome --parallel
You can also execute multiple test files in parallel and generate the report using the Mochawesome report generator. To do so, simply add the following script in the package.json file.
"scripts": {
    "test": "mocha --spec ./tests/*.js --reporter mochawesome --parallel"
  },
./tests/*.js indicates that all the test files inside the tests folder will be executed in parallel (with the help of –parallel modifier).
Run the following command on the terminal to trigger the tests:
npm test
Generating Mochawesome Report Under Custom Folder
By default, Mochawesome generates the Mocha reports by creating a folder by the name mochawesome-reports. What if you want to use the Mocha reporter to generate reports in a specific folder. WellMochawesome lets you create reports under a custom folder.
The --reporter-options modifier should generate reports under a custom folder with a custom filename. Pass the custom folder name to reportDir and custom filename path as the value to reportFilename.
npx mocha --spec specs/search_basic.js --reporter mochawesome --reporter-options reportDir=myReport,reportFilename=reportFile
As soon as the command is executed, the tests will run in Mocha style, and the reports will be generated with the help of the Mochawesome report generator. This time, the reports will be saved in the specified directory with the filename passed in the command.
As seen below, the reports were generated in the designated folder:
Mochawesome Advanced Reporter Options
The Mochawesome Mocha report generator utility also provides advanced reporter-options that work with CLI and through the .mocharc.js file. This file has to be configured for overwriting default reporter settings.
Here are the commonly used Mochawesome advanced reporter options for generating Mocha reports:
| FLAG | TYPE | DEFAULT | DESCRIPTION |
|---|---|---|---|
| -f, –reportFilename | string | Filename of saved report | |
| -o, –reportDir | string | [cwd]/mochawesome-report | Path to save report |
| -t, –reportTitle | string | mochawesome | Report title |
| -p, –reportPageTitle | string | mochawesome-report | Browser title |
| -i, –inline | boolean | FALSE | Inline report assets (scripts, styles) |
| –cdn | boolean | FALSE | Load report assets via CDN (unpkg.com) |
| –assetsDir | string | [cwd]/mochawesome-report/assets | Path to save report assets (js/css) |
| –charts | boolean | FALSE | Display Suite charts |
| –code | boolean | TRUE | Display test code |
| –autoOpen | boolean | FALSE | Automatically open the report |
| –overwrite | boolean | TRUE | Overwrite existing report files. |
| –timestamp, –ts | string | Append timestamp in specified format to report filename. | |
| –showPassed | boolean | TRUE | Set initial state of “Show Passed” filter |
| –showFailed | boolean | TRUE | Set initial state of “Show Failed” filter |
| –showPending | boolean | TRUE | Set initial state of “Show Pending” filter |
| –showSkipped | boolean | FALSE | Set initial state of “Show Skipped” filter |
| –showHooks | string | failed | Set the default display mode for hooks |
| –saveJson | boolean | FALSE | Should report data be saved to JSON file |
| –saveHtml | boolean | TRUE | Should report be saved to HTML file |
| –dev | boolean | FALSE | Enable dev mode (requires local webpack dev server) |
| -h, –help | Show CLI help |
LambdaTest — An Online Cloud-Based Solution To Meet All Your Testing Needs
The size of the Mocha reports is bound to increase when more tests are added to the test suite. This might create issues when it comes to the maintenance of the report. To top it all, the lack of advanced visual options such as graphs, plots, etc., are the major drawbacks in local Mocha report generators.
In addition to this, Mocha reporter can be used only on the local Selenium Grid. Here are some of the significant drawbacks of local Selenium setup (when used with Mocha):
Testing on a local Selenium Grid lets you test only on specific browser and OS combinations.
Running Mocha tests on browser versions other than the ones installed on your machine is not possible.
Performing parallel testing on multiple browser versions is still a challenge for Selenium Grid setup.
To overcome these challenges of local Selenium setup and Mocha reporter, you can use a cloud-based Selenium Grid like LambdaTest. The cloud-based Selenium Grid helps run Mocha tests 24/7 and saves the trouble of maintaining local infrastructure.
With LambdaTest, you can download the report of the automated tests in just a click, that too independent of the programming language being used for test case development. All you need to do is run your Mocha tests on the LambdaTest platform and use the Download Report option to download the detailed report.
Test on Windows 7 across latest and legacy Windows 7 browsers.
Running Tests On LambdaTest Platform
Let’s explore the benefits of using LambdaTest’s cloud-based Selenium Grid with an example. For demonstration, we perform a simple Google search and assert the first result with a fixed key:
var assert = require("assert"),
  webdriver = require("selenium-webdriver"),
  conf_file = process.argv[3] || "conf/single.conf.js";

var capabilities = require("../" + conf_file).capabilities;

var buildDriver = function(caps) {
  return new webdriver.Builder()
    .usingServer(
      "http://" +
        LT_USERNAME +
        ":" +
        LT_ACCESS_KEY +
        "@hub.lambdatest.com/wd/hub"
    )
    .withCapabilities(caps)
    .build();
};

capabilities.forEach(function(caps) {

  describe("Google's Search Functionality for " + caps.browserName, function() {
    var driver;
    this.timeout(0);

    beforeEach(function(done) {
      caps.name = this.currentTest.title;
      driver = buildDriver(caps);
      done();
    });

    it("can find search results" + caps.browserName, function(done) {
      driver.get("https://www.lambdatest.com").then(function() {
        driver.getTitle().then(function(title) {
          setTimeout(function() {
            console.log(title);
            assert(
              title.match(
                "Cross Browser Testing Tools | Test Your Website on Different Browsers | LambdaTest"
              ) != null
            );
            done();
          }, 10000);
        });
      });
    });

    afterEach(function(done) {
      if (this.currentTest.isPassed) {
        driver.executeScript("lambda-status=passed");
      } else {
        driver.executeScript("lambda-status=failed");
      }
      driver.quit().then(function() {
        done();
      });
    });
  });
});
Let’s create a config file parallel.conf.js for defining the desired browser capabilities to execute the tests on LambdaTest. The capabilities are generated using the Lambdatest capabilities generator.
LT_USERNAME = process.env.LT_USERNAME || "<your username>";
LT_ACCESS_KEY = process.env.LT_ACCESS_KEY || "<your access key>";

var config = {
  commanCapabilities: {
    build: "Mocha-Reporter-Sample", //Build name
    tunnel: false // Make it true to run the localhost through tunnel
  },
  multiCapabilities: [
    {
      // Desired capabilities
      name: "Win10Firefox", // Test name
      platform: "Windows 10", // OS name
      browserName: "firefox",
      version: "latest",
      visual: true, // To take step by step screenshot
      network: true, // To capture network Logs
      console: true // To capture console logs.
    },
    {
      name: "Win10Chrome", // Test name
      platform: "Windows 10", // OS name
      browserName: "chrome",
      version: "75.0",
      visual: true, // To take step by step screenshot
      network: true, // To capture network Logs
      console: true // To capture console logs.
    },
    {
      name: "Win10Edge", // Test name
      platform: "Windows 10", // OS name
      browserName: "Edge",
      version: "latest",
      visual: true, // To take step by step screenshot
      network: true, // To capture network Logs
      console: true // To capture console logs.
    },
    {
      name: "Win7Chrome", // Test name
      platform: "Windows 7", // OS name
      browserName: "chrome",
      version: "75.0",
      visual: true, // To take step by step screenshot
      network: true, // To capture network Logs
      console: true // To capture console logs.
    },
    {
      name: "Win7ChromeLatest", // Test name
      platform: "Windows 7", // OS name
      browserName: "chrome",
      version: "latest",
      visual: true, // To take step by step screenshot
      network: true, // To capture network Logs
      console: true // To capture console logs.
    },
    {
      name: "MacOsBigSurChrome", // Test name
      platform: "macos bigsur", // OS name
      browserName: "chrome",
      version: "75.0",
      visual: true, // To take step by step screenshot
      network: true, // To capture network Logs
      console: true // To capture console logs.
    },
    {
      name: "MacOsBigSurFirefox", // Test name
      platform: "macos bigsur", // OS name
      browserName: "firefox",
      version: "latest",
      visual: true, // To take step by step screenshot
      network: true, // To capture network Logs
      console: true // To capture console logs.
    }
  ]
};

exports.capabilities = [];
// Code to support common capabilities
config.multiCapabilities.forEach(function(caps) {
  var temp_caps = JSON.parse(JSON.stringify(config.commanCapabilities));
  for (var i in caps) temp_caps[i] = caps[i];
  exports.capabilities.push(temp_caps);
});
Trigger the following command to run the tests in parallel:
npm run parallel
Here is the execution snapshot is taken from the LambdaTest platform:
Now, you can easily perform browser automation testing on the most powerful cloud infrastructure. Leverage LambdaTest automation testing for faster, reliable and scalable experience on cloud.
Downloading Most Detailed And Most Intuitive Report From LambdaTest
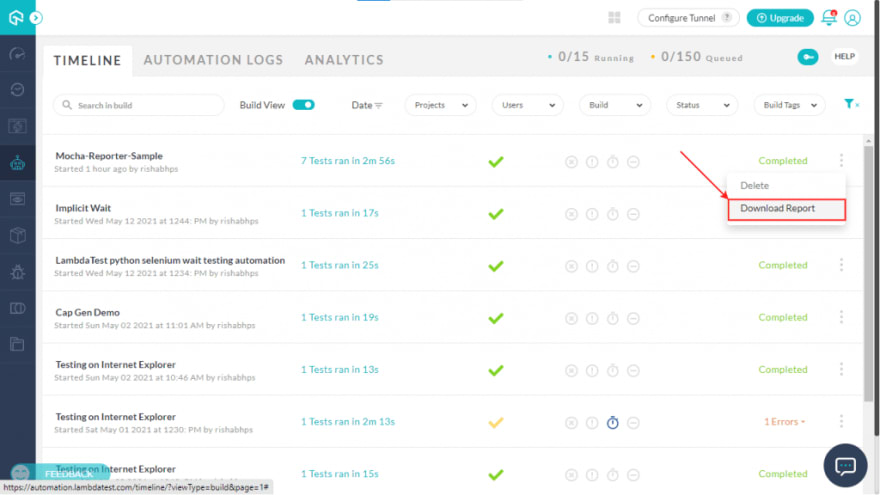
Now to download the detailed test report, all you need to do is go to the automation dashboard and click on the three dots on the extreme right of the build. In the options that appear, click on the Download Report option. That’s it. The detailed report will be downloaded.
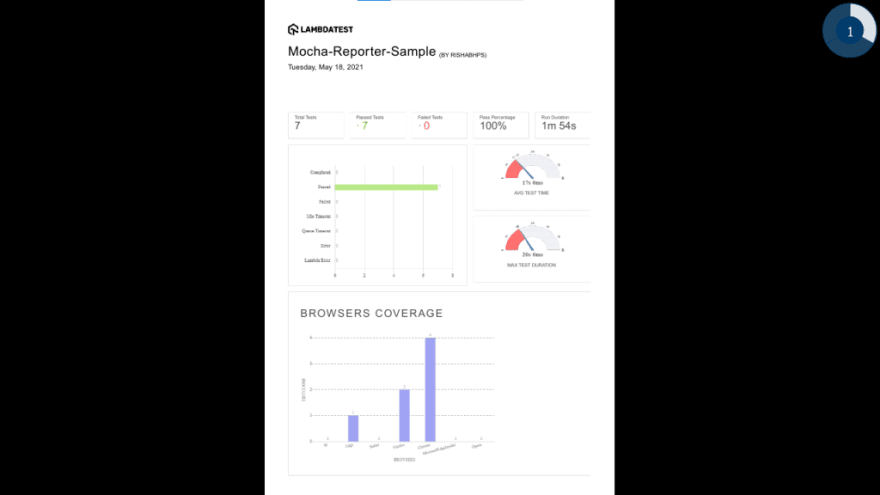
If you open the downloaded report, you can see detailed information on the build. We must represent the total number of tests run, tests passed, tests failed, and more.
Below is the screenshot of the Mocha report downloaded from the LambdaTest platform.
That’s not all…You can also use LambdaTest to get detailed network logs, console logs, and other relevant information obtained using Automation APIs from LambdaTest.
Conclusion
With the increased focus on Selenium automation testing, it is important that we represent the reports of automation runs in a readable format. The automation test report should encompass all the details about the test runs. This makes it easy for all the stakeholders to grasp the underlying issues in the system.
Though Mochawesome utility can be used to create HTML/CSS & JSON Mocha reports, the lack of test and report at scale makes it very difficult for enterprises to use these Mocha report generators. As a result, the cloud-based Selenium Grid like LambdaTest can be used to ensure cross-browser compatibility. It also helps in generating advanced visual reports.
Happy Learning!


