Introduction
Deploying a website to a hosting platform is an important step to share the web application with others. There are additional steps to follow while switching from localhost to a hosting platform.
Today, we are going to look into the following topics
- Why Vercel is the first choice for NextJS deployment?
- How to deploy the NextJS site to Vercel?
- Adding environment variable to the vercel server
So let's get started.
Why Vercel?
Vercel is a hosting platform for frontend technologies. It has support for most of the fronted tech stack such as React, NuxtJS, Svelte, Vue, Gatsby, and many others. You can find all the supporting frameworks here.
Here are the following reasons to prefer Vercel for NextJS deployment:
- Zero Configuration: You don't need to configure the build for NextJS It makes the deployment process faster than other hosting platforms.
- Optimization: Vercel's servers are built to increase the performance of a NextJS site. The loading time will be faster.
- NextJS created by Vercel: NextJ framework is designed and managed by Vercel. This makes them know NextJS better than anyone.
All these reasons contribute to the use of Vercel for deploying your NextJS site on their platform. Now we have decided on the hosting service. Let's look into the process of deploying the application.
Getting Code ready for Git Repository
Before Vercel, first, let's get our code on a Git repository hosting website. I prefer GitHub. Add a .gitignore file in the root to prevent unnecessary and confidential files like .env from getting to the public.
Add the following to the .gitignore file:
- .next/
- node_modules/
- .env
- .env.local
If there are more, you can add all the files and folders here. You can take the help of a gitignore generator. I like to use gitingore.io by Toptal.
After checking everything, push the code to the repository hosting site in my case GitHub.
Setting Up Vercel
Let's now set up our project in vercel and deploy it. Visit their website and create an account, if you haven't.
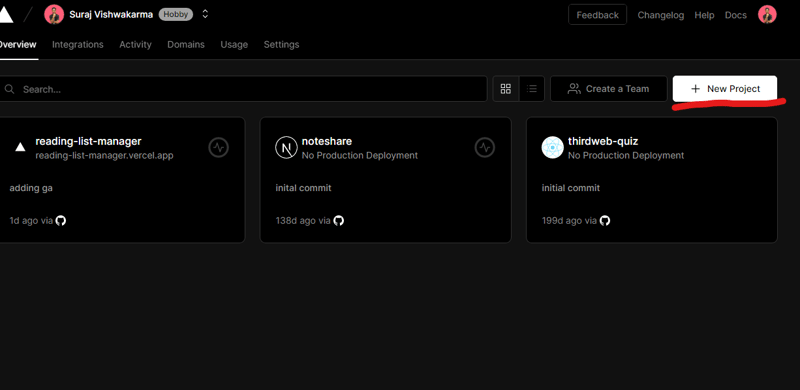
On their website, click on + New Project to create a new project on Vercel.
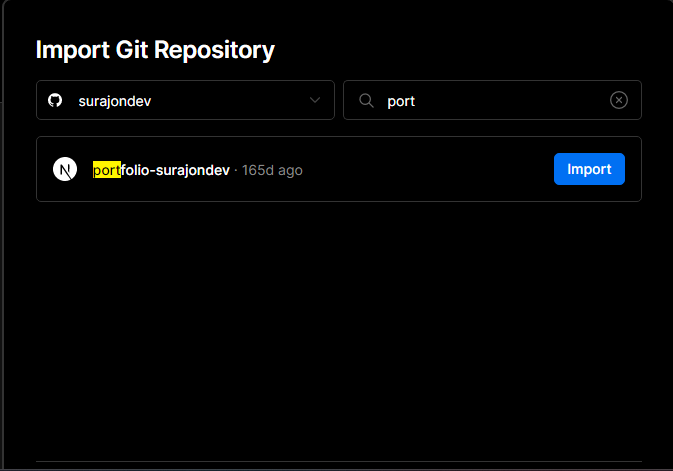
On the next page, you will be asked to connect your Git repository hosting site. I have connected my GitHub. After connecting, search your repository in the search box and click on import.
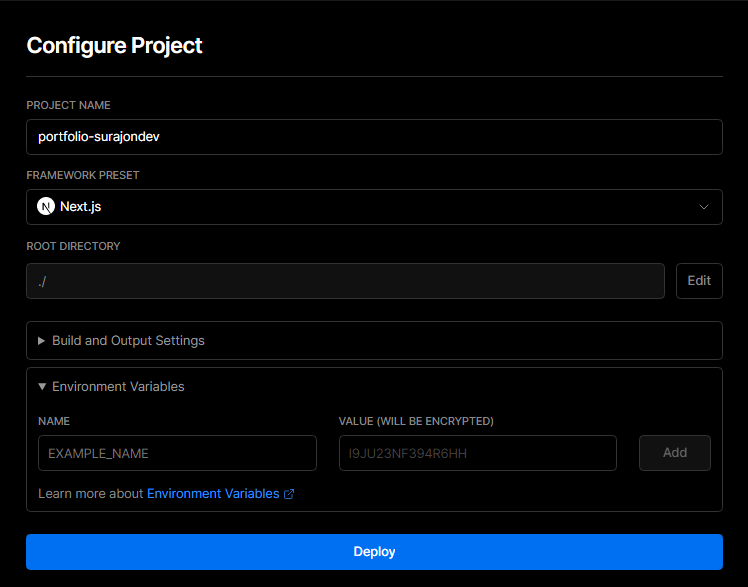
On Configuring the project, you have to configure the following things:
PROJECT NAME: By default, it will be the name of your repository and it will be enough.
FRAMEWORK PRESET: Here, you can choose the framework preset.
It will be autoselected according to the dependencies of your project. You can change it.ROOT DIRECTORY: Here choose the folder in which you have your frontend made through NextJS. By default, it will be the root folder.
Environment Variables: Add the environment variable according to your project.
After filling in all the details, click on deploy. This will build and deploy the project. If everything goes well, you will have your website deployed on the vercel.
Connect With Me🔗
Conclusion
Vercel is my first choice to deploy the NextJS site. It's also well optimized for React, Svelte, and NuxtJS. I also started using Vercel for my React projects too. I will recommend you use vercel and make your own decision about Vercel.
I hope this article has helped you understand deployment on Vercel. Thanks for reading the blog post.


